Redesigning a Classroom for the Visually Impaired
TeachEngineering activity was contributed by the Department of Technological Studies, School of Engineering, The College of New Jersey.
Grade level: 9-11
Time: 8 hours (60-minute classes over 10 days)
Summary
Engineering Connection
Human-centered design is an approach used by engineers and industrial designers to develop solutions to problems faced by a specific segment of the population. The approach requires the designers to develop empathy by deeply understanding the essence of the problem as well as becoming familiar with the particular behaviors and psychology of the individuals affected by the problem. By designing for the visually impaired, students get the idea of having a “real customer” and understand how their design solutions could have significant impact other people’s lives.
In addition, students make scale models of their design solutions, which is great practice in developing prototypes—a typical step for engineers who are troubleshooting early designs and/or presenting their design ideas to others.
Learning Objectives
After this activity, students should be able to:
- Follow the steps of the engineering design process to design a solution to a problem that impacts people.
- Collect measurements of the dimensions of an object and then accurately draw the object using CAD software.
- Print an object to scale on a 3-D printer.
- Construct a 1:20 scale model of a room.
Educational Standards
Next Generation Science Standards
HS-ETS1-2. Design a solution to a complex real-world problem by breaking it down into smaller, more manageable problems that can be solved through engineering.
Common Core State Mathematics Standards
- Reason abstractly and quantitatively. (Grades K – 12)
- Apply geometric concepts in modeling situations (Grades 9-12)
International Technology and Engineering Educators Association
- Students will develop abilities to apply the design process. (Grades K – 12)
- Students will develop an understanding of the attributes of design. (Grades K – 12)
- Students will develop an understanding of engineering design. (Grades K – 12)
- The design process includes defining a problem, brainstorming, researching and generating ideas, identifying criteria and specifying constraints, exploring possibilities, selecting an approach, developing a design proposal, making a model or prototype, testing and evaluating the design using specifications, refining the design, creating or making it, and communicating processes and results. (Grades 9 – 12)
- Engineering design is influenced by personal characteristics, such as creativity, resourcefulness, and the ability to visualize and think abstractly. (Grades 9 – 12)
- Aprototype is a working model used to test a design concept by making actual observations and necessary adjustments. (Grades 9 – 12)
- Refine a design by using prototypes and modeling to ensure quality, efficiency, and productivity of the final product. (Grades 9 – 12)
- Evaluate final solutions and communicate observation, processes, and results of the entire design process, using verbal, graphic, quantitative, virtual, and written means, in addition to three-dimensional models. (Grades 9 – 12)
Materials List
Each group needs:
- 1 stack of Post-it® Notes, ~60 sheets
- Evaluation Matrix Template, one per student
- Morphological Chart Template, one per student
- colored pencils or markers
- pencils
- orthographic paper
- isometric paper
- drawing paper
- 1 measuring tape
- 1 foam core board sheet, 20 x 30-inches
- 1 utility knife
For the entire class to share:
- low-vision simulation goggles, such as those available at https://www.lowvisionsimulators.com/; alternatively, use blindfolds
- (optional) white canes, such as the “canes for the blind” for $20+ at http://www.maxiaids.com/; or borrow a cane
- metric rulers
- hot glue guns and hot glue sticks
- 3D printer and ABS filament, such as the FlashForge Creator Pro alternatively, provide foam core board and hot glue for students to cut, construct and paint their product prototypes and scaled furniture items
- computers with access to CAD software such as Tinkercad, a free 3-D design tool and easy-to-learn online app; requires an e-mail address to open a free account; must be 13 years of age or older
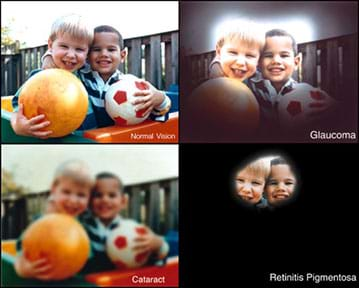
- (optional) computer with projector and Internet access, to show students images that depict how various types of visually impaired people see; such as Figure 3 and the images provided at the National Eye Institute’s Eye Diseases and Vision Disorders Flickr album
Worksheets and Attachments
More Curriculum Like This
Pre-Req Knowledge
A familiarity with the concepts of scale and measurement, technical drawings (isometric and orthographic), and the steps of the engineering design process. Additionally, basic experience using 3D CAD software to make simple geometric shapes and at least one class period completing the introductory Tinkercad tutorial at www.tinkercad.com.
Introduction/Motivation
Imagine you have a visual impairment. What types of things in your daily life might be more difficult to do? What types of tools might help you? Now picture yourself moving to a new city and attending a new high school. What would be the hardest thing to do when you arrived at your new school? What would you find difficult to do in your new classroom?
In this activity, you are going to work your way through the steps of the engineering design process in order to design a product that makes a classroom more accessible for a new student who is visually impaired. Think about the activities you usually do in your classroom. What type of things would be more difficult to do if you were visually impaired? What type of product would help you accomplish some of those routines? (Some possible ideas include: Textured floors, multi-outlet charging stations, desk organizers, bright colors to find stations, redesigned supply closets, etc.)
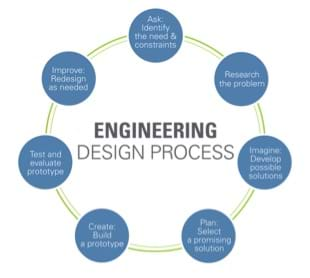
In your groups, you will follow the steps of the engineering design process (see Figure 1). Do you remember the steps? The steps are: 1) ask: identify the need and constraints, 2) research the problem, 3) imagine: develop possible solutions, 4) plan: select a promising solution, 5) create: build a prototype, 6) test and evaluate prototype, and 7) improve: redesign as needed.

copyright: TeachEngineering URL
In order to help us better understand the problem, we are going to practice what engineers and designers often do themselves when they really want to more deeply understand a problem from a user’s point of view—we call it human-centered design. We do this by closely observing how the target audience interacts with a product or environment, conducting interviews to learn about the users’ experiences with a product, and using the proposed product ourselves in its intended environment so we have our own first-hand experiences. In this latter approach, we are going to experience what it would be like to have a visual impairment by wearing low-vision simulation goggles (or blindfolds) as we navigate through the classroom. The lenses in the goggles have been coated to simulate low-vision conditions such as tunnel vision, macular degeneration, cataracts or glaucoma.

copyright 2014 National Eye Institute, National Institutes of Health
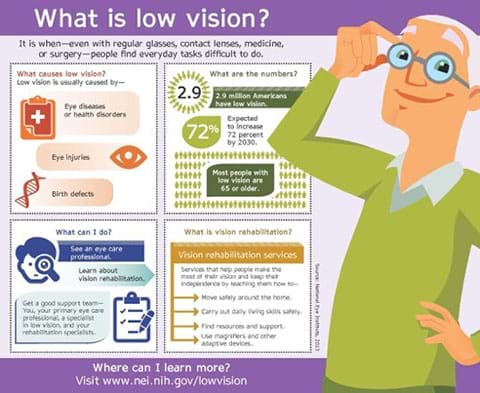
It is a common misconception that blind people cannot see anything at all. In reality, only 18% of people who are visually impaired are classified as being totally blind, while most of them can differentiate between light and dark (AFB 2016). Most blind people have a condition that limits their vision below a certain threshold and therefore have “low vision” (see Figure 2). Eye conditions like glaucoma, cataracts and retinitis pigmentosa can occur due to health disorders, eye injuries or birth defects. (If possible, use a computer/projector with Internet connection to show the class the Figure 3 National Eye Institute images at the URL in the Materials List.)

copyright: National Eye Institute, National Institutes of Health
After you develop your design solution, you will 3D print your design and place it in a scale model of the classroom—also built by you! Your scale model will be 1/20th the size of a real room, so you must carefully measure the room dimensions along with a few selected pieces of furniture. The outer shell of the room—its walls—will be cut from foam core board sheets. The furniture items and your final design—of a product that helps a visually impaired person in a classroom—will be a 3D-printed prototype (or, alternatively, made of cut, glued and painted foam core board) to demonstrate it to others.
Procedure
Before the Activity
- Gather materials and make copies of the Evaluation Matrix Template and Morphological Chart Template.
- As an alternative, or in addition to redesigning a classroom for the visually impaired, you may want to permit groups to do the same for dorm rooms, bathrooms, offices, etc.
- For the low-vision simulation on Day 1, it is recommended that you arrange for students to navigate a classroom that is unfamiliar to them.
- If possible, arrange for students to interview at least one visually impaired person to better understand the problem and issues they face, as well as to get feedback on their product ideas. Suggest students take advantage of the resource of a visually impaired person at numerous stages of the process.
- To be ready for Days 4-5, prepare computers with the online version of Tinkercad software. If students have never used Tinkercad, then devote at least one extra class period to completing its online introductory tutorial in advance.
With the Students
- Day 1: Present to the class the Introduction/Motivation section, which includes setting up the engineering challenge and showing some National Institutes of Health images.
- Divide the class into groups of four students each.
- Direct the groups to perform the low-vision simulation with goggles (or blindfolds) and walking canes. Give students enough time to each walk around with the goggles and canes in a new environment. Make sure they get a sense of walking through entry ways, opening doors, turning on light switches, navigating desks and tables, and doing other tasks they typically do in their own classroom.
- Provide measuring tapes for groups to measure the room dimensions as well as selected furniture items. They will use the dimensions to draw the items on paper and in Tinkercad in preparation for making 3D-printed scale models. Suggest that they measure in centimeters to make it easier to convert the measurements for scaled drawings.
- Administer the pre-activity reflection assessment as a homework writing assignment. Using the prompt provided in the Assessment section, ask students to describe their experiences during the low vision simulation.
- Day 2: Give each student a stack of Post-it® Notes and direct them to brainstorm in their groups to come up with possible ideas for products that would help visually impaired students gain more accessibility in the classroom (or chosen room). Give them 30-40 minutes.
-
- Require them to write down 60 possible ideas on the Post-it® Notes. Example ideas include: Textured floors, multi-outlet charging stations, desk organizers, shower caddies, etc.
- As necessary, remind them of how brainstorming works: At this stage, there are no bad ideas! Listen to every idea and record it. Even wild and crazy ideas. Build off others’ ideas.
- Often, students run out of ideas after 15 or 20. When that occurs, interject some ideas to guide them to new avenues of thought that they have not yet considered. What difficulties did they encounter during the low-vision simulation exercise?
- Have students categorize their ideas into common concepts or activities such as navigation, organization, showering, morning routines, etc.
- Day 3: Hand out the Morphological Chart Template and explain that a morphological chart is a visual tool used to quickly generate alternative solutions given key elements or components. Direct groups to each pick a favorite concept or activity and then expand it into three fully developed solutions using the morph chart. In the first column, agree on and write down the five key attributes that their idea must include. For example: color contrast, texture, body layout, unit shape, and location. Then they fill in the rest of the chart by drawing five pictures of their creative ideas for each attribute. The pictures must be in color and contain no words. Then, students use a circle to highlight one attribute from each row representing the team’s first proposed solution; then students use a triangle and square to identify the team’s second and third proposed solutions. Once the morph chart is completed, direct each group to write down three proposed concepts by including one idea from each attribute.
- Next, hand out the Evaluation Matrix Template and explain that an evaluation matrix is a weighted objectives method that guides teams to converge on one solution based on scores assigned to each design objective. Direct groups to use the matrix to narrow their three proposed concept ideas into one final solution per group. In the first column, choose five key functions that their idea must try to meet. For example: portability, safety, accessibility, intuitive to the touch, and simplifies a common task. Then assign a weight percentage to each function to reflect how important they view it; the percentages must add up to 100%. Then, agree on evaluation scores from 1-10—with 10 as the highest—to rate how well each concept idea meets the five functions. Once the chart is filled in, add up the evaluation scores. The concept idea with the highest number becomes the final solution the group will pursue to develop as a prototype and include in its scale model.
- For homework, assign students to each sketch their team’s proposed design solution on paper as orthographic and isometric drawings. Require the drawings to clearly indicate a scale in centimeters.
- Days 4-5: In a computer lab, have students use the online version of Tinkercad software to draw their proposed design solutions and selected furniture pieces. Require each group member to be responsible for completing at least one of the drawings. Remind students to save their completed files with STL extensions so they can be 3-D printed. To keep everything to scale, printed items must have dimensions that are 1/20th of their real-world sizes. If a 3D printer is not available, direct groups to construct their model pieces from foam core board and hot glue.
- Days 6-7: Direct students to:
-
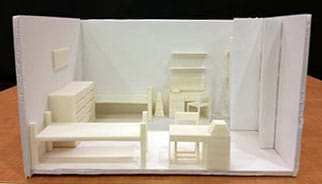
- Cut pieces of foam board to scale (1/20th of the original dimensions) to make a classroom shell, leaving the ceiling and one wall missing so the room can be viewed easily from the outside (see Figure 4).
- Use hot glue to join together the walls. After the outer walls dry, use hot glue to adhere the proposed solution and all furniture items to the walls and floor. Figure 4 shows an example finished model.

copyright: Manuel Figueroa, School of Engineering, The College of New Jersey
- As groups finish their scale models, have them critique each other’s design solutions and then write summary self-evaluations of their design solutions, including future improvements to make.
- Days 8-10: To conclude, have teams prepare poster presentations as described in the Assessment section.
Vocabulary/Definitions
- 20/20 vision: A fraction from the Snellen visual acuity system used in the U.S. to characterize “normal” vision. The 20 on top corresponds to a person standing 20 feet away from a chart as s/he tries to identify the smallest row of letters on the chart. The smallest letters on the chart are what a person with “normal vision” can see at a distance of 20 feet (the 20 on the bottom).
- brainstorming: A group problem solving method in which all members quickly and spontaneously contribute as many ideas as possible.
- design: The development of a well thought-out plan to solve a problem. Usually the plan is well documented and includes graphics and an evaluation of possible ideas.
- engineer: A person who applies his/her understanding of science and math to design solutions for specific problems that impact humanity and our world.
- engineering design process: A series of decision-making steps used by engineering teams to guide them as they develop new solutions, products or systems. The process is iterative and may begin at, and return to, any step. See Figure 1.
- human-centered design: A design process in which significance is placed on the user, and human perspective is considered at every step in the process.
- legal blindness: Refers to a person whose vision is characterized as 20/200 when wearing the best possible corrective lens or having a visual field no greater than 20 degrees. In the first case, the smallest letters identified on a chart at a distance of 20 feet are the same size as what a person with “normal vision” can see at a distance of 200 feet. The “legal” refers to meeting a government-determined level of visual impairment that makes a person eligible for benefits.
- model: A representation of something for imitation, comparison or analysis, sometimes on a different scale.
- prototype: A first attempt or early model of a new product or creation. May be revised many times.
- vision impairment: A limitation of the functions of the eye that affects sharpness, clarity or normal range of vision.
Assessment
Pre-Activity Assessment
Low-Vision Simulation Reflection: At the end of Day 1, as a homework assignment, have students each write at least 100 words to answer the following prompt. If possible, have them post their descriptions on an online discussion board and then respond to at least two other classmates’ posts.
- Describe your experience today wearing the low-vision simulation goggles and using a walking cane. What did you learn about dealing with a visual impairment? Did this activity help you rethink any misconceptions you might have held before today? Explain.
Activity Embedded Assessment
Morph Chart: A morphological chart is a visual tool used by designers to quickly generate alternatives solutions given key elements or components (Cross 2008). To keep groups’ creative brainstorming process flowing, direct them to draw their ideas (no words permitted) to fill in the Morphological Chart Template, and then follow its instructions to narrow their many ideas into three possible solutions.
Evaluation Matrix: An evaluation matrix is a weighted objectives method that guides teams to converge on one solution based on scores assigned to each design objective (Cross 2008). Using the Evaluation Matrix Template, have each group discuss what functions are important to the design problem and then assign a weight of importance to each function. Then each group evaluates its designs based on the functions, giving scores from 1-10, with 10 being the highest.
Technical Drawings: Once each group converges on its chosen solution, have each team member individually draw on paper orthographic and isometric representations of the proposed solution. The following day, the group meets and decides how to proceed with its design solution. If a 3D printer is available, they draw it on Tinkercad, along with other key classroom furniture items.
Post-Activity Assessment
Group Poster Presentations: Have teams prepare posters that detail how they used the design process to converge on their final solutions. Review their final models and posters to gauge their depth of comprehension of the activity subject matter and learning objectives.
- Remind them that posters need to tell a story. The poster content explains the team’s logic and steps towards creating a final solution for people who don’t know anything about it.
- Require groups to: explain what was learned through the low-vision simulation, walk the audience through the design process, and explain how the scale model helps to demonstrate the design in its environment.
- Suggested poster sub-title headings include: Define the Problem, Low-Vision Simulation Reflection, Brainstorming Ideas, Choosing a Solution, Prototype Development, Self-Evaluation, Future Improvements, and Conclusion.
- Also have teams display nearby their final constructed scale models that include their proposed product solutions.
Safety Issues
- Since low-vision goggles (or blindfolds) reduce visual acuity, make sure students hold the elbow of a group member when navigating through the classroom.
- Be cautious when using utility knives to cut foam core board since they are extremely sharp. Use a cutting board on the surface where you cut the material and make sure to position the blade down and away from yourself and other people.
- Hot glue guns get very hot and can burn skin so avoid touching the nozzle or hot glue.
Troubleshooting Tips
Depending on the number of groups involved, the 3D-printing process can be very time consuming. Students tend to group all objects that need to be printed into one STL file, which creates problems as they try to print. Insist that students turn in STL files with only one object per file.
Make sure students verify the dimensions in their 3D-printed files before turning them in. Usually this is in millimeters. Suggest they double-check their dimensions by holding a metric ruler next to the walls of their classroom models and then scale down the furniture dimensions.
Activity Extensions
Assign groups to each think about the many private and public spaces in their communities and brainstorm and/or research ways that the spaces could be redesigned to be safer and more accessible for the visually impaired. Then have students create scale models of their final designs and showcase them in their school’s display cases and/or share them on their school’s blog. See many ideas for environmental adaptations on the American Foundation for the Blind website (AFB 2017).
References
(AFB 2016) “Learning about Blindness.” American Foundation for the Blind. New York, NY. (Covers topics such as: What is blindness or low vision? How do I interact with a blind person? Myths about blindness.)
(AFB 2017) “Creating a Comfortable Environment for People with Low Vision.” American Foundation for the Blind. New York, NY. Accessed January 10, 2017. (Great suggestions for environmental adaptations/modifications that enhance functioning related to lighting, furniture, hazard elimination, use of color contrast, hallways and stairways, signs, telephones) http://www.afb.org/info/low-vision/living-with-low-vision/creating-a-comfortable-environment-for-people-with-low-vision/235
National Institute of Building Sciences Low Vision Design Program.
Cross, Nigel. Engineering Design Methods: Strategies for Product Design. Fourth edition. West Sussex, England: John Wiley & Sons Ltd, 2008.
Contributors
Manuel Figueroa
Copyright © 2017 by Regents of the University of Colorado; original © 2016 The College of New Jersey
Supporting Program
Department of Technological Studies, School of Engineering, The College of New Jersey
Acknowledgements
This activity was made possible through a collaboration between the Department of Technological Studies and the Center for Sensory and Complex Disabilities at The College of New Jersey. The CSCD provided the low-vision simulation goggles, white canes and instructional support.
Filed under: Class Activities, Grades 9-12, Grades 9-12, Lesson Plans
Tags: accessibility, Class Activities, Engineering Design Process, Grades 9-12, Human-centered design, sight-impaired


