


Lunch in Outer Space!
This TeachEngineering activity on designing devices to help astronauts eat in outer space is part of a nine-lesson, 17-activity curricular unit on the solar system for grades 3 to 5 as well as an elementary curricular unit on engineering and the human body.
Grade Level: 3-5
Time: 45 minutes
Cost/Group: $1
Group Size: 3

Figure 1. An astronaut’s meal, Copyright NASA Quest
Engineering Connection
Engineers are involved in all aspects of space travel and living. Many astronauts are engineers! Because of the microgravity environment, eating in space is a great challenge, so NASA engineers develop creative devices to help astronauts eat while traveling in away from the Earth’s gravity.
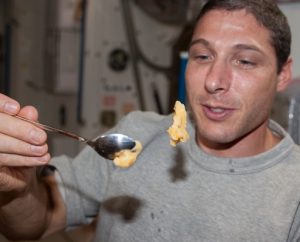
NASA astronaut Michael Hopkins, Expedition 37 flight engineer, uses a spoon to eat aboard the International Space Station
Learning Objectives
After this activity, students should be able to:
- Explain the challenges of eating in space (microgravity).
- List the three main steps in the engineering design process (design, build, test).
- Describe some of the devices engineers have designed to help astronauts eat in outer space.
- Work in teams to design and build their own device for eating in outer space.
Learning Standards
Next Generation Science Standards
- 3-5-ETS1-1. Define a simple design problem reflecting a need or a want that includes specified criteria for success and constraints on materials, time, or cost.
- 3-5-ETS1-2. Generate and compare multiple possible solutions to a problem based on how well each is likely to meet the criteria and constraints of the problem.
Common Core State Mathematics Standards
- Fluently add and subtract multi-digit whole numbers using the standard algorithm. (Grade 4)
- Fluently multiply multi-digit whole numbers using the standard algorithm. (Grade 5)
International Technology and Engineering Educators Association
- Students will develop an understanding of engineering design. (Grades K – 12)
- Students will develop an understanding of the attributes of design. (Grades K – 12)
- Identify and collect information about everyday problems that can be solved by technology, and generate ideas and requirements for solving a problem. (Grades 3 – 5)
Materials
- scissors
- white glue
- tape (cellophane, masking, etc.)
- pens and pencils
- Design Worksheet, one per team (also available in Spanish)
To share with the entire class:
- paper
- rulers
- assorted building materials for their prototype devices, such as balsa wood, construction paper, toothpicks, popsicle sticks, white paper, string, aluminum foil, paper clips, styrofoam, foam core, film canisters, etc.
- markers and crayons
- (optional) hot glue gun (for use by the teacher)
Worksheets and Attachments
Introduction/Motivation
What do you think it would be like to try to eat in outer space? Can you imagine trying to eat a snack as it keeps float
 ing away from you? Well, that’s what would happen in an environment with little gravity (see Figure 2). It seems like it would be pretty tricky! Astronauts face a lot of new challenges when they travel in space, and one of those challenges is figuring out how to eat. Thankfully, the astronauts have a whole team of engineers and scientists who help get their food ready for them and design ways to help them eat it without it floating away.
Who can guess some of the astronauts’ favorite foods to eat in space?
Top 10 foods astronauts like to take on space shuttle missions:

Figure 3. Copyright NASA Greetings Kids Earthlings!
The engineers who design ways for the astronauts to eat in outer space must design a lot of different items for their use—even the salt and pepper shakers! If salt and pepper got loose in the space station or space shuttle, it could get stuck in equipment and cause a lot of damage. So, the astronauts use salt combined with water, and pepper in oil to season their food. The salt and pepper come in small bottles (see Figure 4) and work perfectly well for the astronauts.

Figure 4. Even salt and pepper shakers need to be modified for microgravity.
copyright NASA Greetings Kids Earthlings!
Engineers have designed many ways for astronauts to have food in space. When astronauts first started traveling in outer space, much of their food came in squeeze tubes, similar to toothpaste tubes. As you can imagine, food from a tube would not be that delicious, and the astronauts were not thrilled with this “food in a tube.” Another food item that the astronauts used to eat were small bite-sized cubes of food (see Figure 5). These were somewhat better than the squeeze tube food, but still did not taste too great.

Figure 5. Early Project Mercury food tube and bite-sized snacks. Copyright: NASA
To provide astronauts with better-tasting foods, engineers came up with some new ideas for space food! Obviously, engineers have many goals in mind as they design food for the astronauts, but the two most important goals are to conserve space and weight. Because most foods are 90% water, it makes sense to remove the water and add it in later—ultimately saving weight and volume. The NASA engineers also want to minimize the garbage that generated from the meals. And one more goal—they want to make the astronauts’ food taste delicious!
Now, seven different forms of food are available to astronauts—giving them more meal choices. Before the astronauts go into space, they pick out exactly what they want to eat from the available food choices. Some selections include: Rice Krispies®, sweet ‘n sour chicken, brownies, Cornflakes®, scrambled eggs, strawberries, and macaroni and cheese (see the Baseline Shuttle Food List for more). They have an oven on the space shuttle, but no refrigerator or freezer. So, astronauts can have warm dinners, but no popsicles!
A lot of people work to prepare the astronauts’ food for space flight; then, when they take off, all their food is waiting for the astronauts in the space shuttle. Each astronaut has a unique colored dot on all their food packages so they can easily tell which packages belong to them. And, since most of the astronauts’ food is sealed up in packages, another important component of their meal tray is scissors—needed to open the packages. Each astronaut has his/her own set of flatware and scissors.
The astronauts’ drinks are powdered, and they come in flexible beverage packages with a special adapter, called a septum adapter, into which they add water to re-hydrate the powder. Once the water is added, they put a straw in the same opening.
When engineers, such as the engineers at NASA, want to design something, they go through the engineering design process. Today we are going to become NASA engineers and practice this process. Then you will put the design and building parts into practice. As you will see, a lot of work that goes into eating lunch in outer space!
The Engineering Design Process
The engineering design process is a set of steps that engineers go through when they want to design a solution to a problem. Remember these three main steps of the engineering design process: design, build and test. We are going to talk a little bit about each step, and then you are going to get to try them out yourselves.
Design: Before engineers build anything, they first figure out exactly what they are going to build. They determine out how big it should be, how much it can weigh, what shape it should be, and how much money can be spent building it. Often, they talk to the people who are going to use their design, and they decide what features they want it to have.
Build: Once engineers have finished a design and are happy with it, they build a model or a prototype of it. Models are usually smaller than the actual design, and there are many different types of models—some look just like the design, but in miniature, and others only exist on the computer. A prototype is another version of the design. A prototype generally functions just as the final design will, and it is an opportunity to work out and fix some of the trouble spots that might—and usually do—arise before the final product is built.
Test: Once engineers have a model or prototype ready, they run many different tests on it: strength, waterproof or not, weight, breakability, etc. They run many tests (sometimes over and over again) to ensure that the product can do what they designed it to do. If their device fails a test, or if the engineers discover some sort of problem with it, then they go through the cycle again—they re-design, re-build, and re-test until it is exactly how they want it to be.
Now that you understand the design process, we are going to design and build our own devices to help the astronauts eat in space given constraints on some of the supplies, time (only one class period) and cost (assign a dollar amount to each length of material used and require students stick to a budget). Unfortunately, we will not get to travel into outer space to test our designs, but we can still do a great job on the design and build parts of the process!
Procedure
Background Information

Figure 6. Rehydratable shrimp cocktail. Copyright NASA Quest
The seven forms of food are: rehydratable, thermostabilized, intermediate moisture, natural form, irradiated, condiments and shelf-stable tortillas.
Rehydratable food is food or beverages that have had the water removed. To prepare, astronauts just add the water back in and heat the food up in an on-board oven. Breakfast cereals can be pre-packaged with dry milk and sugar, and are ready to eat once water is added. These foods might include soups, casseroles and appetizers (see Figure 6).
Thermostabilized food has been heat processed to kill organisms. These packages are heated, opened with scissors and eaten. This type of food is generally packaged in cans, plastic cups or flexible pouches. Food choices include beef tips with mushrooms, tomatoes and eggplant, and ham.
Intermediate moisture foods have just the right amount of water in them: not too wet (to prevent microbes from growing in the package) and not too dry (to help cut down on the amount of preparation for the astronauts). Essentially, these foods are ready-to-eat right out of the package. Examples are dried peaches, pears and apricots, and dried beef (see Figure 7).

Figure 7. A vacuum-sealed sack of apricots, an intermediate moisture food for astronauts. Copyright NASA Quest
Natural form foods are ready-to-eat. They come in clear, flexible pouches that are cut open with scissors, and they include granola bars, nuts and cookies (see Figure 8).
Irradiated foods are meat products that also come in flexible, foil-laminated pouches, and have been sterilized by radiation. There are 12 kinds of irradiated meat products, including: beefsteak, sliced turkey, breakfast sausage and fajitas. The FDA only permits a few foods for the general public to be irradiated (at very low levels), so NASA has special permission to irradiate meat at higher levels so that the meats do not need to be refrigerated. (Note: meats that the general public eats that have been irradiated at the standard, low levels still need to be refrigerated.) As we have learned, with no refrigerators on the space shuttle, irradiation at higher levels is important.
Condiments include ketchup, mustard, mayonnaise, hot sauce, salt and pepper (see Figure 4).

Figure 8. Vacuum-sealed bags of M&Ms and dried fruit, natural-form foods. Copyright NASA
Since bread is bad news on the space shuttle—because the crumbs can get into the machines and affect their functioning—shelf stable tortillas are used instead. NASA developed special packaging for these tortillas, so they will not mold. Pretty nifty stuff!
Before the Activity
- Gather materials and make copies of the Design Worksheet, one per team.
- (optional) Make copies of the Baseline Shuttle Food List to hand out during the Introduction/Motivation presentation to the class.
With the Students
- Review with students the seven forms of food (see the Background section). Explain that these forms of foods help with the problem of eating in microgravity and demonstrate some of the solutions NASA engineers have developed for food during space flight. Tell students that today they will act like NASA engineers and design a form of food or device to help the astronauts eat in space.
- Write the three main steps of the engineering design process on the board: design, build and test. (Note: See the Introduction section for more on the engineering design process.)
- Divide the class into teams of 2-3 students each and hand out the worksheets, one per team.
- Give teams 8-10 minutes to work on their designs and complete the worksheets. Encourage students to focus on a particular food or a specific challenge of eating in space. (Note: This is an open-ended design, so encourage creativity.) Teams may not begin building until their worksheets have been checked off.
- Once a team’s worksheet is checked off, encourage students to begin building a model of their design.
- To incorporate some mathematics, establish constraints on some of the supplies and have students measure out a certain amount. For example: “you are limited to use no more than 0.4 meters of masking tape, and 2.3 meters of string.” Have students work together to measure the permitted amounts. Other possible constraints include time (only one class period) and cost (assign a dollar amount to each length of material used and require students stick to a budget).
- Give teams some time before the end of class to present their ideas and designs to their peers. Discuss how well each meets the criteria and constraints of the problem.
- Remind groups to clean up.
Vocabulary/Definitions
- engineering design process: A multi-step process by which engineers design a solution to a problem; the basic steps are: design, build and test.
- microgravity: A condition in space in which only very small gravitational forces are experienced.
- prototype: An early full-scale (and usually working) version of a new design.
- septum adapter: A special adapter that enables astronauts to add water to powered, flexible beverage packages.
Assessment
Pre-Activity Assessment
Discussion Question: Solicit, integrate and summarize student responses to the following questions:
- Have you ever seen a picture or a movie of astronauts eating in outer space? It looks pretty funny, right? Why do you think it is so hard for astronauts to eat in outer space? (Write student responses on the board; possible answers include: they are homesick, the shuttle is spinning, they do not have a refrigerator, they do not have an oven, there is hardly any gravity, their food is floating around…)
Lists: With the students, come up with a list of foods that would be easy and foods that would be hard for astronauts to eat in space. (Make two lists on the board. Hard foods might include: spaghetti, cereal with milk, salad, etc. Easy foods might be: tortillas, lollipops, M&Ms.)
Activity Embedded Assessment
Student Interviews: As students are working in groups on their designs, visit each team and ask what they are learning about engineers as they build. (Possible answers: engineers are creative, engineers help people, engineers work in teams, engineers help astronauts, engineers have a design process, etc.).
Post-Activity Assessment
Calculations: Have students determine the total cost of their designs (i.e., multiply unit costs and add).
NASA Engineering Team Presentations: Have students to choose one team member to present their team’s idea to the rest of the class or have both/all team members present together. Presentations should explain the problem their team is trying to solve, why they chose a particular design, and any challenges they faced in the engineering design process.
Making Sense: Have students reflect about the science phenomena they explored and/or the science and engineering skills they used by completing the Making Sense Assessment.
Safety Issues
- Remind students to use caution while using scissors.
- Use caution with the hot glue gun. To help prevent accidents, set up a “hot gluing station,” that can easily be monitored. Lay down newspaper to catch spills.
Troubleshooting Tips
Encourage students to work as a team – to listen to their teammates and not discourage or make fun of others’ ideas.
Activity Extensions
- Check out NASA’s Living in Space Space Food for fun food-related videos, and NASA’s photo archives for more photographs of astronauts taste-testing food and eating in outer space.
- Have students create their own outer-space salt and pepper shakers using small plastic dropper bottles, salt, pepper, oil and water. Tips: Dissolve the salt in water, and suspend the pepper in oil.
Activity Scaling
- For upper grades, encourage students to make their designs to scale. Discuss the numerous iterations that a design goes through before finally being produced and used by the astronauts.
- For lower grades, discuss the importance of teamwork, and explain how engineers and scientists work together in teams at NASA.
Additional Resources
Eating in Space. NASA site from A Day in the Life Aboard the International Space Station includes links to videos about space food, pizza night in space, and other topics. Click HERE for the “Food for Thought” educators’ guide.
Food in Space. The Smithsonian Institution’s National Air and Space Museum history of space food include photos of freeze dried pineapple and a Russian can of pickled tongue.
NASA’s Living in Space section on Space Food includes links to fun food-related videos, or see NASA’s photo archives for more images of astronauts taste-testing food and eating in outer space.
Incredible Edibles. NASA’s space-food spinoffs include hospital hot plates and meals that need no refrigeration.
First Batch of Cookies in Space. CNN’s 2019 story on the first microgravity oven and what it baked.
NASA for Kids. Activities, posters, games, and other resources for K-4 students.
References
Dismukes, Kim. National Aeronautics and Space Administration, Human Space Flight, Living in Space, “Space Food”
Dismukes, Kim. National Aeronautics and Space Administration, Human Space Flight, Food for Space Flight, “Space Food History”
National Aeronautics and Space Administration, Lyndon B. Johnson Space Center, NASA Facts, “Space Food,” FS-2002-10-079-JSC
Smith, Malcolm C. et al. National Aeronautics and Space Administration, Lyndon B. Johnson Space Center, SP-368 Biomedical Results of Apollo
Copyright © 2006 by Regents of the University of Colorado
Contributors
Abigail Watrous; Denali Lander; Beth Myers; Malinda Schaefer Zarske; Janet Yowell
Supporting Program
Integrated Teaching and Learning Program, College of Engineering, University of Colorado Boulder
Acknowledgements
The contents of this digital library curriculum were developed under grants from the Fund for the Improvement of Postsecondary Education (FIPSE), U.S. Department of Education and National Science Foundation (GK-12 grant no. 0338326). However, these contents do not necessarily represent the policies of the Department of Education or National Science Foundation, and you should not assume endorsement by the federal government.
Last updated by eGFI Teachers on January 26, 2021
Filed under: Class Activities, Grades K-5, Lesson Plans
Tags: astronauts, Class Activities, Engineering Design, Engineering Design Process, Grades K-5, International Space Station, Living in Space, microgravity, NASA, space food, teachengineering