Lesson: How Telescopes Work
 (Lesson courtesy of Northrup Grumman Telescope Guide) Telescope Guide Pdf. Level: Students in grades 3-6. Time Required: 30 minutes.
How Telescopes Work
Overview
In this lesson, students in grades 3-9 learn how lenses gather and focus light, and how mirrors bounce light. They conduct experiments with water and mirrors to gain a greater understanding of the basic workings of telescopes.
These activities were drawn from Taking a Closer Look curriculum guide and simplified to accommodate teachers who do not have access to an assembled telescope and telescope kit. The complete set of activities 1-4 and information about purchasing a classroom kit can be found in the Telescope Guide Pdf.
Student Outcomes
Students should be able to explain that:
- Mediums such as water, glass, and plastic focus, or refract, light.
- Surfaces such as mirrors bounce, or reflect, light. We see most things around us because of the light reflected off them.
- Telescopes work by gathering light with either a lens or a mirror and creating a magnified image.
Materials
Materials for the Presenter
- magnifying glasses to distribute to each group
- images to project or draw upon the class board (see pdf. for illustrations)
- a source of water to fill each glass
For each student
- Telescope Worksheet
- One set of colored pencils, 4 to 8 pencils per set
- pencils or pens to record answers
For each Group
- 1 clear drinking glass
- 1 brightly colored straw
- 1 small mirror
STANDARDS
This activity aligns with the California science content standards.
Kindergarten: Investigation and Experimentation 4 a,b,c,e
Grade 1: Investigation and Experimentation 4 a,b
Grade 2: Investigation and Experimentation 4 a,g
Grade 3: Investigation and Experimentation 4 g
Grade 4: Physical Sciences 2 b,d; Investigation, Experimentations 5g
This activity supports the following national science content standards:
Grades K-4
- Content Standard A: Science as Inquiry
- Content Standard B: Physical Science
- Content Standard E: Science and Technology
Grades 5-8
- Content Standard A: Science as Inquiry
- Content Standard E: Science and Technology

Background Information:
History of Telescopes
The invention of the telescope is often attributed to Hans Lippershey, an optician who, in 1608, aligned two lenses of different curvatures and focal lengths. It is not known how Galileo Galilei heard of the process, but there is evidence that Galileo quickly bought or ground his own lenses and made a simple telescope that he demonstrated in 1610 to the Senate in Venice. Galileo is credited with discovering four of Jupiter’s moons, crater walls on Earth’s moon, Venus’ phases, sunspots, and Saturn’s rings.
Regardless of type and complexity, all telescopes operate in basically the same way. Telescopes capture light and provide a detailed image to the viewer. Our eyes are telescopes, as are cameras, satellite dishes and radio telescopes.
How Do Telescopes Work?
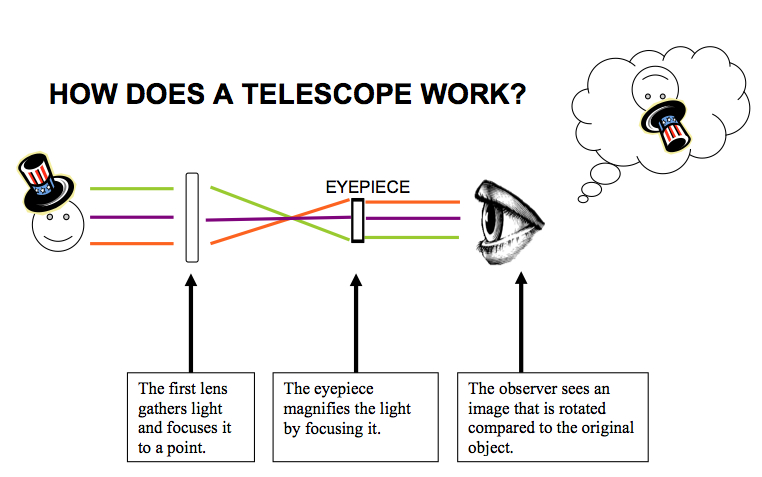
Telescopes have two main parts: the first lens and the second lens. The first lens is called the objective lens and the second lens is called the eyepiece. Telescopes that use only lenses are called refracting telescopes, or refractors. Some telescopes use a mirror, called the primary mirror, in place of the first lens. These are called reflecting telescopes, or reflectors. Most professional telescopes are reflectors.
The objective lens (or primary mirror in reflectors) collects light from a distant object and brings it to a point or focus. The image is bent, or focused, on a small surface called the focal plane. The eyepiece is a magnifying glass. It focuses the light from the image at the focal plane so the observer sees a larger, magnified image.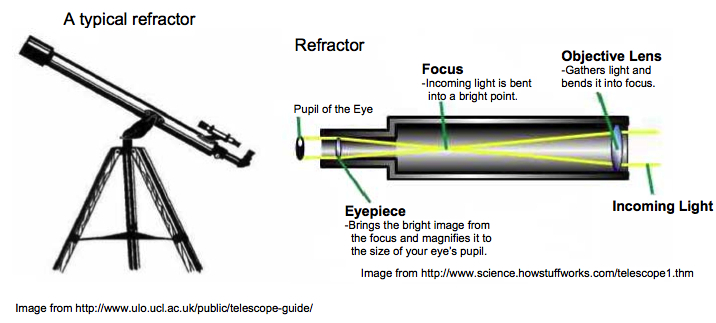
Most professional telescopes are reflectors. The main advantage of reflectors is that they can be made very large because the back of the mirror can be supported. Another advantage of reflectors is that there is no chromatic aberration, a feature of refractors where the different wavelengths of light pass through the lens at different speeds and produce a rainbow-like halo around the image. A third advantage of reflectors is that only one side of the objective (the reflecting side of the primary mirror) needs to be the right shape and smoothness to reflect the light. Because light passes through a lens, however, it needs to be perfectly shaped on both sides.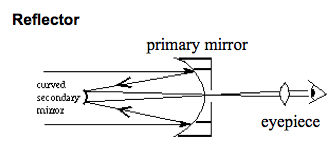
How Does a Magnifying Glass Work?
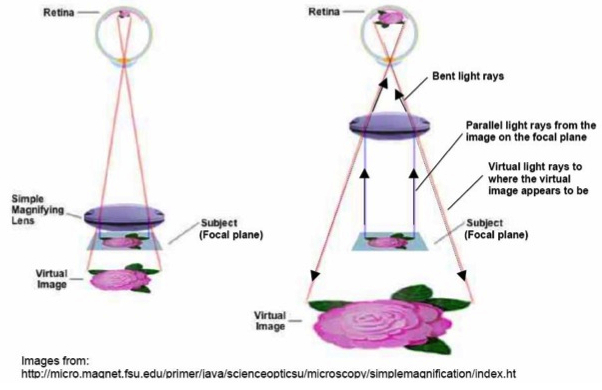
Magnifying glasses work by focusing light to create a virtual image in a location other than it would appear if the light were not focused. Just like you can see a “virtual you” who appears to stand back in the depths of a mirror, an observer sees a larger, virtual image cast by the light bent through a magnifying glass. The real image is cast on the observer’s retina, not out beyond the focal plane. To the observer, however, the image appears to be some distance beyond the surface of the magnifying glass. Magicians often take advantage of virtual images to make objects seem to appear in a seemingly empty box, or to look like they are hovering in mid air.
Professional Telescopes
Astronomers use telescopes (mostly reflectors) that observe across all wavelengths of light, from low-energy radio and microwave light to high-energy gamma rays and x-rays. The image below is of the complete light spectrum. See the lesson pdf for two images, as well as background information on professional telescopes, the Chandra X-ray observatory and the planned James Webb Space Telescope (JWST). The Chandra X-ray observatory observes x-ray light and the James Webb Space Telescope will observe primarily in infrared light. Students can study both telescopes as a followup to this activity.
More information on telescopes and optics can be found in the content section of the Bringing It Closer module (from www.science-fest.org).
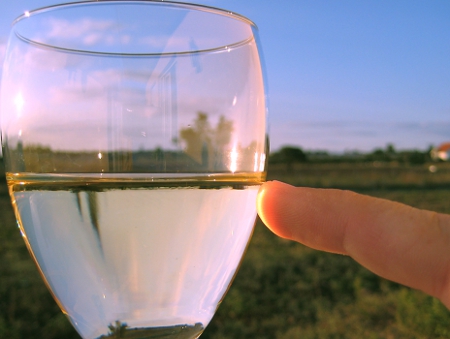
 Refracted Light Through Liquid Distorts the Image of the Straw
Procedure:
Preparation:
Teachers should consult the background materials to ensure that they can explain how magnifying glasses and mirrors bend light to create a virtual image, and how refracting telescopes gather and bend light to create a magnified image of a distant object.
*Please note: activity #1 has been revised for teachers who do have access to an assembled telescope. The original activity can be accessed in the Telescope Guide Pdf.
Activity #1: What Do Telescopes Do?
Goal: Students will enact the processes used by a telescope to gather light and create a magnified image.
1. Explain to the students they are going to learn about how telescopes work. Show them an illustration of a reflector telescope and its lenses, using one from this lesson plan, the pdf., or your own drawing on the class board.
 2. Identify the objective lens. Explain that it comes first, to “catch and focus light.” Make a catching motion with your hands, then cross your arms to show light focusing. Ask students to repeat what they have heard, copying your motions.
3. Now, identify the eyepiece lens. Explaining that it comes second, and “magnifies the image.” Spread your arms to demonstrate magnification. Ask students to repeat back this back to you.
4. Repeat the motions, names and basic functions of both lens with the class several times, and then throughout the lesson.
5. Distribute the worksheets and colored pencils. Have them complete question #1, tracing the light path for a refractor. After they have done so, project the image of the light path, below (also in the lesson pdf).
6. Explain that there are two types of telescopes: Reflectors and Refractors. Refractors use lenses to catch the light and focus, or refract it. Reflectors use mirrors to catch and bounce, or reflect, it.
7. Hold up the telescope and explain that this is a refractor because it uses a lens.
8. Hold up a picture of James Webb Space Telescope and point to the mirror. Ask if JWST is a reflector or a refractor.
9. Repeat the motions used earlier, this time replacing “objective lens” with “primary mirror” and “focus” with “bounces.” Cross and bounce your arms to show light bouncing off the mirror.
10. Repeat the motions for both reflectors and refractors with the class several times.
ACTIVITY #2 – Bouncing Light
Goal: Students will observe how mirrors reflect light.
Procedure
1. Hold up a mirror at arm’s length and face it, standing sideways to the class so they can see your face and part of the reflection.
2. Ask students to describe what you will see in the mirror. Ask them on which side your right eye will appear when viewed in the mirror.
3. Explain that the light around you is bouncing off your face. Some of the light hits the mirror. Because the mirror is very reflective, most of that light bounces back and goes into your eye, so you see your reflection. Demonstrate how the light is moving by tracing your finger along the light path from your face to the mirror to your eyes.
4. Explain that another word for bouncing is reflecting.
5. Ask a student to explain to you why you can see your reflection in the mirror. Now, have one student to come up and point out where the light is going as it bounces off your face, off the mirror, and into your eye.
6. Have students to complete question #2 on the worksheet, tracing the light path from the mirror.
7. Distribute mirrors to the student groups. Have students describe what they see as they examine the mirrors. Pose the questions: “Which side of the mirror is your right/left eye on?” to help guide their description.
8. Ask a student to explain why her partner can see herself in the mirror, showing the light as it bounces off her face and the mirror. Repeat with several other students.
9. Have students complete question #3 on the worksheet: Draw an oval around the smiley face that the observer sees using the lens. Draw a rectangle around the smiley face the observer sees using the mirror.
ACTIVITY #3 – Focusing Light
Goal: Students will observe how water and lenses focus light.
Procedure:
1. Distribute the colored straws and glasses to each student group. Have each group prepare a lab report to record their observations; this can be done on the back of the worksheet or a separate piece of paper.
2. Have students examine the straws and describe to one another what they look like. Pose the question, “Are the straws straight or bent?” to help guide their description. Have them record their answer.
3. Direct students to put their straws in their glasses and look at them again. Direct students to describe the straws to the other students in their group, again taking into consideration whether the straw appears straight or bent. Have them record their answer.
4. Pour water into the glasses and ask students to examine the straws once again. Have them record a description of the straws on their labsheet, again identifying whether the straw appears straight or bent.
5. Ask, “What just happened?” Ask whether, the straw is, in fact bent, or if it just appears that way.
6. Explain that water focuses, or refracts, light as it passes through the water. The focusing of the light is what makes it look like the straw is bent. This is also what makes images appear larger through a magnifying glass.
7. Ask students to students to complete question #4 on the worksheet and draw the straw in water on their worksheet.
8. Display the card with a triple sunset on it, from the pdf, page 18, or use another graphic, or items items such as seeds, leaves, and rocks can also be used.
9. Ask students what will happen when they look at these items through a magnifying glass. Expected response: they will look bigger.
10. Explain that magnifying glasses focus light, just like water. This is called refraction. Distribute the magnifying glasses to each group, to hold over the picture or display items and examine the magnified image.
Extension
Students can be assigned to research a professional telescope, such as the Chandra X-Ray Observatory or James Webb Space Telescope, planned for launch in 2013.
For older students, teachers may also wish to extend this lesson with another that prompts students to debate the value of such powerful, yet costly space telescopes. See: The Space Telescope Debate.
Resources
WEB LINKS
Amazing Space. Amazing Space is a set of web-based activities primarily designed for classroom use, but made available for all to enjoy. Be sure to check out their “Solar System Trading Cards” activity and the “Student Astronaut Challenge.” http://oposite.stsci.edu/pubinfo/education/amazing-space/stellar-top-level.html
NASA’s James Webb Space Telescope (JWST) Website provides comprehensive information on this planned infrared telescope with a 6.5-meter primary mirror. the launch of which is currently planned for 2014. http://www.jwst.nasa.gov/
The Next Big Space Telescope is a 2-minute 2010 NOVA video on the Webb Space Telescope available for viewing on the NOVA Website.
HubbleSite. The HubbleSite Website, provides access to a gallery of images, updates on dark energy and other discoveries, and information about the Hubble and the planned-for Webb telescope. http://hubblesite.org/
Northrup Grumman’s Resources for Teachers page offers teaching guides on rockets, weather, and moon phases, as well as a Space Primer and SpaceKids Workbook, and links to useful sites.
Filed under: Grades 6-8, Grades K-5, Lesson Plans
Tags: Lesson Plan, Physics, Telescope


