Lesson: Build a Prosthetic Device
 (Lesson Courtesy Teachengineering). Level: Grade 7 (4-8). Time Required: 120 minutes. Group size: 4. Cost: $5 per group. Lesson pdf.
Overview
Student in grades 4 – 8 are introduced to biomedical engineering and the technology of prosthetics. As they create a model prosthetic lower leg, testing strength and considering its pros and cons, they learn about issues and materials that biomedical engineers consider in designing artificial limbs.
Learning Objectives
After completing this activity, students should be able to:
- Describe the engineering design considerations that go into developing quality prostheses.
- List characteristics and features that are important for a prosthetic leg.
- Analyze a prototype prosthetic leg and make suggestions for design improvements.
Engineering Connection
One aspect of biomedical engineering is researching and designing better prostheses. Biomedical engineers are continually improving these parts so that amputees can lead full lives. Those who need an artificial leg must have a structurally stable one to replace a critical part of their skeletal system.
Educational Standards
Colorado Science – Grade 7, 2007
b. Develop, communicate, and justify an evidence-based scientific explanation regarding the functions and interactions of the human body
c. Gather, analyze, and interpret data and models on the functions and interactions of the human body
International Technology Education Association-ITEA STL Standards Technology – Grades 6 – 8, 2000
H. Apply a design process to solve problems in and beyond the laboratory-classroom.
K. Test and evaluate the design in relation to pre-established requirements, such as criteria and constraints, and refine as needed.
G. Advances and innovations in medical technologies are used to improve healthcare.
Please see teachengineering for other state standards
Pre-Requisite Knowledge
Familiarity with the idea of bones providing a body’s structure, as described in the teachenginering Engineering Bones lesson.
Materials
For the entire class:
- 1 roll duct tape
For each group:
- A yardstick, ruler or tape measure, for measuring
- Scissors
- One type of prosthetic structural material with which to create a prototype (see suggestions below); note: The number of groups depends on how many different prosthetic resource materials are collected.
- Prosthetic Party Worksheet, one per person
Teachers also should provide, or encourage students to bring in a variety of prosthesis structural material resources. Suggestions include:
- (For leg structure): toilet plungers -unused, plastic pipes, metal pipes, metal strips, cardboard tube from wrapping paper roll, wooden “2 x 4,” thin metal duct material to be rolled and taped into a tube shape, all generally 1.5 ft or .46 m. long
- (For comfort): Large sponges, scrap bubble wrap, scrap cardboard, etc.
- (For lifelikeness): bath towels, pairs of pants, shoes — use students’
- (For body attachment): string, rope, twine, about 30 ft or 10 m
Introduction/Motivation
A prosthesis is an artificial body part that replaces a missing body part. Many people are in need of various types of prostheses, including injured soldiers, people who live in war zones, or people who have been in accidents. Biomedical engineers design prostheses for these amputees so that they can live as easily as others.
The most important characteristics for a good prosthetic leg include strength, durability, longevity, shock absorption, lifelikeness and comfort. Biomedical engineers research and design new ways to create prosthetic legs that have all of these characteristics.
Vocabulary/Definitions
- amputee — a person who has had a limb removed.
- biomedical engineer — an occupation that includes designing artificial body parts.
- bioengineering — the use of artificial tissues, organs or organ components to replace damaged or absent parts of the body, such as artificial limbs and heart pacemakers.
- engineer — a person who applies understanding of science and math to creating things for the benefit of humanity and our world.
- prosthesis — an artificial body part to replace a missing one. Plural: prostheses.
- prosthetics — a specialty of medicine and engineering that designs, constructs and fits artificial limbs and body parts (prostheses).
- prototype — an original, full-scale, and usually working, model of a new product, or new version of an existing product.
- Other keywords: body, bone, biomedical, design, design process, engineering design process, human body, leg, skeletal system, skeleton, strength, structure
Procedure
Safety: Be careful when testing prostheses. Have student “spotters” positioned around their teammate who is testing the prosthesis to catch him/her if s/he falls.
Troubleshooting Tips:
If the prostheses are not strong enough to hold the body weight, test them with heavy objects (such as books) while students hold the prosthetic steady.
PRE-ACTIVITY
- Gather materials and make copies of the Prosthetic Party Worksheet.
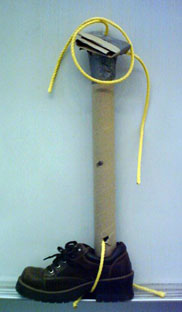
- Review the Images of Example Prototype Prostheses for ideas for student-created protheses and to address comfort and lifelikeness.
With the Students
1. Pre-activity Discussion: Introduce the topic of biomedical engineering and prosthesis, then lead a pre-activity discussion and brainstorming session so students gain a basic understanding of the various prosthetic requirements and material resources to meet these needs.
Remind students that in brainstorming, all ideas should be respectfully heard. Take an uncritical position, encourage wild ideas and discourage criticism of ideas. Solicit, integrate and summarize student responses, giving prompts as necessary, and recording ideas on the board. Ask:
- What features would make a useful prosthetic lower leg? (Possible answers: strength, stability, durability, longevity, shock absorption, lifelikeness, comfort.)
- How can you achieve some of these qualities, using the provided resources? (Possible answers: Use the plunger head for a comfortable knee support, use rope or duct tape for connection to the body, use tube or pipe or wood for strong and sturdy support.)
3. Remind students that when engineers design a new or improved product, they work in groups and follow the steps of the engineering design process: 1) understand the problem or need, 2) come up with creative ideas, 3) select the most promising idea, 4) communicate and make a plan to describe the idea, 5) create or build a prototype or model of the design, and 6) evaluate and refine what has made.
1. Divide the class into enough teams so each has a different structural prosthetic material.
2. Assign teams different material resources with which to construct their prostheses. Make available other materials for them to consider incorporating into their design.
3. Hand out worksheets and have students follow along with the questions throughout the activity.
4. Have students discuss ideas within their groups, while completing the first page of the worksheet.
5. Have each group choose one teammate for whom to make the prosthesis. Measure his/her lower leg from where it bends at the knee, to be sure the prosthesis fits.
6. Have students collect other materials, such as tape and string, and begin creating their prototypes, creatively addressing the requirements of strength, stability, durability, longevity, shock absorption, lifelikeness, comfort, etc.
7. After all teams are finished, each group will present their prosthesis to the rest of the class, explaining their design concepts and choice of materials, as well as demonstrating the prototype’s strength by having their teammate use it to walk (while bending his/her knee and wearing the prosthesis). Give the teams in-class and homework time to prepare their presentation.
When the groups present, they can imagine they are doing so at an engineering conference. They should include in their presentation:
Be sure to allow time for students to ask questions and to evaluate the other groups’ presentations. What solutions did groups devise that were particularly clever? What problems did all the groups encounter?
Assessment
Worksheet. Have students submit their completed activity worksheet; review their answers to gauge their mastery of the subject.
Presentation. Have students help design a matrix for the presentations, determining how each group will be evaluated.
Concluding Discussion Questions: Conclude with a class discussion to gauge students’ comprehension of the subject matter covered. Ask:
- What improvements could be made to your prototype?
- What other materials would help improve your design?
- What would be different if you had to make the whole leg, including the knee?
- What design constraints or limitations might be different for biomedical engineers developing real prostheses?
 Extensions
- Expand the design challenge to have teams make a functional prosthetic arm. For an artificial arm, the primary purpose shifts from being structural to enabling movement. Have students brainstorm ways to make the prosthetic arm move. A bonus challenge is to create a prosthetic arm and/or hand that can pick up an object.
- See if a local hospital, rehab center, veteran’s hospital or medical center can loan you real prostheses to show to students. Or find images of the latest designs on the Internet.
- Have students research gait analysis and how engineers help measure a person’s gait. How would this analysis be helpful in designing a prosthetic limb?
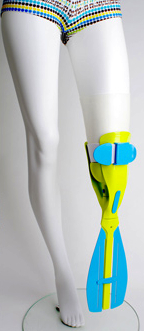
- Have students read Prism magazine’s profile on Prof. Lisa Pruitt on one engineering professor’s efforts with prosthetic limbs. See also our Egfi article on a prosthetic “fin” for swimmers and an October 2010 Prism feature on biomedical engineering, “Extra Strength.”
- As featured in Copper-Hewitt National Design Museum’s Design for the Other 90% exhibit (http://other90.copperhewitt.org/Design/jaipur-foot-and-below-knee-prosthesis), have students investigate the Jaipur prosthesis at http://www.jaipurfoot.org/.
Activity Scaling
- For lower grades, instead of testing the prosthetic with the weight of an entire body, test it with heavy objects (such as books) while students hold the prosthetic steady. This way, the prosthetic need not be as strong or dependent on a secure attachment to the leg.
- For upper grades, have students draw more than one design. Have them predict and explain why one of their designs would be best, and construct a prototype of that one.
Resources
- A biomechanics lesson for a prosthetic arm from the Society of Women Engineers.
- Description of a biomedical engineering lesson plan “A Study of Failed Replacement Joints: What Can They Teach Us About Physics, Polymer Chemistry and Human Anatomy?” from the Lerner Research Institute
Contributors: Megan Podlogar, Malinda Schaefer Zarske, Denise W. Carlson; Integrated Teaching and Learning Program, College of Engineering, University of Colorado at Boulder
Filed under: Grades 6-8, Lesson Plans


