


Build a Kicking Machine
Activity from PBS Design Squad, with additional materials curated by eGFI Teachers. Click HERE for short web version, and HERE for parent/educator guide [English] and HERE [Spanish]. Or use this teacher guide with an “extreme kicking machine” activity extension [PDF]
Click HERE for the Kick Stick Challenge (video above) and HERE for kid-friendly graphical version. Video can be found HERE.
Summary
Students teams design, build, and test a machine from a rubber band or pendulum that kicks a Ping-Pong ball into a cup lying on its side 12 inches away.
Grade level: 4 – 9
Time: One or two class periods
Learning objectives
- Employ the engineering design process to create a solution to a given problem.
- Explain the importance of different launch angles.
- Explain the meaning of projectile motion, accuracy, and precision.
Learning standards
Next Generation Science Standards
Generate and compare multiple possible solutions to a problem based on how well each is likely to meet the criteria and constraints of the problem (Elementary School)
Design, build, and refine a device that works within given constraints to convert one form of energy into another form of energy. (High School)
Engineering connection
We use machines to move things for us all the time, and they use energy to do it. This energy can be stored (i.e., potential energy), for instance, as fuel, weights, or springs and then released at a later time (i.e., kinetic energy). In this challenge, kids (1) build a machine that uses energy stored in a pendulum or a rubber band to set a ball in motion; and (2) test the accuracy of their machines by shooting a Ping-Pong ball into a cup.
For a real-world example, building machines that make tasty—and sometimes far-out—ice cream flavors is just the kind of challenge Pete Gosselin loves. He’s head engineer for Ben and Jerry’s® ice cream. Pete’s the guy who designs the machines that make different flavors and mix the right amounts of candy, filling, or swirl into each container. And you thought getting a ball into a cup was a challenge! Some days, it’s, “We want every container to have half a pint of cherry ice cream with cherries and fudge flakes and half a pint of chocolate ice cream with fudge brownies. Now on the brownie side, make sure there are at least three but no more than four brownie bites. Oh and by the way, these babies need to roll off the production line at 200 pints a minute.” To make some flavors, Pete tinkers with the factory’s existing machines.
For others, he has to design special machines. His biggest challenge: to design a machine that makes a flavor with a core of fudge and caramel wedged between chocolate and caramel ice cream. The way Pete sees it, “The world is full of problems and possibilities. And technology has a huge influence on making our lives better, whether the challenge is addressing global warming or making delicious food.”
Materials
- Balls (Ping-Pong and golf)
- Corrugated cardboard
- Paper clips
- Paper cups
- Popsicle sticks
- Rubber bands
- Ruler
- Scissors
- String
- Tape (masking or duct)
- Thin metal wire (optional)
- Wooden skewers or dowels
Procedure
Before they begin designing their machines, have students brainstorm answers to the following questions and record and sketch their ideas in their design notebooks: 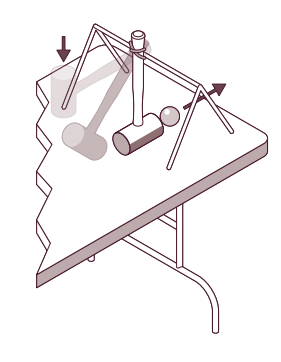
• Will my machine use a pendulum or rubber band (or a combination) to send a ball into the cup?
• How will I stop the machine from launching the ball before I’m ready to release it?
• How will the machine be triggered when I’m ready to launch the ball?
• How will I make sure the pendulum or rubber band launches the ball straight enough and with the right amount of force so it goes into the cup?
Think about how to create different release points for the pendulum or rubber band so you have more control over a launched ball. Also consider how to determine the right amount of energy to store up before making your shot.
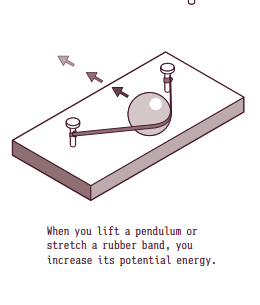
When you lift a pendulum or stretch a rubber band, you increase its potential energy. Potential energy is energy that is stored. When you release the pendulum or rubber band, its potential energy is turned into kinetic energy, the energy of motion. Many machines have this in common—they turn potential energy (e.g., fuel, electricity, muscle power, springs, or weights) into kinetic energy that can be used to do a task (in this case, launch a ball)
A pendulum is a rod with a weight at the end of it that allows it to swing back and forth. What kinds of machines have a pendulum swing? (Amusement park rides, clocks, swings) How can a pendulum move a ball? How can a rubber band move a ball? How will you stop the ball from launching before you’re ready to release it? How will you release the right amount of force needed to launch the ball?
Write down your ideas
How does a pendulum or rubber band store energy? How can you use gravity to get a ball moving? How can a rubber band get a ball moving?
How will you launch your ball when you are ready to release it?
TIP: When you lift a pendulum or stretch a rubber band, you increase its stored energy, or its potential energy. When you release the pendulum or rubber band, its potential energy is turned into kinetic energy, the energy of motion. Many machines turn potential energy (such as electricity and muscle power) into kinetic energy.
TIP: Gravity is a force that acts like a magnet in that it attracts one object to another. Gravity will move an object to the floor if you drop it or hit it with a pendulum.
Look at the materials. What will you use to make the base for your launcher? What materials do you have to build a release trigger for your machine? What materials do you have to build a pendulum launcher? A rubber band launcher? What will you use to make sure the ball goes in the right direction? TIP: A pendulum device could be a golf ball taped to a string or a piece of cardboard hanging from a frame. A rubber band device could have a rubber band stretched between two posts.
Design and build the machine base
- Decide what size you will make your kicking machine.
- Think about how big the base for the machine will need to be.
- Think about what materials you will use for the base.
- Choose the materials and build the base.
-
Design and build the launch frame
-
- Decide what materials you need to make the frame to hold the pendulum or rubber band.
- Choose the materials and build the frame.
- Test that it is strong enough to hold the pendulum swing or the stretched rubber band.
- TIP: If the stretched rubber band bends the frame, try using stronger materials for the frame or make the frame stronger by reinforcing it.
- TIP: You can test a design at different steps along the building process. This way you can spot a problem, such as a bump in the base, and fix it when it happens instead of at the end of the process.

Modify your base or build a ball holder- Decide how you will keep the ball from rolling off the base until you release it.
- Think about modifying the base or designing an extra feature to hold the ball.
- Choose the materials and build the ball holder.

- Place the ball in the holder on the kicking machine.
- Modify the design if the ball rolls off.
- TIP: If the ball won’t stay in place, try using a paper clip or a piece of cardboard to anchor it.
- TIP: If the ball rolls out of the holder, try tying a piece of string across the holder, and use it to pull back the rubber band. Then release it.

Test the kicking machine
- Place a cup on its side 12 inches (30 cm) away from your kicking machine. Tape it down.
- Position the direction of your machine so the ball goes in the cup.
- Release it!
- TIP: If the ball is hard to get into the holder, try using different release points for the pendulum or the rubber band. Or check whether the ball bumps into part of the machine on its way out. If necessary, revise your design.
- TIP: You’ve just built a prototype, which is an early version of a product. Prototypes help engineers understand a product’s strengths and weaknesses and how the product might be improved.
TIP: Your base will need to be a smooth surface so the ball does not get stuck or slowed down by ridges or bumps in the base.

-
Debug the machines
Does the ball bump into parts of the machine and go in unexpected directions? Does the stretched rubber band bend the frame. If things like this happen to you, figure out a way to fix the problem so that your machine works every time.
Activity scaling and extensions
- Move the cup so it’s 24 inches from your kicking machine.
- Build a ramp and see if you can shoot the ball up and over the ramp.
- Build a machine that can launch two balls at once or that can launch balls at different speeds.
- Build a mechanical “goalkeeper” to prevent the ball from going into the cup
Additional resources
Forces on a Soccer Ball. Short NASA guide to how Newton’s laws of physics, weight of the ball, and spin determine the path of a soccer ball.
Game On! Soccer. Cheveron’s STEM Zone activities include this graphical look at the math and science of soccer balls and scoring goals.
Extreme Kicking Machine. PBS Design Squad activity.
Just for Kicks PBS Design Squad builds a machine to automatically serve balls to a professional soccer player.
Filed under: Class Activities, Grades 6-8, Grades 9-12, Grades K-5, Lesson Plans
Tags: ball, Class Activities, Engineering Design, forces and motion, Grades 6-8, Grades K-5, Kicking Machine, kinetic energy, Lesson Plan, PBS Design Squad, Physics, projectile motion, simple machines, soccer