


Honeybee Human Design Challenge
Activity courtesy of C-PALMS, Florida’s platform for teacher resources. Click HERE for PDF. This version includes additional material inserted by ASEE’s eGFI Teachers editor.
NOTE: For a 3-D prototype design challenge, please see Engineering is Elementary, from the Museum of Science, Boston, which developed a four-part unit that challenges students in grades 1 to 5 to build a hand-operated pollinator – or I Scream You Scream, Ringwood, Ill., second grade teacher and NSTA contributor Jeri Faber’s end-of-unit activity to design a pollinator for vanilla plants, which are grown away from natural pollinators to produce flavorful beans.
For older elementary students, consider including Honeybee Mystery, a lesson from Oregon that focuses on Colony Collapse Disorder and a performance task that involves writing an advocacy letter to local, state, or federal legislators proposing solutions.
Summary
Students in grades 3 to 5 learn about the engineering design process by making a 2-dimensional model (graphic illustration) of an apparatus that will pollinate a field.
Grade level: 4 (3-5)
Time: 2 hours
Learning objectives
Students will:
- create a 2-D model of a system to pollinate a “blacktop” size field of plants.
- keep careful records as they design, analyze, and modify the models based on the analysis.
- present the designs at an engineer conference/peer review session, discussing merits of their design, citing features of their design and how it would work in the real world.
- evaluate other designs from the point of view of the plants or farmer, identifying at least 2 positive impacts and 2 negative impacts over the course of the presentations.
- decide on the best solution to the problem of less natural pollination due to honeybee colony collapse and cite specific positive impacts (based on evidence) in support of the solution.
- gain a deeper understanding of pollination, its importance in the food chain, and its impact on living organisms.
Learning standards
Next Generation Science Standards
- Construct a model based on evidence to represent a proposed object or tool
Guiding Questions
- How do honeybees impact our lives?
- How can we do the job of honeybees?
Introduction/Motivation
In science class, you’ve been learning about the important role bees play in plant pollination. But what if there aren’t enough bees to do the job?Agricultural, mechanical, and electrical engineers design mechanical or hand pollination systems that can pollinate plants when insects are scarce, or to use on plants grown in greenhouses and special plants like vanilla that must be grown away from natural pollinators.
As junior graphic design engineers at the state Department of Agriculture, you’ve been called in by farmers to develop a pollination system that will help deal with the loss of honey bees due to colony collapse.
Materials
- Engineer Report—Automatic Pollinator [PDF] at the end of lesson—1 per student
- large white paper for official design—1 per team (18″ x 12″ construction paper works well)
- Hibiscus, tulip, or other flower with visible pollen cells—1 per student, if possible
- white paper to collect pollen cells—1 per student (coffee filters also work well)
Materials for teacher use:
- Engineer Design Process for 2-D (illustration) model [PDF]
- Honeybee Engineer Report – Automatic Pollinator [Word]
- Honeybee Automatic Pollinator Engineering Design Process Evaluation Rubric [Word]
Process
1. Ask students to make a list of the plants they eat, as many as they can write in 2 minutes. Then have them make a list of all the plants that are eaten for food by any animals, and the animal that eats that food. For example: grass—cow, corn—chicken, hay—sheep, etc. Give them a time limit (3 minutes), as nearly every plant is eaten for food by some animal.
2. Show the students some fruits and vegetables that we eat every day (apple, orange, tomato, etc.). Images of the fruits would also work. What is important is that the students are able to see the seeds in the fruit. If there are seeds, there were flowers! Have the students work in teams of 4 to highlight the plants on their lists that have flowers. Most will not realize that many of the plants we eat are seed-bearing.
3. Show a video or image of bee pollinating a plant. Some options are:
- U.S. Department of Agriculture’s Natural Resources Conservation Service Insects & Pollinators site, or USDA-Forest Service Bee Basics guide.
- PBS produced a video about the honey bee colony collapse called Silence of the Bees. An introduction to the video is available for free on their website.
- For older students, introduce these two short videos address the role that bees play in nature and about why bees are disappearing. The first
video gives an overview of the importance of bees. The second video discusses about the sudden and mysterious drop in honey bee populations (Colony Collapse Disorder) and what might be causing bees to disappear:
http://www.youtube.com/watch?v=mdfMkr1pXrM
http://www.youtube.com/watch?v=2P7cYGjI8Fw
4. Review plant reproduction. Give each student a flower with visible pollen cells and a white piece of paper. Hibiscus are easy to find in Florida and are good for “dissection.”
5. Challenge the students to collect some pollen on the white paper. Don’t tell them how to do it—that’s part of the challenge. They should already know that the yellow, grain-like substances are the pollen cells.
6. Tell students that most flowers cannot pollinate themselves—the pollen from one flower must go to a different flower to be effective. Some flowers have both male and female structures in one flower, but they still need pollen from another flower in order to reproduce. In most cases, a flower cannot use its own pollen to reproduce; it must get it from another flower. That’s where honeybees and other insects come in.
Teacher’s tip: This would be a good spot for a paired reading lesson on “Honeybee Colony Collapse” from National Geographic for Kids.
7. Ask the students the following:
What will happen if we lose the majority of the honeybees? You might consider making a class flow chart, such as:
| Honey bee numbers drop | leads to | less pollination | leads to | less seeds | leads to | less food |
Who will this affect? (All animals) How? (The whole food chain depends on plants.)
How can we get the pollen that you collected on your white paper to another flower so that it can be used by the new flower for reproduction? Talk to your team and begin discussing ideas.
Introduce Challenge Question: How could you design a machine to do the job of pollinating the flowers on a field the size of our school blacktop?
Handouts
- Engineer Design Process for 2-D (illustration) model [PDF]
- Honeybee Engineer Report – Automatic Pollinator [Word]
- Honeybee Automatic Pollinator Engineering Design Process Evaluation Rubric [Word]
Investigate: What will the teacher do to give students an opportunity to develop, try, revise, and implement their own methods to gather data?
Teacher note: This Challenge asks students to make a 2-dimensional graphic illustration of their design (a scientific illustration, complete with labels and other helpful information to explain how their design will work). Students are the “initial design” team. They draw and label their design, get feedback from their peers (other designers), then modify the design, taking into account all the feedback received. This is still a “real-world” engineering application. Many design engineers never put their hands on the 3-D version of their design. Some examples are car design engineers and architects, who use computer-aided design tools instead of 3-D prototypes.
Because the process of designing a 2-dimensional model is a bit different, the Engineer/Design Challenge Process for 2-dimensional Models flow chart is slightly different from other Engineering Design Challenges.
1. Explain to the students that they are junior graphic design engineers at the State Department of Agriculture. [You can put real state and location, such as the Florida State Department of Agriculture in Talahasee.] They’ve been called in by farmers to develop a pollination system that will help deal with the loss of honey bees due to colony collapse. Tell them that after all the groups develop a possible solution, we will have a review session to present all the solutions. After the presentations, there will be a time for modifying the designs before the final designs are due.
2. Explain the Engineering/Design Challenge Process for 2-dimensional Models (refer to chart of graphic, if posted).
Phase 1. Explain that we are now in Phase 1: Identifying the Problem. In this stage, engineers identify the problem and any things they need to consider when they design their solution. These considerations are part of the “specifications” for the solution. After they identify the specifications, they brainstorm possible solutions. Engineers usually brainstorm many solutions before they settle on the best one to build. Stress that they shouldn’t stop at the first idea they get—they should think of several ideas before choosing the one that best fits the specifications. After they decide on a solution, engineers make a drawing of their idea so they can begin to work out the details of the design (material needed, size, etc.). In many cases, they would build a model of their design, then test the model.
3. Point out that in this case, though, we are the initial design team. We will be making 2-dimensional models. This means we won’t actually be building a prototype. We will be drawing our design, getting feedback from our peers (other designers), then modifying the design, taking into account all the feedback received. The goal is to clearly communicate how the design works.
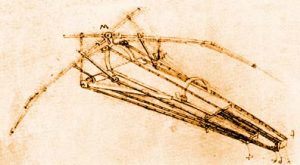 4. Show them Leonardo da Vinci’s sketches of an ornithopter in the 1480s. Although da Vinci drew very detailed plans, he lacked the technology to build a prototype. However, we are able to understand his plans because of the details he left in his journal.
5. Distribute copies of the Engineer Report—Automatic Pollinator (this can also be done as part of a science notebook). Even though they are working as a team, each student completes his/her own report. (See Accommodations, below, for options)
6. Guide the class in developing the question: How could you design a machine to do the job of pollinating the flowers on a field the size of our school blacktop?
7. With the students, brainstorm a list of considerations for the design. Some possibilities include:
- The pollinator has to collect pollen from one flower’s stamen and carry it, placing it on the pistil of another flower. Remind them of the earlier “pollen collecting” activity.
- The pollinator cannot damage the flower.
- The pollinator must be powered by hand.
- The pollinator must be operated/carried by one person.
- The pollinator must pollinate a field the size of our blacktop (or playground, parking lot, etc.) in a reasonable amount of time. For this, you might decide to take the students out to the “field area” and let them “walk their designs” to see approximately how fast they would need to move, how much area they’d have to cover, etc. Then have students come up with a consensus on an amount of time that would be “reasonable” for your selected field.
8. Tell students that, as Project Head, you cannot give them ideas, but you can help clarify. One idea is to tell them that you will only be able to ask questions, not answer any. For example, if a student asks if you think their design will work, respond with, “Does it meet our considerations?”
9. Set an amount of time for the initial designs (one class meeting time is sufficient). Remind students that the plans should be very detailed so that someone else could pick up their plan and understand it.
10. Students meet in their teams to begin brainstorming and complete the rest of Phase 1 on the Engineer Report. They don’t get the “official” design paper until they’ve brainstormed several ideas and chosen the one they want to draw. As students are ready to begin to draw their design, have them come to you to describe their idea. Ask: “How does your design do the bee’s job?”
Assessment 
Formative assessment—Does the student understand the pollination process? Does your design clearly communicate your idea? How can you make it clearer? Educative assessment
11. As you approve ideas, give students the larger construction paper to use for their official design. Remind them to use words to describe what each part of the design is doing.
-
- Who will present the idea?
- Who will be collecting the feedback?
- Analyze: How will the teacher help students determine a way to represent, analyze, and interpret the data they collect?Phase 21. Gather the student teams together and tell them that we are moving into Phase 2: Modifying. Refer to the Engineering/Design Challenge Process for 2-dimensional Models graphic. Explain that design engineers get feedback from their peers before they present their ideas to their customer. The purpose of this Conference/Peer Review Session is to have someone else take a close look at your design to work out all the “bugs” in a design before showing it to the customer. They get specific feedback, and then modify their design to fix any identified issues while keeping the things that fit the considerations. After modifying, they go back to get feedback again, continuing the peer review—get feedback—modify cycle until they feel their solution is complete.2. With the students, decide on a way to record feedback on the Modifying, Step 1 section of the Engineer Report.3. As they finish their designs, have them prepare their initial presentation. They will need to decide:
4. At a time determined by the Project Head, bring the engineer teams together for a Conference/Peer Review Session. One team member presents the idea, while the other members record the questions or concerns brought up by their peers.
5. After all teams have presented, teams meet to decide on modifications. They complete Modifying, Step 2. One note: Some students may have a hard time with modifying their current design and instead want to start over with a new design. There is usually something that works in every design—help the team find those things that they can build on. Starting over with a new design each time defeats the purpose of the Engineering/Design Process.
6. Repeat the Conference/Peer Review Session with a different student doing the presentation. Encourage the “peers” to ask for details about how the pollinator will work in the field.
7. Allow time for students to finalize modifications of their design.
Teacher Tip: Arrange with another class to be your customers. They get the final designs and make comments about the clarity of the design. Students can use these for their Final Evaluations.
- More benefit than harm to the plants
- Ease of use
- Amount of time it takes to pollinate
Closure: What will the teacher do to bring the lesson to a close? How will the students make sense of the investigation?
1. Gather the student teams together and tell them that we are moving into Phase 3: Presentation. Refer to the Engineering/Design Challenge Process graphic. Explain that, after modifications are completed, engineers present their final design for “public comment.” This public comment could be with the customer who ordered the project, the people who will be using the project, or some other interested party. If you’ve made arrangements with another class, this is the time. If not, you might consider hanging the designs in the hallway of your school. Help the students see that this is when the designs must “speak for themselves.”
2. Explain the Engineering Feasibility Report (see Summative Assessment). Remind the students of the considerations the class developed in Investigate: Step 7. Have the students think about each consideration; have them rate their design with a score of 0, 1, or 2 on each consideration:
2 = This design fully meets this consideration.
1 = This design partially meets this consideration.
0 = This design does not meet this consideration.For each rating, the student should include evidence to support the rating given.
3. Then have the students complete the Summative Assessment prompt in the Science Notebooks:Which of the presented designs would be the most effective at pollinating our field?
Have the students give evidence from the Engineers’ Conference/Peer Review Session to support his/her evaluation.
Students should take into account the following issues:
- Note: Students may decide that none of the solutions presented are feasible because they don’t give enough benefits. This is an acceptable conclusion, as long as it is supported with evidence from the Conference/Peer Review.4. Teacher evaluation: Use the attached Engineering Design Process Evaluation Rubric to assess students.
Summative Assessment
1. Student self-evaluation: After the Final Design Presentation, have each student evaluate the “feasibility” of her/his project. Students will discuss the strengths of their designs and the drawbacks to using it in the real world. Use the list of considerations generated in Investigate: Step 7 as a guide for the students as they decide if their automatic pollinator would help solve the problem of honeybee colony collapse. For example, if one of the considerations is that the pollinator can only be operated by one person, but it is too bulky, the student may decide that the design is not feasible. This is not intended as a correct/incorrect assignment. The goal is for the student to progress in giving an objective evaluation of his/her own projects, using the challenge considerations as a guide.
2. Teacher evaluation, part 1 (notebook): Have students decide which of the presented solutions would be the most feasible, giving evidence from the Engineers’ Conference/Peer Review Session to support his/her evaluation. Students should take into account the following issues:
- More benefit than harm to the plants
- Ease of use
- Amount of time it takes to pollinate
NOTE: Students may decide that none of the solutions presented are feasible because they don’t give enough benefits. This is an acceptable conclusion, as long as it is supported with evidence from the Conference/Peer Review.
3. Teacher evaluation, part 2: Use the attached Engineering Design Process Evaluation Rubric to assess students.
Formative Assessment
Ask the students, “Why are bees important to us?”
Students may mention that bees pollinate flowers, and flowers make things pretty or smell nice, not realizing that plants are essential parts of food chains and pollination is essential for flowering plants’ reproduction.
-
Feedback to Students
As students are brainstorming their possible solutions, ask them:
- How is your solution modeling the bee’s behavior?
- How might it help the plant?
- How might it hurt the plant?
- How many plants would you estimate that it could pollinate in one hour?
- How easy is it to operate?
- How will your solution help solve the problems created by honeybee colony collapse?
While you can guide the students in looking at their solutions from the point of view of multiple stakeholders, you still want to take care that you don’t limit their ideas. As students bring you their Engineer Reports (at “Project Head approval” points), discuss their work to that point.
- How will this help the plant?
- How might this hurt the plant?
- Is the design or modification “doable” within the limits of the classroom?
- Have they been thorough in their analysis of the testing?
- Based on our discussion, feedback, and your reflections, how might you use these ideas to modify or improve your design?
Accommodations
Students with physical impairments will be on teams with non-disabled peer to enable them to fully realize their ideas on paper.
The teacher may choose to have a student complete each section of the Engineer Report and Summative Assessment orally.
Extensions
Some engineers may develop designs that can move to the prototype stage. If a team wants to try to develop their design into a prototype, work with them to problem-solve the feasibility of building a prototype.
For a 3-D prototype design challenge, please see Engineering is Elementary, from the Museum of Science, Boston, which developed a four-part unit that challenges students in grades 1 to 5 to build a hand-operated pollinator.
I Scream You Scream, is Ringwood, Ill., second grade teacher and NSTA contributor Jeri Faber’s end-of-unit activity to design a pollinator for vanilla plants, which are grown away from natural pollinators to produce flavorful beans.
For older elementary students, consider including Honeybee Mystery, a lesson from Oregon that focuses on Colony Collapse Disorder and a performance task that involves writing an advocacy letter to local, state, or federal legislators proposing solutions.
Lesson #4 of the National Park Service’s Biodiversity – Honey Bee Week activities for middle school students is an engineering design challenge to build a model robotic bee using pipe cleaners, and to assess some drawbacks to the mechanical version.
Suggested Technology
Document Camera, Computer for Presenter, Internet Connection, LCD Projector
Filed under: Class Activities, Grades K-5, Lesson Plans
Tags: Agricultural Engineering, Class Activities, crops, design challenge, Grades K-5, honey bee, Lesson Plan, Mechanical engineering, pollinator