


Flying T-Shirt Challenge
Flying T-Shirts activity from TeachEngineering contributed by the Integrated Teaching and Learning Program, College of Engineering, University of Colorado Boulder. Click HERE for similar maker challenge, T-Shirt Launch, which emphasizes design journals.
Summary
Students follow the engineering design process to design and build a usable device to get school t-shirts up into the stands during home sporting events while keeping costs under budget.
Engineering Connection
All types of engineers design products to satisfy some need to address some problem. To do this, engineers follow a design process to help them create the best possible product or solution. It is essential for all engineers to become comfortable with the steps of the process as well as particular project requirements and constraints, such as as a budget or client needs.
Learning Objectives
After this activity, students should be able to:
- List the steps of the engineering design process.
- Explain why engineering is driven by need.
- Work under the constraints of a budget.
- Explain how potential energy is converted to kinetic energy to launch a T-shirt.
Learning Standards
Next Generation Science Standards
- Design, build, and refine a device that works within given constraints to convert one form of energy into another form of energy.
Common Core State Mathematics Standards
- Solve linear equations and inequalities in one variable, including equations with coefficients represented by letters.
International Technology and Engineering Educators Association
- A prototype is a working model used to test a design concept by making actual observations and necessary adjustments.
Materials
For sketching and prototype-building, each group needs:
- paper, pencils and erasers
- assortment of office/classroom supplies and small arts and crafts supplies, such as paper, tape, scissors, glue, Popsicle sticks, paper clips, rubber bands, twist ties, etc.
For full-scale model building, groups may request and need:
- pieces of wood, such as cuts of plywood, dowel, 2 x 4 beams
- PVC pipes and joints
- nails, screws, hinges, springs
- elastic tubing
- bungee cords
- other items available at grocery, hardware and dollar/discount stores
Note: Activity costs will vary widely, depending on materials requested by/made available to students. A rough estimate is $10-15 per group. To keep costs low, try to use scraps, leftovers from home and recycling bin materials.
Each group needs:
- Budget Sheet
- Presentation Guidelines
- Presentation Peer Review, one per person time the number of groups in the class
To share with the entire class:
- power drill
- drill bits, including a hole cutter (a circular saw drill bit attachment that cuts wider holes in wood sheets)
- hacksaw
- sandpaper
- duct tape
- wood glue
- screw drivers
- hammer
- computer with Internet access (to show an eight-minute video)
Introduction/Motivation 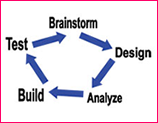
During home games, your school’s cheerleaders have decided they want to throw school T-shirts into the crowd during breaks. The problem is they don’t have any way to loft the shirts up to the top rows from the field (or court). The cheerleading coach has approached your class to see if you can design and build some device to help them out.
All engineering designs start with a need. For example, practical solar panels were engineered when companies like NASA needed a way to power satellites in space. The Internet was born when the U.S. military needed a way to communicate between computers. Here, cheerleaders need a way to get a T-shirt high into the stands. So now what do we do? As engineers, how do we actually go about designing something to meet our client’s need?
When faced with a design challenge, engineers follow the engineering design process. This process consists of the following five basic steps (write them on the board, in a circle arrangement): 1) ask, 2) imagine, 3) plan, 4) create, and 5) improve.
The first step is to identify the need or problem to be solved by “asking” yourself or someone else what issues need help. Then you “imagine” as many different ways as possible to meet the need. Team brainstorming helps with this step. In step three, you choose the best idea and figure out how to design it by making a “plan.” Then you “create” your design and because the first attempt is never perfect, step five is to “improve” on your design. Engineers typically follow this circular process as they design solutions to all kinds of challenges to make things better for people.
While all five steps are important, it is essential to emphasize the second and third steps: imagine and plan. During step 2, when you are imagining your design, it helps to work in teams and think “outside the box.” This helps generate more creative designs.
(optional; This is a good time to show an inspiring eight-minute ABC News Nightline video called “The Deep Dive,” which showcases an engineering design firm going through this creative step as they design a shopping cart. See https://www.youtube.com/watch?v=M66ZU2PCIcM.)
Here’s one example of how your “out of the box” creative thinking can benefit an engineering design. Alligator clips are little devices that temporarily connect two or more wires (show Figure 3). How do you think someone came up with the idea for alligator clips? Well, during step 2, when a team was brainstorming, one engineer said something about training mice to bite down on the wire ends to hold them together. Although the idea seemed a bit ridiculous at the time, it led to the development of alligator clips, which act like mice biting down on the ends of two wires!
Procedure
Background
If students are given a real client who plans to use the device, it greatly increases students’ interest in the project and the quality of their designs. This client could be the cheerleading squad who will use the resulting working models during home sports games, or other students in the class who use their working model designs during an upcoming school pep rally. These arrangements take some extra time to set up but really make the project more meaningful and fun — a real-world project.
The design challenge itself is open ended, so designs could vary greatly, but given the constraints listed in #4 of the Procedure section, most “products” end up being some sort of catapult, slingshot or crossbow. Figure 1 shows two examples of the kinds of devices that might be designed. Limit the potential materials the students can request to basic supplies available at any hardware, grocery or dollar/discount store. Use or modify the attached Budget Sheet, which contains a fictional set of costs for the available materials, to present to students with their construction materials options. Remind students to plan ahead and keep their designs within the budget.
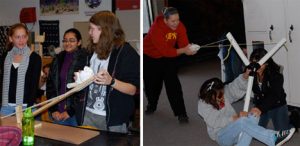
Two example t-shirt launching devices designed by students—a catapult (left) and slingshot (right). © 2008 Jonathan MacNeil, ITL Program, University of Colorado, Boulder.
Suggested Schedule
To complete this design challenge, give students twelve 50-minute class periods. To stay on schedule, require students to meet the interim deadlines and accomplishments suggested below.
Period 1: Introduce the project and the engineering design process. Begin brainstorming.
Period 2: Conduct the associated lesson, Physics of the Flying T-Shirt, and its two math worksheets.
Period 3: Continue brainstorming, this time with all the constraints in place.
Periods 4-5: Build a miniature prototype and draw a detailed sketch of the full-sized design.
Periods 6-10: Build the actual device. Have groups test and redesign their devices as time permits.
Periods 11-12: Final test for all groups. Project wrap up.
Before the Activity
- (optional) Arrange for a real-world “client” for the design challenge.
- Visit your local hardware (and/or grocery, dollar/discount) store to gather information on available materials and pricing. Personalize the Budget Sheet for your class project.
- Make copies of the Budget Sheet, Presentation Guidelines and Presentation Peer Review handouts.
- Prepare to show the class an eight-minute online video (see hot link in the Additional Multimedia Support section).
- Gather materials and tools to be used by the entire class.
With the Students
- Period 1: Introduce the students to their engineering design challenge — to design and build a device to meet the cheerleading squad’s need. (allow 10 minutes)
- Divide the class into groups of three or four students each.
- Emphasize the importance of teamwork, thinking “outside the box,” and the engineering design process as students prepare to start step 2: imagine. At this point, do not impose too many (or any) constraints. Instead, encourage wild ideas (for example: hiring a really strong man to throw the shirts up into the stands, or using a miniature helicopter to fly the shirts up into the upper bleachers). As time permits, show the eight-minute ABC Nightline “The Deep Dive” video (see hotlink in the Additional Multimedia Support section). (allow 40 minutes)
- Period 2: Conduct the associated Physics of the Flying T-Shirt lesson (and its two math worksheets) at this point. You want students to come to understand the importance of air resistance and launch angle and use this knowledge as they continue brainstorming during step 2 of the design process. For example, if students have not already thought about this, have them incorporate their understanding of air resistance to include fluid dynamic packaging of the t-shirts into their brainstorming session. (allow 50 minutes)
- Period 3: Make clear all project requirements and constraints. Requirements might include ease of use by three or fewer cheerleaders, reaching a certain distance with a certain level of accuracy, safety, reliability, and ease of repair. Constraints might include (but are not limited to) a $30 budget and no explosions. Have groups brainstorm some more and then narrow their ideas to what is feasible. Explain the types of energy that will be demonstrated in this project. Students that use a catapult, slingshot, or crossbow design will be converting elastic potential energy to kinetic energy. Or, perhaps a group will design a trebuchet or other device that relies on gravitational potential energy to be converted to kinetic energy. (allow 50 minutes)
- Periods 4-5: Have students start step 3 (plan) by picking their best idea and then quickly designing a miniature prototype using office and classroom supplies and small arts and crafts supplies. Require that the prototype be sized to be easily carried in one hand. Students will naturally move to step 4 (create) once they have their materials. These prototypes do not necessarily have to be working models; the idea is to create a visual and generate other issues before designing/creating their full-scale model. (allow 50 minutes)
- Periods 6-10: Once teams have finished prototype building, have them complete step 5 (improve) by analyzing their prototype and imagining what difficulties they might face when building the full-scaled model. This naturally leads (again) to steps 1-2-3 (ask-imagine-plan) as they design a full-sized device. Require that designs include a detailed drawing and a materials list to build it. At this point, check the designs to make sure they are feasible, and begin to compile a shopping list of materials for each group. (allow 50 minutes)
- Give each group their materials and start step 4 (create). Some groups may need to use basic power tools so spend some time showing the class how to safely use the available tools. Encourage teams to finish early so they have time to test their designs and make modifications. (allow 200 minutes)
- (optional) Have students create user’s manuals for their devices.
- Periods 11-12: Hold a test day in which the entire class goes outside to test their devices. (allow 50 minutes)
- When all the building and testing is done, wrap up the project. Have groups present their devices to the class. Give each group a Presentation Guidelines handout that clarifies the presentation requirements. Also have students use the Presentation Peer Review to provide feedback for each presentation.
Safety Issues
Power tools can be dangerous, so make sure students are shown how to operate them safely.
Troubleshooting Tips
Open ended design projects can be difficult for students who have never worked on these types of projects before so don’t feel discouraged if you have to help push them towards a certain design. Just being exposed to these types of projects is beneficial to many students.
Assessment
Pre-Activity Assessment
Class Discussion: Have the class think about new designs (inventions) they would create if they had the money and resources. Ask them about where their ideas came from, why people would want to use their designs, and how they would go about building their designs.
Activity Embedded Assessment
Project Review: Ask each group to evaluate their full-scale model designs, asking:
- Why did you choose that design?
- Will the client (cheerleaders) want to use your final product? Why?
- Will you be able to finish your device under budget?
Post-Activity Assessment
Group Presentation: Have each group present their project to the class. Make sure they cover all the topics required in the Presentation Guidelines handout and use the Presentation Peer Review to provide feedback on other teams’ presentations.
Activity Extensions
Have students think about how they might further change/improve their designs if they scaled up to a manufacturing level of production with their best prototype.
Have students create user’s manuals for their devices.
Additional Resources
Who Made that T-Shirt Cannon? New York Times June 21, 2013 article about Tim Derk, whose 90-pound gun debuted in the 1990s, when he worked as the Coyote mascot for the San Antonio Spurs.
VIDEOS
Engineering Design Process Science, Engineering & Design! Video 2 is an MIT student-made explanation using the steps he followed to design, build, test, and improve a prototype automatic volleyball server. [YouTube 7:58]
Overview of the Engineering Design Process Bucknell University electrical engineering senior capstone project explains the steps in designing a new process or product, including Gantt charts to track progress. [YouTube 15:37]
Contributors
The contents of this TeachEngineering digital library curriculum were developed under grants from the Fund for the Improvement of Postsecondary Education (FIPSE), U.S. Department of Education and National Science Foundation (GK-12 grant no. DGE 0338326). These contents do not necessarily represent the policies of the Department of Education or National Science Foundation, and you should not assume endorsement by the federal government.
Filed under: Class Activities, Grades 6-8, Grades 6-8, Grades 9-12, Grades 9-12, Grades 9-12, Lesson Plans
Tags: catapult, cheerleaders, Class Activities, Engineering Design Process, forces, Grades 6-8, Grades 9-12, Lesson Plan, maker challenges, motion, Physics, Sports, T-shirt cannon, teachengineering, tools