


Engineer a Vertical Farm
Engineering is Everywhere Vertical Farms curriculum unit is part of a series of engineering design activities for use in middle school enrichment and after-school programs developed by the Museum of Science, Boston’s Engineering is Elementary. Click HERE for the teacher’s guide. [PDF]
Summary
Students explore food production problems related to population growth and then engineer a model vertical farm as a potential solution in a fictional community, Greentown, culminating with a presentation to the imaginary city’s “legislators.” Because vertical farms are still a new concept with only a few prototype examples worldwide, exploring vertical farms provides youths with a chance to imagine what the future could bring.
Grade level: 6-8
Time: 7 to 8 hours for all six hour-long activities; 2 to 3 hours for the vertical farm design project.
Learning objectives
After doing these activities, participants should be able to:
- Understand the engineering design process and role of engineers in developing products and processes that benefit society.
- Understand that technology is anything designed by people to help solve a problem.
- Design, build, test, and improve a technology to solve a problem.
Learning Standards
Though designed for out-of-school time, these activities cover a number of academic standards.
Next Generation Science Standards
Middle School Physical Science
- MS-PS4-2 Develop and use a model to describe that waves are reflected, absorbed, or transmitted through various objects.
- Middle School Life Science
MS-LS1-6 Construct a scientific explanation based on evidence for the role of photosynthesis in the cycling of matter and flow of energy into and out of organisms.
MS-LS2-5 Evaluate competing design solutions for maintaining biodiversity and ecosystem services.
Middle School Earth and Space Sciences
- MS-ESS3-3 Apply scientific principles to design a method for monitoring and minimizing a human impact on the environment.
- MS-ESS3-4 Construct an argument supported by evidence for how increases in human population and per-capita consumption of natural resources impact Earth’s systems.
Middle School Engineering and Technology
- MS-ETS1-1 Define the criteria and constraints of a design problem with sufficient precision to ensure a successful solution, taking into account relevant scientific principles and potential impacts on people and the natural environment that may limit possible solutions.
- MS-ETS1-2 Evaluate competing design solutions using a systematic process to determine how well they meet the criteria and constraints of the problem.
- MS-ETS1-3 Analyze data from tests to determine similarities and differences among several design solutions to identify the best characteristics of each that can be combined into a new solution to better meet the criteria for success.
- MS-ETS1-4 Develop a model to generate data for iterative testing and modification of a proposed object, tool, or process such that an optimal design can be achieved.
21st-century Skills
- Collaboration
- Creativity
- Critical thinking
Motivation/Engineering Challenge
Greentown’s population has been growing at an increasingly fast rate and local farmers are having a hard time producing the fresh food that the residents need. Like engineers, you will work in groups to explore how food production in Greentown has changed with the increasing population.
Materials 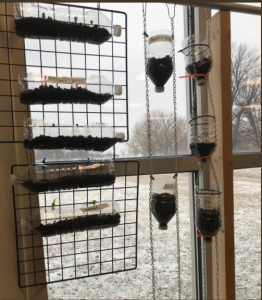
For the whole group
- Engineering Design Process poster
- colored markers
- 1 paper towel roll
- 1 sticky notepad
- 1 utility knife (for educator use)
- 1 light and moisture meter
- 2 measuring tapes
- 2 rolls of duct tape
- 2 rolls of masking tape
- 4 pitchers of water
For each group of 3
- 1 plastic aquarium plant
- 1 flashlight
- 1 pair of scissors
- 1 set of Food Production Cards
- 1 room (storage cube) created during previous lesson
For each youth
- Engineering Notebook [ENGLISH PDF]
- Engineering Notebook [SPANISH PDF]
For Materials Store
- 1 roll of aluminum foil
- 1 package of modeling clay
- 8 water pumps
- 12 mirrors
- 12 tubing connectors
- 12 tubing splitters
- 16 aluminum trays
- 16 deli containers, 16 oz.
- 16 lbs. soil
- 80 ft. of vinyl tubing, 1/4 in.
- 100 craft sticks
- 100 pipe cleaners
Procedure
- Post the Engineering Design Process poster.
- Gather about 16 lbs. of soil. If you are using the aquarium plants, it does not have to be soil specific for growing plants.
- Lay out supplies for the Materials Store.
- Set aside materials for each group.
- Review Materials Store Extra Challenge (p. 47 in the guide) and decide whether you would like to include a budget requirement for your group.
Introduction (5 min)
- Tell youth that they are now ready to begin their final design challenge. Have them form groups of 3 that they will remain in for the rest of the unit and turn to The Challenge, p. 16 in their Engineering Notebooks. [Spanish]
- Review the challenge and the criteria and constraints as a group, as well as the materials they will have available. Ask: What is the Greentown City Council asking us to engineer? Why? A model of a vertical farm that can supply food to the citizens of Greentown.
- Explain that each group will make one room of the vertical farm, and those rooms will be combined to form a vertical farm structure. This design will be presented during the City Council Presentation, the last activity of the unit.
Greentown’s Vertical Farm (15 min)
-
- Explain that the whole group will now decide how the rooms of the vertical farm will be arranged to form one complete vertical farm building. Let youth know that the building must be at least three rooms high, as stated by Greentown’s City Council.
- Give each group a sticky note and have them write their names on it. This will represent their room of the vertical farm.
- As a group, have youth decide how the rooms will be stacked by rearranging the sticky notes until an agreement is reached. When the arrangement is finalized, tape the notes together and display them somewhere in the classroom where youth can refer back to them.
- Have youth stack their empty rooms in the arrangement they decided upon. They should not attach them yet. Ask:
• What do you notice about the location of your room?
• Where can light enter your room?
• Where will your water reservoir be located? How
much tubing will you need to reach your water reservoir? - Tell youth that they will now decide where the light source (flashlight) will be located. The flashlight must be located on the outside of the room with the light projecting in. Each group should decide where the light would likely be coming from given their room’s position. Rooms on the top level may have light coming in from the top or sides, while rooms in the first two layers can only have light coming in from the sides.
- Give each group a pipe cleaner. Tell groups to decide where their light source will be located. They should form a circle out of the pipe cleaner and tape it to the location where the flashlight will be held. This will ensure that the flashlight will be tested at the same position throughout the remainder of the challenge.
Imagine and Plan (10 min)
- Have youth read through Test, p. 18 in their Engineering Notebooks, to review how their models will be tested.
- Let youth know that today they will work in their groups to imagine, plan, and create their room of the model vertical farm for Greentown. They can visually assess how their systems are working as they create, but they will officially test the light and water systems in the next activity.
- Show groups the materials they will have available for their designs.
- Give group 5 minutes to imagine and plan their designs. Let youth know that they can plan their vertical farm designs on Plan, p. 17 in their Engineering Notebooks. [Spanish version]
- As groups are finalizing their plans, circulate and ask:
- How did you decide on this design and these materials?
- What do you think will work well about your design?
Create (25 minutes)
1. Have groups visit the Materials Store to collect their supplies.
2. As groups work, rotate among them, encouraging what they are doing and asking them to explain how they are engineering. Ask questions like:
• Which parts of your design are working well?
• What aspects of your design have you modified since you started? Why?
• What do you predict will happen when you test your design?
3. If groups would like an additional challenge, encourage them to use one or multiple Food Production Cards from Prep Activity 2 and place them somewhere in their vertical farm room. They should make sure that these model plants also receive adequate light.
4. When time is up, have youth clean up their materials and tell them that they will test their designs in the next activity.
Reflect (5 minutes)
1. Gather youth around the Engineering Design Process poster. Point to each step of the Engineering Design Process and ask:
• How did you use this step today? We planned, created, and tested designs, and made improvements.
2. Let youth know that next time they will combine the rooms of the vertical farm to create the model for Greentown. Ask:
• How did the original design you planned change as you were creating your model vertical farm room?
• What challenges do you think you will face when combining multiple systems into a single vertical farm model? There is limited space; it can get
complicated; the more connections you make, the greater chance there is for something to go wrong.
• Why do you think using models before building is helpful for engineers? Encourage all answers. Youth may say that it saves materials and time, the model can help you see potential problems, designs need to be approved by the client, etc.
Troubleshooting tips
- The vertical farm building should be no more than four rooms tall to prevent the structure from tipping over.
- If you feel that it will be overwhelming for your group to have access to all of the materials during this lesson, consider holding back the soil and water until the next activity.
- If groups have access to both soil and water, their soil may become saturated with water as they design and test. Have dry soil available to replace wet soil. Spread out wet soil so that it can dry and be reused during the next activity.
Activity scaling
- For an additional challenge, consider adding a budget. Suggestions can be found on p. 47. If using the budget, teams should add the cost of the materials to their materials list.
Resources
To see an example of a vertical farm that was built within an existing building, show them the Plant, a vertical farm in Chicago that was built in
what used to be a pork packing facility: http://www.plantchicago.com/
Engineering an Indoor Vertical Garden. Tufts University’s Center for Engineering Education Outreach has a community-based engineering design initiative that includes a learning module using the engineering design process to build a vertical garden, including watering system.
Room to Grow. Cover story on vertical farming that ran in the March/April 2018 issue of ASEE’s Prism magazine. [PDF]
Examples of vertical gardens:
Mirai in Tokyo ranks as the world’s largest indoor farm; the former Sony semiconductor factory ships out 10,000 heads of lettuce a day.
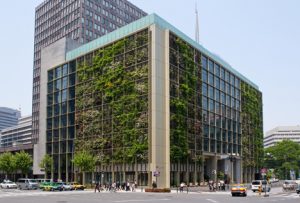
Tokyo’s Pasona (photo, below) refurbished a 50-year-old building, with one fifth of its 215,000 square feet devoted to growing fruits, vegetables, and rice.
In the crowded city-state of Singapore, Sky Greens claims to be the world’s first low-carbon, hydraulic-driven vertical farm.
 In Linköping, Sweden, meanwhile, a firm called Plantagon says it plans to erect a 16-story “plantscraper,” with offices on one side and on the other, a vertical farm in which crops will be grown hydroponically using both LEDs and natural light.
In the United States, one of the fastest-growing ventures is AeroFarms, based in Newark, N.J.
Vertical Harvest of Jackson in Jackson, Wyo., is one of the world’s first vertical greenhouses. Located on a sliver of vacant land next to a parking garage, the 13,500-square-foot, three-story facility uses a tenth of an acre to grow produce equivalent to five acres of traditional agriculture and supplies it fresh to local grocery stores and restaurants. 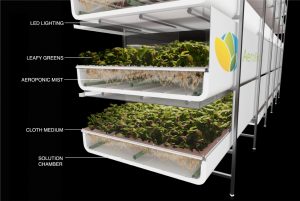
Across the state in Laramie, entrepreneur Nate Storey launched the vertical farm Bright Agrotech after earning an agronomy doctorate from the University of Wyoming. His company has since been acquired by a Silicon Valley firm, Plenty.
Within universities, research on vertical farming falls under controlled environment agriculture (CEA), a term that encompasses both greenhouse produce and plant factory and warehouse-style production. The University of Arizona’s Controlled Environment Agriculture Center (UA-CEAC) recently launched a new two-floor vertical farm known as the UAgFarm for research and to provide experiential educational opportunities for students and educate growers and the public on indoor growing systems. It occupies 750-square-feet with two individually controlled chambers, one on each floor, with two racks, each with two layers of floating, raft-based hydroponic systems. Undergraduate and graduate engineering students designed the systems for it. Other colleges involved with CEA and vertical farming include Cornell.
Filed under: Class Activities, Grades 6-8, K-12 Outreach Programs, Lesson Plans, Web Resources
Tags: agriculture, Class Activities, crops, EiE, Engineering Design Process, engineering grand challenges, Engineering is Elementary, Engineering is Everywhere, Environmental Engineering, Environmental science, food supply, Grades 6-8, greenhouse, plant science, school gardens, STEM education, vertical farming, Web Resources