


Build a Pop-Up Card or Book

Activity adapted from Teachengineering.org’s Engineering Pop-Ups and PBS Kids Design Squad Nation’s Build a Floating Box Pop-Up Card.
Summary
In this activity, students in grades 3 to 8 learn about applied forces and elements of the engineering design process by creating a pop-up card or book.
Grade level: 3-8
Time: 50 (for card) – 120 minutes (for book)
Engineering Connection
Just like forces travel from your hand to move an object, engineers want forces to “travel” in their designs as well. For example, in the construction of buildings and bridges, engineers make sure the forces acting upon the structures (people, washing machines, trucks, wind, snow, etc.) will be safely transferred to foundations in the ground. During the engineering design process, they do this by adding up all the potential forces that could be applied to a structure and drawing free-body diagrams — drawings that help to visualize how forces act upon an object — to ensure that the structure will not collapse.
Learning Objectives
- Define a force and identify several forces in their environment.
- Understand how forces work in a pop-up book.
- Use brainstorming as a means to generate ideas for a work of art.
- Use the engineering design process to create a product for a client.
Standards
International Technology and Engineering Educators Association
- H. Modeling, testing, evaluating, and modifying are used to transform ideas into practical solutions. [Grades 6 – 8]
- H. Apply a design process to solve problems in and beyond the laboratory-classroom.
- J. Make two-dimensional and three-dimensional representations of the designed solution.
Next Generation Science Standards
- Generate and compare multiple possible solutions to a problem based on how well each is likely to meet the criteria and constraints of the problem. [Grades 3 – 5]
Introduction/Motivation

Materials 
- Paper (8.5 x 11 inch copier or construction paper)
- Tape
- Scissors
- Glue stick
- Ruler
- General art supplies for decorating & writing messages
For the entire class to share:
- Several pop-up or movable books from the library or home
- Stapler (or needle and thread to stitch through several sheets of paper)
- How to Make Tabs (PDF)
- How to Make Flaps (PDF)
Procedure (For Card)
- Fold the paper in half. On the crease side of the paper, make two straight, inch-long cuts.
- Define the tab: Bend the tab up and over, and fold it flat.
- Make the box: Push the tab into the card. This turns it into a box that sticks into the card. Once the box is in the card, close the card and press the box flat. • Open the card and check that the box pops up.
- Add a character: Glue a drawing or photo onto the box.
- Add a cover and message: Glue on a cover to hide the cut you made. Add a message and decorate your card.
Activity Extension
Make a fancier design by using two or more boxes. Or make several boxes that are different lengths and widths. This lets characters pop up in different places, like near the front and near the back of the card.
Procedure (For Book)
Before the Activity
- Gather materials and bring to class example pop-up books from the library or home.
- Divide the class into teams of two students each.
- Research: Have the student teams browse through the pop-up books, paying careful attention to why and how parts of the book move, and where the forces are applied.
- The Design Process. Write on the board the main steps in the engineering design process, and discuss with the students.
With the Students
- On Day 1, start a discussion about pop-up books by asking if anyone has read a pop-up book. Do you know how they work? Take guesses on when they were first invented. (Answer: 500 years ago.)
- Information gathering. List on the board all the different design techniques found in the example pop-up books. (Possible techniques: Revolving disks, push/pull tabs, lifts/flaps.) Also note that some books create movement only by the reader moving a disk, tab or flap, while others move simply with the motion of turning a page.
- Understand the science. Review with the students how the forces travel from the student’s hands along the tabs or through the book pages to cause movement. It may be helpful to draw arrows that represent these forces on the board (see Figure 1).
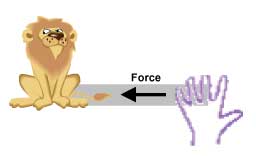
Copyright © 2004 Natalie Mach, using Microsoft Corp. clip art. ITL Program, College of Engineering, University of Colorado Boulder
- With the remaining class time, have the student teams write a short story that they will illustrate in their pop-up book. Decide if the book will be a simple children’s story created for a child they know, or perhaps a comic book designed for themselves. The story length can be five sentences to five pages. Remind students that some books have no words or very few words; paper engineers design books so the pictures (illustrations and movement) tell the story.
- An important part of the engineering design process is creating a diagram of your design. This step helps make the project real so decisions can be made and refined for a better end product. Have the students divide their story into approximately five pages, and draw rough sketches (words and pictures) to lay out each page.
- Brainstorming is important in the engineering design process. Working in a team helps everyone come up with creative ideas. Have the students brainstorm unique ways to make their pictures move. Which illustrations will move? In what way? What movement(s) help to tell the story best? Find ideas in the example pop-up books and talk with other students about possible ideas. Brainstorm creative and silly ideas that use the materials available.
- Planning ahead is a very important part of the engineering design process. Why? (Answers: It helps with the collection of materials, prevents the wasting of materials, saves time during the construction phase, and keeps projects organized so other people can understand what is going on.) Have the students plan how they will make some of their illustrations move. What will be on the page background? What will be on the flap or tabs? What will be the tab/flap shapes? Where will be the folds? How will the moving pieces be attached? Practice with a prototype (or mock-up), until it works the way you want. Use the suggestions provided in the How to Make Tabs and How to Make Flaps attachments.
- On Day 2, continue with the pop-up book making process. After the students have shown they have a good grasp on how they want to complete their project, they can begin the construction phase.
- Share the construction tasks among the team members. The first step is to create the base pages of the book. Have each student team figure out how many pieces of paper they need based on the number of finished pages in their book when the 8.5 x 11″ paper is folded in half. Plan to include a cover page and a title page. For instance if a story is six pages long, the team needs three pieces of copy paper for the story, one piece for the title page and one piece of colored construction paper for the cover.
- Have students stack their book page papers, placing the construction piece on the bottom (see Figure 2).
- Next, have students fold the stack of papers in half so that the construction paper is on the outside, creating a front and back cover (see Figure 2).

Copyright © 2004 Natalie Mach, using Microsoft Corp. clip art. ITL Program, College of Engineering, University of Colorado Boulder
- To make a binding, either staple the fold of the book, or use a needle and thread to stitch the pages together (see Figure 2).
- Next, the students may proceed to add the story, illustrations and moving parts to the blank book. Create a title page that includes the components found on the title page of other books (title, author(s), illustrator(s), location, date).
- When all students have completed their books, have each team present them to the class. They should be able to describe the type of forces that cause their book parts to move. Discuss the creative ideas used in the pop-up books. Do they function well? Do they have any ideas for improvement? Who is the end user of their book? How did the steps of the engineering design process work for your team? Deliver the pop-up books to younger students and see how they are received.
Safety Issues
- Students should be careful when handling scissors.
- If needle and thread are used, students should be careful when handling the needles.
Troubleshooting Tips
Activity Extensions
Activity Scaling
- For younger students (grades 3-4), print out instructions from one of the how-to books and stick to simpler flap designs.
Additional Resources 
Make Your Own Pop-Ups Best-selling children’s author Robert Sabuda’s website shows how to make a variety of pop-ups, from bats to ships to witches… even the Emerald City of Oz.
Paper Engineering Animation and video galleries are part of the Smithsonian’s exhibition entitled Paper Engineering: Fold, Pull, Pop & Turn, which presented more than 50 examples of “action-packed constructions and inspired works of art spanning 500 years.”
Folding Frontier ASEE Prism magazine January 2013 cover story on origami engineering.
Fold, Pull, Pop & Turn. [YouTube 7:50] The making of a pop-up book, featuring book artist Chuck Fischer and paper engineer Bruce Foster from the Smithsonian’s Paper Engineering: Fold, Pull, Pop & Turn exhibition, which was on display in the Libraries Exhibition Gallery in the National Museum of American History through September 2011.
The Magic Moment. [Vimeo 7:30] German paper engineer Peter Dahmen creates magical, moving sculptures out of paper.
Filed under: Class Activities, Grades 6-8, Grades 6-8, Grades K-5, Grades K-5, Lesson Plans
Tags: book making, Class Activities, diagram, engineering design proces, folding, forces, Grades 6-8, Grades K-5, Lesson Plan, NGSS, paper, paper engineering, pop-up card