Build a Bobsled Racer
Activity adapted from the Museum of Science, Boston‘s Design Challenges, a program of hands-on activities developed to help students and visitors explore the engineering design process, and from this version modified for classroom use by California’s Tech Museum of Innovation. Click on link to view the educator’s guide (.pdf)
Summary
Teams of students in grades 3 to 8 learn about friction, forces, and the engineering design process by building and testing miniature bobsleds to see which can race down an icy slope either the fastest or slowest.
Grade level: 3-8
Time: 20 minutes for the activity, 10 minutes for setup and clean up.
Learning outcomes
After doing this activity, students should be able to:
- Demonstrate their knowledge of potential and kinetic energy.
- Apply their knowledge of friction, drag, mass, and gravity to the design of their bobsleds.
- Gain a first-hand understanding of the design process that engineers and scientists undergo, and (for older students) apply concepts of aerodynamics, acceleration, velocity, and terminal velocity.
Standards
International Technology and Engineering Educators Association
Energy is the capacity to do work. [Grades 6 – 8]
Next Generation Science Standards
- Develop a model to describe that when the arrangement of objects interacting at a distance changes, different amounts of potential energy are stored in the system [Grades 6-8]
- Construct, use, and present arguments to support the claim that when the motion energy of an object changes, energy is transferred to or from the object. [Grades 6-8]
The Challenge
Design a bobsled to race down the icy slopes as quickly or as slowly as possible.
- Bobsled track (make from plastic rain gutters, with wooden block to brace it)
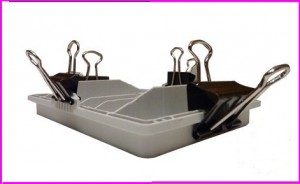
- Bobsled base (1 per team; plastic pipette-tip storage trays work well, or use the bottom of plastic soap dishes. Alternatively, students can make their racers out of stiff paper, such as brochures, cardboard, craft sticks, toothpicks, twist ties, and rubber bands)
- Strips of fabric (3″ x 8″)
- Duct-tape covered, dead AA batteries
- Pipe cleaners
- Plastic straws
- Binder clips
- Stop watch (to time trial runs)
Procedure
Before the activity
Make a multiple-lane bobsled course out of plastic rain gutters. Mark the start and finish lines with a dark marker, and brace the lanes with a wooden block.
Activity
1. Planning. Ask students to explore the available materials, seeing which are the heaviest or lightest. Which materials slide well across the table? Have them test some of the sample materials to see how they perform and brainstorm different combinations for their bobsleds. Decide whether the bobsled will be a fast or slow one. Discuss different possible solutions with their teammates, then pick an idea to design and test.
2.Create. Ask teams to determine which materials to use and construct their designs. Will they change the surface material or the weight? How will they attach all of the components to the bobsled chassis?
3. Test. Teachers and volunteers might want to help teams test their designs. Be sure they test multiple designs and keep track of the results. (See page 2 of student worksheet. Click HERE for PDF.) Ask them to try changing just one thing on their design and testing again.
4. Improve. Which design worked best? What did you learn from your tests? How could you make an even faster or slower bobsled? Plan your new design like before and then ask design challenges staff to help you test it. Is your new design faster? slower? Why?
Extensions
- Change the angle and length of the bobsled track. Investigate the results of increasing potential energy (length and height of hill). How does it effect the acceleration and velocity of the bobsled?
- Restrict the weight to 8 oz. or lighter. How does that affect the bobsled’s performance?
- Have students identify where on the track their bobsled has zero kinetic and potential energy.
1. Friction:
Have students rub their hands together. Do they feel the heat? That is the energy from the movement of their hands being converted to thermal energy (i.e. heat) through friction. Potential energy that becomes heat cannot become motion. Low friction means less energy is lost to heat, leaving more energy for the bobsled to go faster.
Get a paperclip and a rubber band. Ask the designer which one they think will go fast down the track. Drop the paperclip in one track and the rubber band in the other. The paperclip will slide down the track while the rubber band will stick at the top.Which one has higher friction? The rubber band. Things with more friction are“stickier.” Kids seem to have an innate understanding that sticky things don’t move well.
2. Terminal velocity
Slide an empty matchbox and a matchbox full of pennies down the track. The pair have the same profile to affect their aerodynamics, but the heavier box will slide down the track faster.
Additional Resources
Museum of Science, Boston’s bobsled design challenge. Three students design and race bobsleds and videotape interviews with museum scientists. [YouTube 6:44]
Bobsled through the eyes of driver Steven Holcomb. USA Today video gives a bird’s eye view of shooting down an icy chute. [YouTube 1:23]
What a Drag! Aerospace engineering-related activity to reinforce friction and drag concepts from Teachengineering.org.
Steven Holcomb shows what it’s like to drive a bobsled:
[youtube]http://www.youtube.com/watch?v=5KvwdEsrqEY[/youtube]
Image of bobsled racers made from pipette trays from indestructibles.com.
Filed under: Class Activities, Grades 6-8, Grades 6-8, Grades K-5, Grades K-5, Lesson Plans
Tags: Aerodynamics, Bobsled, Boston Museum of Science, Energy, Engineering Design Process, friction, glide, kinetic energy, Olympics


