Lesson: Solar Water Heater
Lesson courtesy of TeachEngineering.org and the Integrated Teaching and Learning Program, College of Engineering, University of Colorado at Boulder.
Grade level: 9-11
Time: 240 minutes (four one-hour sessions over four days)
Cost: $10 for each 3-member team
Summary: Student teams gain a better understanding of heat transfer and engineering by designing and building solar water-heating devices that mimic those used in residences. Once the model devices are constructed, students perform efficiency calculations and compare designs.
International Technology Education Association Standards
- G. Humans can devise technologies to conserve water, soil, and energy through such techniques as reusing, reducing, and recycling. (Grades 9 – 12) [2000]
- J. Energy cannot be created nor destroyed; however, it can be converted from one form to another. (Grades 9 – 12) [2000]
- K. Energy can be grouped into major forms: thermal, radiant, electrical, mechanical, chemical, nuclear, and others. (Grades 9 – 12) [2000]
- L. It is impossible to build an engine to perform work that does not exhaust thermal energy to the surroundings. (Grades 9 – 12) [2000]
- M. Conservation is the process of controlling soil erosion, reducing sediment in waterways, conserving water, and improving water quality. (Grades 9 – 12) [2000]
Massachusetts Science and Technology/Engineering Standards:
- 1.3 The transfer of energy through radiation, conduction, and convection contributes to global atmospheric processes. (Grades 9 – 12) [2006]
- 1.3 Explain how the transfer of energy through radiation, conduction, and convection contributes to global atmospheric processes, such as storms, winds, and currents. (Grades 9 – 12) [2006]
- 3.1 Explain how heat energy is transferred by convection, conduction, and radiation. (Grades 9 – 12) [2006]
- 3.2 Explain how heat energy will move from a higher temperature to a lower temperature until equilibrium is reached. (Grades 9 – 12) [2006]
- 3.4 Explain the relationships among temperature changes in a substance, the amount of heat transferred, the amount (mass) of the substance, and the specific heat of the substance. (Grades 9 – 12) [2006]
Learning Objectives. After completing this activity, students should be able to:
- Identify locations in the solar water heater at which each type of heat transfer is being utilized.
- Explain why solar energy is a good alternative to the combustion of natural gas.
- Explain how the engineering concepts in this design project can be applied to solve real-world problems.
Materials
Each group needs the following items to make a heated water storage tank:
- Water container large enough to hold at least 1 liter (.22 gal), such as a plastic container (easier to cut) or coffee can
- Cardboard box, sized so it is about 1-inch (2.5 cm) bigger than the water container on all sides
- Insulation material (such as Styrofoam pellets, cotton, or crumpled newspaper)
- 2 feet (61 cm) of plastic tubing (3/8-inch inside diameter, ½-inch outside diameter)
Each group needs the following items to make a solar collector:
- Cardboard box with transparent cover (4-inch deep box, ~12 x 12-inch, or 30 x 30 cm) with a transparent cover (sized to match box area dimensions) made from rigid clear plastic, saran wrap or other thin and transparent plastic material) or a disposable baking sheet pan, 9-inches x 13-inches x 2-inches deep (23 x 33 x 5 cm), that comes with a fitted clear plastic cover
- Insulation material (such as Styrofoam pellets, cotton, or crumpled newspaper)
- Cardboard piece, same size as floor area of cardboard box or sheet pan
- 3 feet (91 cm) soft copper tubing (3/8-inch outside diameter; available at hardware stores)
Each group needs:
- Stopwatch (or a watch or timer to keep track of the passage of time up to 20 minutes)
- 4 Styrofoam cups (any size, but matching sizes so easy to double up for insulating purposes)
- Solar Water Heater Design and Analysis Worksheet, one per team
For the entire class to share:
- Scissors, to cut plastic and cardboard
- Packing or duct tape, and stapler, to make/modify cardboard boxes
- Drill (optional), to make a hole in a metal container; bit sized to create hole for plastic tubing
- Waterproof glue, such as epoxy or gorilla glue
- Aluminum foil, to line inside walls and base of solar collector
- Black spray paint
- String or twine, to tape to coiled copper tubing to help with measuring
- Copper tubing bender tool (see Figure 4; if not available, have students use a rigid cylindrical surface to bend the tubing around)
- Copper tubing cutter (see Figure 4; inexpensive and available at hardware stores) or a hack saw (cuts are not as clean)
- Hammer (optional), to hammer out kinks in the copper tubing
- Jug, to carry water outside
- 1 liter measuring cup
While solar water-heating devices can be extremely expensive, their basic design is simple enough to make using common materials found at hardware stores. Since up to 25% of a typical home’s energy bill goes to heating water, homeowners can save money each year by using sunshine rather than electricity or natural gas. In fact, even a system that costs $7,000 to install could pay for itself in less than five years! Think of the impact if more of the world’s housing incorporated solar energy devices.
Activity Schedule: Student teams design, create and test their own solar water heater devices according to the following activity stages.
- Day 1 (60 minutes) design and create water containers (tanks)
- Days 2 and 3: (120 minutes) design and create solar collectors, and attach them to the water tanks
- Day 4 (60 minutes) test and evaluate the solar water heater devices outside on a sunny day
Before the Activity
- Ask students to bring any supplies that are readily available from home (such as plastic or metal water containers, cardboard boxes, insulation materials, plastic covers, saran wrap, aluminum foil, watches, Styrofoam cups, etc.).
- Gather materials.
- Prepare solar water heater examples to show to the students. This might be photographs, or a solar water heater made in advance by the teacher, or old student examples, or an actual solar water heater taken apart.
- Make copies of the Solar Water Heater Design and Analysis Worksheet, one per team.
Day 1: Design/Build Water Containers (60 minutes)
Accomplish the following during Day 1:
- Divide the class into groups of two or three students each.
- Give each group a copy of the four-page Solar Water Heater Design and Analysis Worksheet.
- Explain how the finished product might work, and show examples.
- Direct student teams to design their water heater within the constraints of the provided materials (see Part 1 on worksheet). As they work through this stage, provide guidelines and suggestions to help them out, as needed.
- Have students gather materials.
- Have students create their water storage container (tank) according to the Part 1 procedure described below.
Part 1: Water Storage Container Design
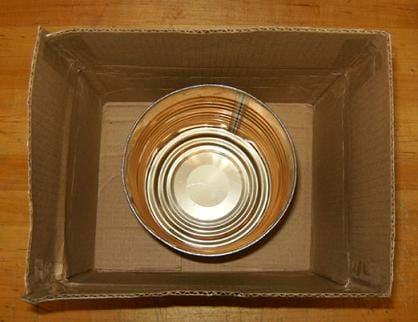
Use cardboard, scissors and strong tape to make a box to house the water container, or use/modify an existing box of the right/similar size. Leave at least 1 inch (2.5 cm) on each side for insulation (see Figure 1, above).
- Cut or drill a hole that matches the diameter of the ½-inch plastic tubing near the bottom of the water container.
- Fit the container into the box and cut a hole in the box, also the same diameter as the plastic tubing, at the point at which the water container hole lines up.
- Insert plastic tubing into the hole in the box and water container (see Figure 2). Seal any gaps around the tubing with waterproof glue to prevent leaking.
- Fill the area between the box and the water container with insulating material (see Figure 2).
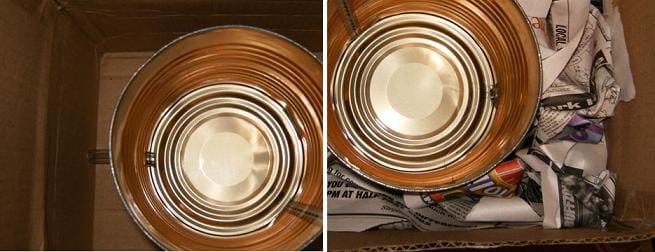
Figure 2. (left) Cut a hole near the bottom of the water tank to accommodate the plastic tubing, and extend the tubing through a hole in the box at the same height. (right) Fill in the gap between the water tank and the box walls with insulating materials.
Days 2 and 3: Design/Build Solar Collectors (120 minutes)
Accomplish the following during Days 2 and 3:
- Have student teams design and build a solar collector as described in the Part 2 procedure below.
- Direct them to use one of the two copper tubing designs provided (described under Example A and Example B), or create their own. Creating a collector with a long coiled copper pipe through which water flows (Example A) works in a cardboard box collector. Creating a collector with a series of parallel pipes across which water flows perpendicularly (Example B) requires a waterproof container such as a disposable baking sheet pan with a fitted clear cover.
- As part of the design process, encourage students to find a way to bend their copper tubing (around something circular) and explain why using just their arms does not work (described below).
- Final assembly. Have students attach their water storage container to their collectors, according to the Part 3 procedure described below.
Part 2: Collector Design
- Use cardboard to create a box (or use/modify an existing box) about 4-inches deep that matches the size of your transparent plastic cover sheet. In this approach, water flows through the copper tubes, so a water tight collector is not necessary (cardboard box works fine).
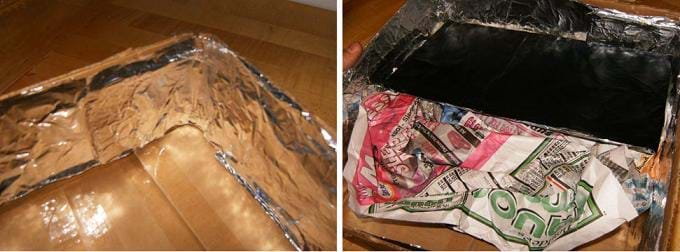
- Line the inside walls of the box with aluminum foil, shiny side out (see Figure 3).
- Layer the bottom of the box with about 1 inch (2.5 cm) of insulating material.
- Cut a piece of cardboard to fit the inside floor of the box. Cover it with aluminum foil and paint it black, then place it over the insulated floor of the box (see Figure 3).
- Direct student teams to determine their coil design. Two examples, A and B, are described below, copper bent into curves and copper in straight pieces. Or, student teams can create their own design.
- Guide students as they measure, bend and cut the soft copper tubing allotted for their team. Share the following tips to help them work with the copper:
- Measuring the copper tubing: Copper tubing usually comes in a coil (see Figure 4). To measure the length of it accurately, use a premeasured piece of string (such as 12 inches) as a flexible ruler. Tape it along the coiled tubing as demonstrated in Figure 4.
- Bending the copper tubing: To bend the tubing, use a copper bending tool (see Figure 4), or a rigid curved surface that has the desired radius. To make straight pieces, use the bender to remove the slight curve of the coiled copper. Note: The copper cannot be bent just using your arm strength because you will not get the desired radius, and you will probably kink the tubing. If the pipe gets kinked, you can partially fix it by hammering it back into shape.
- Cutting the copper tubing: Use a copper tubing cutter (shown in Figure 4), or a hack saw.
Coil Design – Example A:
- For one design approach, bend the copper tubing into a continuous S-shape. Figure 5 provides an example with dimensions; modify the measurements and shape according to the team’s design preference.
- Use spray paint to paint the copper tubing black.
- Cut two holes in the box that align with the points at which the copper tubing comes out.
- Insert the copper tubing into the box and secure it with glue (see Figure 5).
- Cover the box with its plastic sheet cover, and seal the edges.
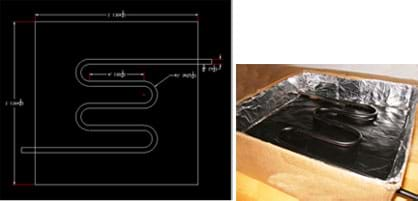
Figure 5. (left) Example drawing shows the dimensional specifications for the bent copper tubing layout for design example A. (right) Insert your bent and painted copper tube into the collector, extending the piping out of holes on either side of the box.
Coil Design – Example B
- For another design approach, cut three or four 8-inch (20.3-cm) pieces of straightened copper tubing and glue them to the bottom of a disposable baking pan. Paint the entire bottom black (see Figure 6). In this approach, water flows over the tubes so the collector must be water tight.
- Cut holes in both of the shorter sides of the baking pan (see Figure 6). Make the hole diameters the same size as the copper tubing.
- Insert two pieces of short, straight copper tubing (½-inch to 1-inch length, or 2.5 to 5 cm) extending out of each hole in the pan (see Figure 6).
- Cover and secure the box with its transparent cover.

Figure 6. (left) Cut holes in the side of the baking pan sized to accommodate the copper tubing. (middle) Glue black-painted pieces of straightened copper tubing to the floor of the baking pan. (right) To connect the baking pan to the reservoir, use short pieces of copper tubing, secured into holes in the side of the baking pan
Part 3: Assembling the System
Attach the plastic tubing to the end of the copper tubing. Seal the connection with waterproof glue (See Figure 7 for finished product).
Day 4: Test Solar Water Heaters (60 minutes)
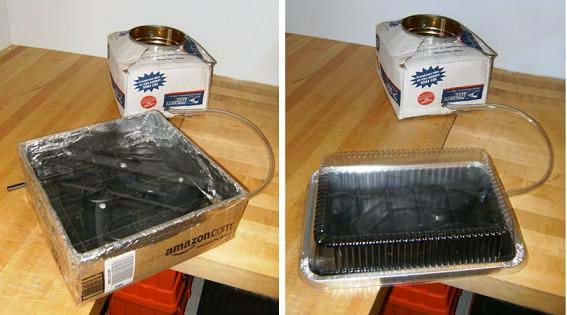
Figures 7. Ready to test! Two designs of completed solar water heaters, with the tank and solar collectors connected, examples A (left) and B (right)
Accomplish the following during Day 4:
- On a sunny day (it is okay if it is cold, but it must be sunny), bring the class outside to test their model solar water heater devices. Bring timers, worksheets, jug of water, measuring cup and Styrofoam cups.
- Have students organize within their teams and assign roles (circulate water through the system [collect and pour], timer, measure temperature, record measurements, etc.).
- Have students follow the experimental test procedure steps described in the worksheet.
- Once all groups have recorded their data, bring the class back inside.
- Have students complete the calculations and evaluation steps of the worksheet. Encourage them to work as a team and discuss each question before agreeing upon their answer.
- Once students have completed all four pages of the worksheet, lead a class discussion to review their findings and explore re-design (improvement) ideas. For details, see the post-activity assessment in the Assessment section.
Pre-Activity Assessment
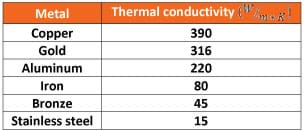
Question/Answer: Write the following information on the board. Ask the students and discuss as a class:
 |
|
Copyright © ITL Program, College of Engineering, University of Colorado at Boulder.
|
- Looking at this table of conductivity values for certain metals, what is the reason for choosing copper tubing for a heating device? (Answer: It has the highest conductivity value and thus transfers heat the fastest.)
- What is the purpose of insulating a water tank? (Answer: To prevent the transfer of heat out of the tank and back into the atmosphere [improve efficiency, achieve optimization].)
- What is the point of painting the copper tubing black in a heating device? (Answer: Black absorbs more solar energy than any other color, reflecting only 3% of the sunlight that hits it. By using black, we help more heat to be absorbed by the water.)
Activity Embedded Assessment
Worksheet: Have student teams use and complete the activity worksheet; review their answers to gauge their mastery of the subject. (Solar Water Heater Design and Activity Worksheet Answer Sheet.)
Post Activity Assessment
Group Discussion: Ask students and discuss either as a class and/or amongst teams:
- Can all three types of heat transfer be observed in the finished product? If so, where? (Answer: Yes, the system absorbs heat through radiation from the sun, the heat is then conducted through the copper piping and to the water, and the warm water transfers its heat to the cooler water in the tank by convection.)
- What are the pros and cons of using this type of heating system for your home water heating needs? (Possible answers: Pros — Uses a renewable energy source, reduces the use of energy from fossil fuel sources, reduces emission of harmful chemical byproducts to the environment, and reduces the cost of your utility bill. Cons — Cannot collect the sun’s energy during the night and during times when cloud cover blocks the sun, which is much of the year in some locations; requires up front cost to install the system; cannot completely replace another type of system.)
Engineering Re-Design Queries: Have students think about their water heater design and the trade-offs involved. What worked? What didn’t work? What is the reasoning behind the way you built your water heater? Could you have built it a better way? What if you had unlimited materials or different time constraints? If time allows, or for homework, have students make a sketch or write a description about design changes they would make and why.
Troubleshooting tips. If you have trouble bending the copper tubing, try using a larger radius rigid guide, such as a sturdy cylindrical pipe or another suitable object found around the school. It sometimes helps to have extra tubing to serve as a longer lever to pull on when bending the copper (to increase the torque exerted).
If your copper tubing gets a kink in it, hammer it out on a hard surface, and then straighten it out again.
Activity extensions. Have students come up with some ways to improve the overall efficiency of their device based on their observations and assuming no constraints on materials. Have students improve their design by modifying it, using a new material, or swapping out a material (if possible).
For younger students. Instead of building a water heater, bring in some sort of heat exchanger and let them measure its heat transfer.
For more advanced students. Incorporate a simple pumping system (such as a small aquarium pump) into the water heater so the water can circulate on its own much as it would in a large-scale water heating system.
Extra credit.
You’re in Hot Water, Now! Teachengineering.org solar water heater activity for grades 3 -5 using aquarium tubing, Styrofoam cups, and other readily available materials.
Feel the Heat! A NASA/Design Squad solar water-heater challenge for grades 9-12 using plastic tubing and a goosneck lamp for heat.
Developed by the Integrated Teaching and Learning Program, College of Engineering, University of Colorado at Boulder. Contributors: Landon B. Gennetten, Lauren Cooper, Malinda Schaefer Zarske, Denise W. Carlson.
Photos © Landon B. Gennetten, ITL Program, College of Engineering, University of Colorado at Boulder.
© 2007 by Regents of the University of Colorado
Illustration © URL Montgomery County, MD, Department of Environmental Protection
Filed under: Grades 6-8, Grades 9-12, Grades K-5, Lesson Plans
Tags: Energy and Environmental Technology, Environmental Engineering, Environmental science, Grades 9-12, Green, Green Technology, Lesson Plans, Solar Energy, Solar Engineering


