


Lesson: No Valve in Vain
Lesson from TeachEngineering.org. Contributed by the Techtronics Program, Pratt School of Engineering, Duke University.
Note: This activity, part of a teachengineering curricular unit on Engineering and the Human Body that includes a lesson on the heart, could be enhanced with two preliminary heart-valve activities – Engineering the Heart and Saving a Life: Valve replacement
Grade level: 6 – 8
Time: 90 minutes
Summary
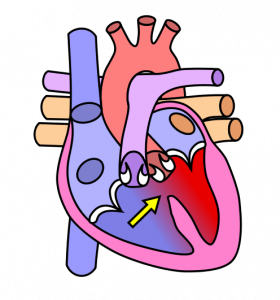
In this activity, teams of middle school “biomedical engineers” will learn about the engineering design process and how a one-way valve works by creating heart valves from tape, plastic tubing and a variety of other materials.
Learning Objectives 
After doing this activity, students should be able to:
- Discuss how valves in the heart work
- Discuss what a prosthetic valve is and how it works
- Explain how engineering contributes to solving problems in the body
- Show a model of a prosthetic valve which they themselves have designed, constructed, and tested
- Explain how the heart valve they created works and why they chose their design
Standards
Next Generation Science Standards
- Define the criteria and constraints of a design problem with sufficient precision to ensure a successful solution, taking into account relevant scientific principles and potential impacts on people and the natural environment that may limit possible solutions. [Grades 6 – 8]
- Evaluate competing design solutions using a systematic process to determine how well they meet the criteria and constraints of the problem. [Grades 6 – 8]
- Science & Engineering Practices: Define a design problem that can be solved through the development of an object, tool, process or system and includes multiple criteria and constraints, including scientific knowledge that may limit possible solutions.
- Disciplinary Core Idea: The more precisely a design task’s criteria and constraints can be defined, the more likely it is that the designed solution will be successful. Specification of constraints includes consideration of scientific principles and other relevant knowledge that is likely to limit possible solutions.
- Crosscutting Concepts: All human activity draws on natural resources and has both short and long-term consequences, positive as well as negative, for the health of people and the natural environment. The uses of technologies and any limitations on their use are driven by individual or societal needs, desires, and values; by the findings of scientific research; and by differences in such factors as climate, natural resources, and economic conditions.
International Technology and Engineering Educators Association
- E. Design is a creative planning process that leads to useful products and systems.
- F. There is no perfect design. Design involves a set of steps, which can be performed in different sequences and repeated as needed.
- G. Requirements for design are made up of criteria and constraints. Brainstorming is a group problem-solving design process in which each person in the group presents his or her ideas in an open forum.
- H. Modeling, testing, evaluating, and modifying are used to transform ideas into practical solutions.
National Science Education Standards
- Form and function are complementary aspects of objects, organisms, and systems in the natural and designed world. [Grades K – 12]
- Living systems at all levels of organization demonstrate the complementary nature of structure and function. Important levels of organization for structure and function include cells, organs, tissues, organ systems, whole organisms, and ecosystems. [Grades 5 – 8]
- Evaluate completed technological designs or products, with consideration given to factors that might affect acceptability and suitability for intended users or beneficiaries; suggest improvements and try proposed modifications. [Grades 5 – 8]
- Communicate the process of technological design. Students should review and describe any completed piece of work and identify the stages of problem identification, solution design, implementation, and evaluation. [Grades 5 – 8]
- Technological designs have constraints. Some constraints are unavoidable, for example, properties of materials, or effects of weather and friction; other constraints limit choices in the design, for example, environmental protection, human safety, and aesthetics. [Grades 5 – 8]

Materials
- Scissors
- Waterproof tape (i.e. duct tape, electrical tape, etc.)
- Flexible plastic tubing (2 in. in diameter and 4 in. length/student)
- Flexible plastic sheets (flexible binder type of material, 12 in. x 12 in. piece/student)
- Foam sheets (1/4 in. thick, 12 in. x 12 in. piece/student)
- Clay
- Wire
- Pipe cleaners
- Beakers or measuring cups for pouring the water
- Buckets or baking pans for catching water (or sink)
- Paper towels, sponges, or cloths for wiping up spills
- Prosthetic heart valves (or, if difficult to obtain without a connection to a hospital, images of prosthetic heart valves)
- Heart valve handout (.pdf)
Procedure 
- Pass around real prosthetic valves (if obtainable from hospital or biomedical department of a university, otherwise, good schematic pictures or animations could work, too) for students to examine and explain how they work
- Show examples of valves constructed out of the materials the students will be given
- Give the students their materials and allow them to experiment with designing a one-way valve that allows water to flow through it one way, but not the other way
- Test the valves by timing how long it takes equal amounts of water to flow through in each direction
- Give the students a certain amount of time to redesign and fix their valves
Troubleshooting
- If students seem to be having trouble coming up with a design, start a one-on-one discussion with them about what options they think they have and how best to start building their valve.
- Make sure students are not using the materials for other purposes than making their valves.
- Make sure students are not discussing off-topic subjects and are focusing on ways to design heart valves.
- Do not let students become discouraged if their valves do not work perfectly as one-way valves when tested. Explain to them the limitations of materials provided to them, time they were given to design and create their valves, and their knowledge and experience level.
- Different materials can be provided if students have trouble envisioning a design with the proposed materials.
- Students could be given more time to create their designs if they seem to be taking a long time to brainstorm and construct their valves.
- Students could create valves in groups if it appears there are a few students having trouble coming up with designs, while other students are not.
Activity Extensions
- Students can practice taking their pulse and blood pressure to explore further how fluid dynamics works in the body’s blood vascular system.
- Students can look around their homes for fluids that are different densities or viscosities and see how they flow differently in tubes.
- Students could visit emergency room to learn how to apply defibrillator or take CPR course.
Activity Scaling
- For younger students, show them a model of a heart and have them discuss the parts and how it works.
- For more of a challenge, have students construct valves out of any materials of their choosing and given a longer period of time to do it, then hold a contest to determine whose valve was the most effective (the ideal being that no water got through in one direction, and water flowed completely unobstructed in the other direction). Technically it is not possible for there to be COMPLETEY unobstructed flow, but many of the engineering ideals used are not actually possible in reality.
- Vary the number of students in each group between 1 and 3. Working individually may be more challenging and/or rewarding as each student will finish with their own project while groups of 2-3 are good to promote teamwork and collaboration and to allow help for students who may struggle on their own.
Resources
Filed under: Class Activities, Grades 6-8, Grades 6-8, Grades 6-8, Grades 9-12, Lesson Plans
Tags: biomdedical engineering, Class Activities, device, Engineering Design Process, Grades 6-8, heart, Lesson Plan, Mechanical engineering, valve