Lesson: Tsunami Survival
 (Lesson courtesy of TeachEngineering and the Integrated Teaching and Learning Program, College of Engineering, University of Colorado at Boulder). Level: grades 3-8. Group size: 5 to 10 students. Time required: 50 minutes.
Overview
Students in grades 3 to 8 use a table-top tsunami generator to observe the devastation of these massive waves. They see how a tsunami moves across the ocean and what happens when it reaches the continental shelf. Students make villages of model houses and buildings to test how different material types are impacted. They also discuss how engineers design buildings to survive tsunamis.
Engineering Connection
No one can stop tsunamis from forming since we cannot prevent earthquakes, volcanoes and landslides, but we can devise ways to minimize the impact of these killer waves on human communities. Engineers design and install seismographs, tide gauges, ocean floor pressure sensors and loud sirens. Engineers also design buildings using materials and shapes that are more likely to survive a tsunami. Between high-tech detection systems and smart structures, the impact of a tsunami strike can be lessened dramatically. But, in many areas, dense populations, unreliable local communication, and poor or nonexistent roads remain the biggest obstacles to quick evacuation to safety.
Standards
Colorado Math. Grades 0 – 4, 2005
2. Identify, describe, draw, compare classify, and build physical models of geometric figures;
4. Solve problems using geometric relationships and spatial reasoning (for example, using rectangular coordinates to locate objects, constructing models of three-dimensional objects); and
3. Demonstrate the process of measuring and explain the concepts related to units of measurement.
Colorado Science. Grades 0 – 12, 1995
4.1 Students know and understand the composition of Earth, its history, and the natural processes that shape it.
2.3 Students understand that interactions can produce changes in a system, although the total quantities of matter and energy remain unchanged. (Grades 0 – 12) [1995]
4.3 Students know major sources of water, its uses, importance, and cyclic patterns of movement through the environment. (Grades 0 – 12) [1995]
Standard 5: Students know and understand interrelationships among science, technology, and human activity and how they can affect the world. (Grades 0 – 12) [1995]
Standard 1: Students understand the processes of scientific investigation and design, conduct, communicate about, and evaluate such investigations. (Grades 0 – 12) [1995]
Standard 6:
Students understand that science involves a particular way of knowing and understand common connections among scientific disciplines. (Grades 0 – 12) [1995]
Learning Objectives
After this activity, students should be able to:
- Explain what causes tsunamis, including movement under the surface of the ocean.
- Communicate that buildings constructed with materials that are heavier are more likely to survive a tsunami, but may be too expensive or not available.
- Describe how engineers cannot prevent tsunamis, but they can design and build buildings so that they are more resistant to tsunamis.
Vocabulary
(from “Understanding Tsunamis,” Discovery Education)
Tsunami: A series of catastrophic ocean waves generated by undersea earthquakes or landslides, volcanic eruptions, or the impact of a large meteorite in the sea. Context: The word “tsunami” comes from the Japanese term for great harbor wave.
Crest: The top of a wave. Context: The crest of a wave may rise only a foot or two above normal.
Fjord: A narrow sea inlet between cliffs or steep slopes. Context: The falling ice creates a wave that spreads rapidly across the fjord.
Surge: A large wave or billow. Context: The water builds and then breaks into a huge surge that rushes ashore.
Trough: The lowest point between waves. Context: For every wave peak is a trough. If the trough appears first, the sea recedes before a wave arrives on land.
Background
Tsunamis are gigantic waves that come ashore with little or no warning. A tsunami is caused by earthquakes or volcanoes that move the land on the bottom of the ocean. Movement of the earth’s land is called an earth tremor. When a tremor shakes the land under the sea, it causes the water at the surface to rise up in a hump. This high swell of water starts moving away. After a long trip, this swell finally reaches shore. It roars onto the beach as a wave. This tsunami wave can be a wall of water 7 meters (21 feet) to 33 meters (100 feet) high.
The name tsunami comes from two Japanese words. Tsu means “port” and nami means “wave.” Many tsunamis hit the coasts of the Japanese islands. To understand why, look at Japan on a world map. Its eastern and southern coasts face the whole Pacific Ocean. A tsunami can form far away in the southern or eastern Pacific. It starts moving towards Asia and builds up size and speed as the tsunami heads west. For thousands of miles, there is no land to stop it or slow it down. Then it hits the coast of Japan. This is why Japan has more tsunamis than anywhere else in the world.
Today scientists have more warning that a tsunami is forming. They can find earthquakes under the ocean using a machine called a seismograph. Also, photos taken from airplanes and images taken by space satellites show ocean waves. Scientists send early warnings to port cities that a big wave is on the way. See a factsheet and find out what government research can tell us. Read a typical tsunami alert message.
In late September, a severe earthquake struck off American Samoa, triggering a series of tsunamis that killed more than 180 people and flattened villages in Samoa and Tonga, according to news reports. Even more people might have died had it not been for 10-year-old Abby Wutzler, who had been taught tsunamis at school. She ran along the beach telling people to head for higher ground. See video.
The Physics of a Tsunami
Earthquakes generate tsunamis when the sea floor abruptly deforms and displaces the overlying water from its equilibrium position. Waves are formed as the displaced water mass, which acts under the influence of gravity, attempts to regain its equilibrium. The main factor that determines the initial size of a tsunami is the amount of vertical sea floor deformation. This is controlled by the earthquake’s magnitude, depth, fault characteristics and coincident slumping of sediments or secondary faulting. Other features which influence the size of a tsunami along the coast are the shoreline and bathymetric configuration, the velocity of the sea floor deformation, the water depth near the earthquake source, and the efficiency which energy is transferred from the earth’s crust to the water column. Read more from NOAA.
A tsunami is a really large wave — much larger than the waves you see when you splash in a pool or surf at the beach. The difference between a regular wave and a tsunami is that a regular wave is just a surface disturbance of the water, and a tsunami is a disturbance that reaches all the way to the ocean floor.
Tsunamis can be caused by anything that moves the ocean or sea floor, like earthquakes, volcanoes and landslides. Think about an underwater earthquake that is caused by the moving of tectonic plates. This could move the sea floor and create a tsunami? Engineers cannot prevent natural events like earthquakes or volcanoes, or the tsunamis that can result from them. So, what can engineers do? One thing engineers is to build structures that can survive a tsunami.
Materials
For the table-top-sized tsunami generator:
- 1 large, shallow, plastic waterproof tub (8-in x 14-in x 30-in or 20-cm x 36-cm x 76-cm, clear plastic is better but not necessary)
- 20 to 30-pound (9 to 14 kg) bag of sand
- 1 piece of sheet metal, ~20-in x 10-in x 0.1-in thick (as long as it is rigid, it is thick enough) or 51-cm x 25-cm x .25-cm thick
- Duct tape
For the brass model houses:
- 1 piece brass sheet metal, 4-in x 10-in x .01-in thick (or 10-cm x 25-cm x .025-cm thick, available at hobby or hardware store)
- Tin snips (scissors also work, but cutting the brass dulls them)
For the entire class:
- Masking tape
- Scissors
- Model House Template (pdf)
For students in group A:
- 2 sheets of tissue paper (the gift wrap type)
For students in group B:
- 3 sheets of cardstock or manila envelope material
For students in group C:
- 3 sheets of notebook paper
- 40 toothpicks
The Tsunami Generator
Materials
- 1 large, shallow, plastic waterproof tub (8-in x 14-in x 30-in or 20-cm x 36-cm x 76-cm, clear plastic is better but not necessary)
- 20 to 30-pound (9 to 14 kg) bag of sand
- 1 piece of sheet metal, ~20-in x 10-in x 0.1-in thick (as long as it is rigid, it is thick enough) or 51-cm x 25-cm x .25-cm thick
- Duct tape
It is best to set up the tsunami generator outside, although indoors may work, too.
Teachers can construct and test the tsunami generator beforehand, or involve the class, particularly when working with older students, as a further demonstration of engineering design and production.
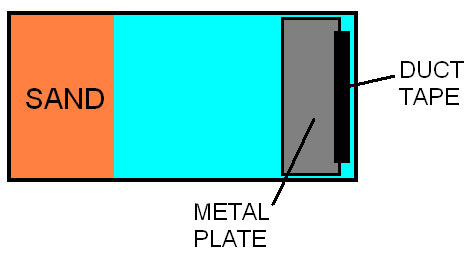
Figure 2. Copyright © Geoffrey Hill
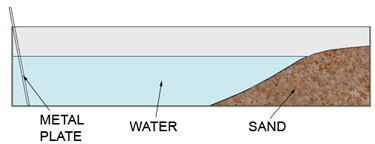
1. Fill one end of the tub with sand, creating a continental shelf and beach (see Figures 2 and 3).
2. At the opposite end of the tub, attach the metal sheet to the bottom of the tub using a piece of duct tape along one edge, so it works like a hinge (Figures 2 and 3).
3. Fill the tub with water so that most of the sand is covered, but leave some sand above the waterline to represent a sandy beach (Figure 3).
Figure 3. Copyright © Geoffrey Hill
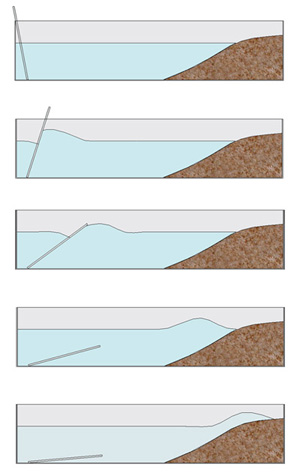
4. Test the tsunami generator by first leaning the metal plate against the back wall of the tub and then pushing the plate all the way down into the water. A tsunami should form that covers most or the entire beach. To adjust the wave height,adjust the speed with which you push down the plate (Figure 4, below).
Figure 4. Copyright © Geoffrey Hill
Figure 4 shows a tsunami generator in action. Pushing the metal plate down into the water creates a wave that moves across the tub of water and onto the sandy beach.
Procedure
Safety: Students should not handle the brass houses since the edges are sharp.Troubleshooting: This activity can be messy, so it is best to set it up outside. To create more controlled and consistent waves, have the teacher operate the tsunami generator for each trial. It helps to practice creating waves before conducting this activity in class.
Before the Activity
- Make 4 brass houses. Using the Model House Template below, use tin snips to cut out four walls and four roofs. Fold the walls and roofs as shown in Figure 1. Tape the roofs to the walls. Safety: Students should not handle the brass houses since the edges are sharp.
- Gather materials and make copies of the Model House Template for the students.
- Optional for younger students, or to speed up the activity: Pre-cut the model house materials, using the Model House Template. Prepare as many sets (one roof and one wall) of each material (tissue paper, cardstock, notebook paper) as you want the students to construct of each material. For example, for a class of 30 students, prepare 10 sets of each of the three types of material.
Construction of the Model Houses
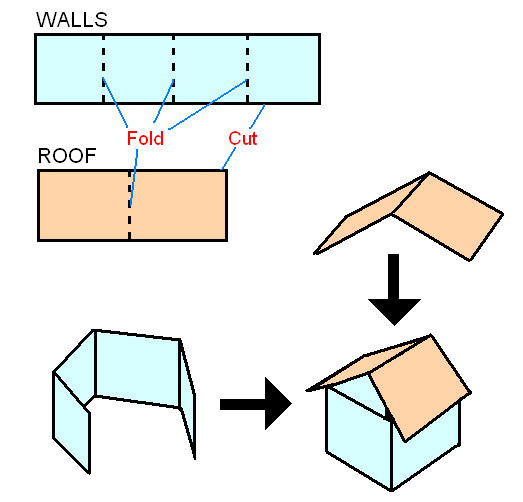
Figure 1. Copyright © Geoffrey Hill
Introduction
Explain to the students that the class will explore some of the choices that engineers have when designing buildings with tsunamis in mind and make some conclusions as to what shapes and materials make the most tsunami-resistant buildings.
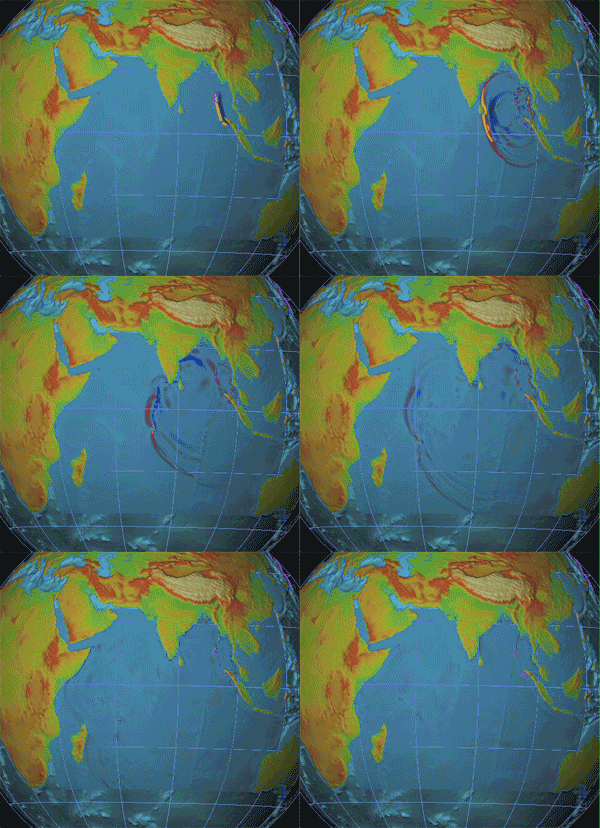
To help them begin to understand the importance of structure and material, discuss with students the 2004 tsunami, which hit the shores of Northeast Sumatra, Indonesia. The material of most of the destroyed houses were made of wood, and some were actually made of paper. A house constructed of weak material, such as wood or paper, probably will not survive the great forces of a tsunami. So, what can engineers do so that a building or structure is able to survive a tsunami? (Possible ideas: Build it out of stronger material; build it on stilts.) What might be some disadvantages of these types of the new houses? (Possible ideas: More costly and difficult to construct, look different than usual buildings.)
Voting: Have the class vote yes or no on the following question: Can engineers prevent tsunamis? Answer: No. Tsunamis are natural events caused by earthquakes, landslides and volcanoes, over which people have no control. Since we cannot control or prevent tsunamis, engineers help us predict and survive them.
Activity
Building the Houses
1. Divide the class into three groups (A, B and C). Each group will make a different type of house, using either tissue paper, cardstock or notebook paper and toothpicks. Students in each group need not sit together while they construct their model houses.
2. Provide each student with supplies according to his/her assigned group, as well as access to scissors and masking tape.
3. Distribute the Model House Template, and demonstrate the construction of the buildings as shown in Figure 1 and on the diagram template. This is a good time to point out that the students are working with geometric shapes.
4. Provide time for each student to construct his/her type of building (tissue, cardstock or notebook paper) using scissors and tape.
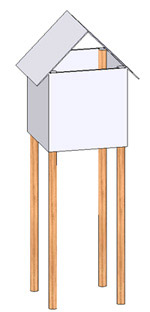
5. Have the group of students who construct the buildings using notebook paper tape toothpicks to the four corners of their buildings so that the toothpicks function as stilts, as shown in Figure 5, to the left.
6. Give the students time to decorate their houses. They can label and decorate their model structures to represent a variety of community buildings, such as houses, schools, bank, grocery store, restaurant, police station, library,city hall, power plant, playground, factory, boat marina, etc.
7. Show students the tsunami generator and explain how it works, with the metal plate simulating sea floor movement and causing huge ocean waves.
The Tsunami Tests
In four different trials, set up the buildings made by each group of students, and the brass buildings made by the teacher. Have students predict the outcome of the activity before it is performed. Before hitting each village with a wave, ask the students they think is going to happen to the village. Students should start to realize that the buildings made from the lighter and more water absorbent materials are more susceptible to tsunami damage. The heavier buildings and those built up and away from the water are most likely to survive. Have the students rank the houses from lightest to heaviest materials in their summary observations.
I. Tissue Paper test. First, have the students who constructed their model buildings from tissue paper place them scattered across on the beach to create a paper model village (see Figure 6). Before the tsunami, have students predict what will happen to the village.
A tsunami hits! Using the metal plate, create a wave that swamps most of the land. Create several more waves and remind the students that there is usually more than one wave associated with a tsunami. Expect the waves to destroy most of the tissue paper buildings.
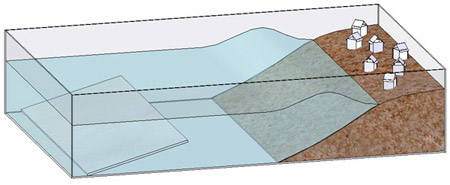
Figure 6. A tsunami wave moves towards the paper model village.
Evaluation: Ask the students what they thought of the tsunami hitting the tissue village. Is this what they expected? Why did the tissue buildings fail so easily? What else do you observe?
II. Cardstock tsunami test. Perform the tsunami test again, this time with the students who built the cardstock buildings. In this scenario, students observe that some buildings move slightly, but overall the cardstock village survives better than the tissue village. Note: After several waves the sand erodes slightly, so build up the continental shelf and beach with more sand, as needed.
III. Notebook paper buildings, toothpick stilts tsunami test. Perform the test yet again, with the students who built the notebook paper buildings with toothpick stilts. Make sure students just set the stilted buildings on the sand and do not push the toothpicks all the way into the sand (see Figure 7).
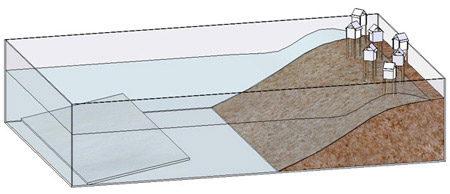
Figure 7. Copyright © Geoffrey Hill. A tsunami wave moves through the stilts of this paper model village.
10. Brass buildings tsunami test. In the final test, time place on the beach the brass buildings the teacher made in advance of the activity (see Figure 8). Have several tsunamis wash over them.
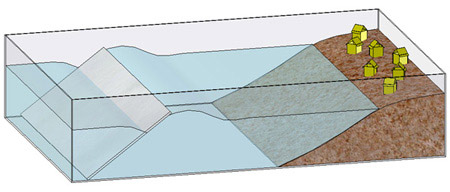
Figure 8 Copyright © Geoffrey Hill. Brass model house village.
Assessment
Discussion: Conclude with a class discussion comparing results of the four trials, and soliciting students’ observations.
Have each group describe the results of the four tsunami trials, Then, as a class, discuss how they compare. What did they observe?
Which materials held up the best? Worst? Have them rank the types of model buildings in order from worst to best at surviving the tsunamis. How might engineers design a building or structure so it is able to survive a tsunami? What might be some disadvantages of these types of houses? (Possible answers: Build it out of concrete, stone or bricks — heavier, stronger materials; build it on stilts so it is above the water flow; make sure it has a deep footing into the soil; or shape it so that water flows around it.)
What might be some disadvantages of these types of houses? (Possible answers: Buildings like this might cost more to construct, be more difficult to build, or be considered less attractive.)
Re-Engineering: Have students consider how they could improve the buildings in their village to better their chances of surviving big waves. Have them sketch or test their concepts for tsunami-resistant buildings. What material would they use? How would they be shaped? What features would they have? (Where would they be located?) If there is time, allow them to produce redesign buildings and run new tests.
Extensions
- Have students research the house designs engineers have come up with to resist tsunamis. Look at this website to see what a group of engineers from Harvard and MIT are doing. Have them write a paragraph describing the building and what makes it unique.
- Assign students to research recent tsunami disasters. How well or badly did structures survive? What efforts were made by engineers to aid survival and recovery?
- Have students read Prism magazine’s September 2009 article “Emergency Response,” which describes the work of engineers who aid in disasters.
Resources
- The Tsunami page of NOAA (National Oceanic and Atmospheric Administration)
- ITIC, International Tsunami Information Centre. Updated January 17, 2006. U.S. National Weather Service, NOAA. Accessed March 1, 2006. http://www.tsunamiwave.info/
- A related eGFI lesson and activity, The Great Wave
Contributors: Geoffrey Hill, Malinda Schaefer Zarske, Denise Carlson. © 2006 by Regents of the University of Colorado
Filed under: Grades 6-8, Grades K-5, Lesson Plans
Tags: Civil Engineering, Disaster relief, Environmental Engineering, Grades 3-8


