Build an Artificial Bicep
Activity courtesy of TeachEngineering. It is part of a unit for students in grades 5 to 8 on bioengineering and the human body.
Grade level: 5-7
Time: 45 minutes
Summary
Students learn about how muscles work and how biomedical engineers can help keep the muscular system healthy. Following the engineering design process, they create their own biomedical device to aid in the recovery of a strained bicep. They discover the importance of rest to muscle recovery and that muscles (just like engineers!) work together to achieve a common goal.
Engineering Connection
To create devices that help the human body, engineers must first understand how the human body functions. With an understanding of how the muscular system functions, they design machines that aid in the muscle recovery of stroke victims, patients with muscular dystrophy, professional athletes, and anyone else with a muscular injury.
Learning Objectives
After this activity, students should be able to:
- Explain how and why muscles work together in pairs.
- Explain why rest is important to muscle recovery.
- Explain why it is important for engineers to understand the human body and its muscular system.
- Describe the engineering design process.
Learning Standards
Next Generation Science Standards
- MS-ETS1-1. Define the criteria and constraints of a design problem with sufficient precision to ensure a successful solution, taking into account relevant scientific principles and potential impacts on people and the natural environment that may limit possible solutions.
- MS-ETS1-2. Evaluate competing design solutions using a systematic process to determine how well they meet the criteria and constraints of the problem.
- MS-ETS1-4. Develop a model to generate data for iterative testing and modification of a proposed object, tool, or process such that an optimal design can be achieved.
Common Core State Mathematics Standards
- Represent and interpret data. [Grade 5]
International Technology and Engineering Educators Association (ITEEA)
- Students will develop an understanding of the attributes of design. [Grades K – 12]
- Students will develop an understanding of engineering design. [Grades K – 12]
- Students will develop abilities to apply the design process. [Grades K – 12]
- Technological advances have made it possible to create new devices, to repair or replace certain parts of the body, and to provide a means for mobility. [Grades 3 – 5]
Materials
Each group needs:
- 6 rubber bands (a few different sizes)
- thin rope, 2.5 m
- string, .5 m
- scissors
- paper, 1 sheet
- Artificial Bicep Worksheet, one per student
- (optional) springs (may be expensive)
For the entire class to share:
- one 20-Newton spring scale ($3-4 at an educational supply store)
- ruler, 12-inch or meter
Procedure
Background
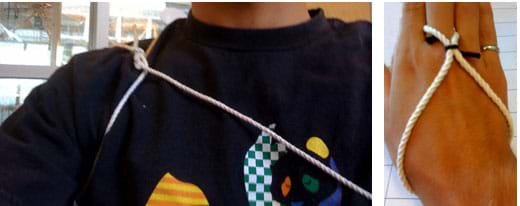
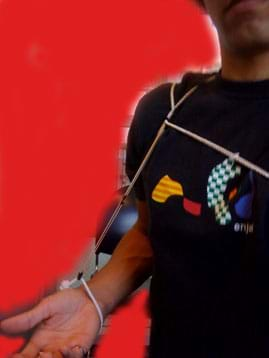
Student teams are challenged to create a product for a bicep strain that provides assistance to the muscle so that it does less work to bend the arm (see Figure 1). The designs should enable the wearers to continue their working days while helping their biceps rest so that they heal quickly and correctly.

Figure 1: Examples of shoulder and hand harness
Test the students’ devices on two criteria: 1) force applied and 2) distance applied. The force test is how much pulling force a device has when the arm is unbent. The distance test is how far a device helps the arm bend. A larger force and longer distance is desired, obviously within reason; we do not want the rubber bands to break or be so tight that students cannot unbend their arms.
Before the activity
Gather materials and make copies of the Artificial Bicep Worksheet, one per student.
With the students:
- Present the class with the biomedical engineering challenge for the day: To create a device to aid in the muscle recovery of a bicep by assisting it, therefore allowing it to rest more and recover sooner.
- Hand each person a worksheet.
- Divide the class into groups of two or three students each and remind them of the steps of the engineering design process (write the following steps on the class board): Ask, Research, Imagine, Plan, Create, Test, Improve.
- Let the students know what materials are provided, and the criteria and tests for their devices.
- Suggest to student teams that each design include a type of shoulder harness and hand harness made from the rope connected with pieces of string that are tied to rubber bands. For example:
- A shoulder harness might have two loops of rope connected, like a figure eight, so that one goes around the arm and the other goes around the chest (see Figures 1 and 2).
- A hand harness might also be created from rope made into a figure eight with one loop going around the middle finger and the other going around the wrist (see Figure 1).
- Use the rubber bands to connect the shoulder harness to the wrist harness so that they pull on the arm when it is straight.
- Give the teams about five minutes to “ask” questions and “imagine” how they could solve the design challenge. Guide the groups to “plan” their designs on their worksheets. Approve student designs before permitting teams to obtain their materials.
- Give students about 15 minutes to “create” their designs.
- When the students are done, test their devices.
- To test the applied force of a device, have a student wear it, but keep the hand harness off. Then pull the hand harness down so that the rubber bands are as long as they would be with their arm extended. Then attach the spring scale to where the rubber bands meet the hand harness and measure the force being applied by the rubber bands. A stronger force means the less the bicep has to work to bend the arm. Have students record their team measurements on their worksheets.
- To test the distance the machine applies a force to the arm, have students wear their device and pull the hand harness down, similar to the last test. Then, place a ruler where the rubber bands attach to the hand harness. Slowly raise the hand harness until the rubber bands are no longer stretched. Measure the distance the rubber bands were stretched. The greater the distance, the longer the machine helps raise the arm. Have students record their team measurements on their worksheets.
- Record the results on the board.
- After seeing all the design ideas and how they all performed, have students complete their worksheets and revisit their drawings to re-design improved versions.
- Conclude by having each team create and perform an infomercial for their design as described in the Assessment section.

Figure 2: Example of a final biomendical design product
Vocabulary
- bicep: The muscle located in front of the upper arm.
- biomedical engineer: A person who blends traditional engineering techniques with the biological sciences and
- medicine to improve the quality of human health and life.
- contracting: (of a muscle) To become shorter or tighter in order to effect movement of the body.
- engineer: A person who applies his/her understanding of science and math to creating things that benefit humanity and our world.
- muscular system: The anatomical system of a species that enables its movement.
- tricep: The muscle located in the back of the upper arm.
Assessment
Pre-Activity Assessment
Brainstorming: Have the class engage in an open discussion. Introduce the idea of muscle pairs/groups. Thinking about the human muscular system, ask students to come up with as many different muscle pairs/groups as possible. Then, ask students to describe how these muscle pairs work together.
Activity Embedded Assessment
Visual Understanding: Before permitting students to obtain their materials, have them each draw an arm and label on it which muscle is going to be resting and which is going to be working harder when someone is using their device.
Post-Activity Assessment
Infomercial: Have the teams act as a marketing group for their engineering firm and create a 30-60-second infomercial to communicate their product features and benefits to the rest of the class. Grade the infomercial on two components: 1) stating the problem and explaining why rest is important in muscle recovery, and 2) stating how rest is hard to get and why their product is a good solution.
Safety Issues
- Watch that the rubber bands do not stretch past their breaking points.
Activity Extensions
- Have students iterate their designs with the goal of improving their biomedical products.
- Introduce cost to the activity by giving a certain value to each of the available materials. For example, thicker rubber bands might cost more than thinner ones. Have students calculate the cost of their device. Could the cost be reduced without reducing the device’s effectiveness?
Activity Scaling
- For lower grades, provide all groups with a pre-made shoulder and hand harness, and have them decide how to use the rubber bands.
- For upper grades, have students convert the measurements from metric to English units (or vice versa).
Copyright
© 2008 by Regents of the University of Colorado.
Contributors
Jonathan MacNeil; Jaime Morales; Malinda Schaefer Zarske; Denise W. Carlson
Supporting Program
Integrated Teaching and Learning Program, College of Engineering, University of Colorado Boulder
Acknowledgements
The contents of this digital library curriculum were developed under a grant from the Fund for the Improvement of Postsecondary Education (FIPSE), U.S. Department of Education and National Science Foundation GK-12 grant no. 0338326. However, these contents do not necessarily represent the policies of the Department of Education or National Science Foundation, and you should not assume endorsement by the federal government.
Filed under: Class Activities, Grades 6-8, Grades K-5, Lesson Plans
Tags: anatomy, biceps, biomechanical engineering, Biomedical Engineering, Class Activities, Grades 6-8, Grades K-5, Human Body, Lesson Plan, muscles


