


Wheeling It In
Activity courtesy of TeachEngineering, an online curriculum library curated by the Integrated Teaching and Learning Program at the University of Colorado, Boulder’s College of Engineering and Applied Science.
Grade level: 3-5
In this open-ended design activity, students use everyday materials—milk cartons, water bottles, pencils, straws, candy—to build small-scale transportation devices that incorporate two simple machines—a wheel and axle, and a lever. They race their carts/trucks, measuring distance, time and weight; and then calculate speed.
Engineering Connection
An important challenge that engineers face is moving materials from their sources to construction sites. Transporting large and heavy materials over mountainous or sandy terrain can be difficult and costly. Even on site, it can still be tricky to move the materials to exactly where they are needed, for example lifting heavy materials to the top floor of a building under construction. Engineers often incorporate simple machines into their designs of real-world transport methods to efficiently and safely move cumbersome building materials to construction sites and locations within the construction sites.
Learning Objectives
After this activity, students should be able to:
- Design a transportation system using a wheel and axle, and a lever.
- Modify the transportation system for speedier transportation.
- Understand how levers simplify the transportation of materials.
- Understand how the wheel and axle system simplifies the transportation of materials.
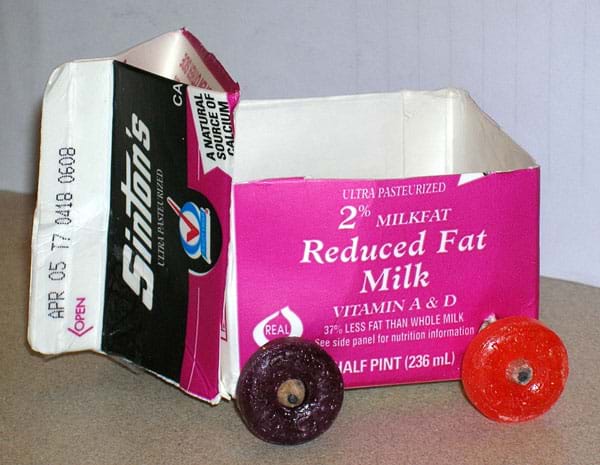
Figure 1. Sweet wheeling! An example student-designed transportation system.
Educational Standards
Next Generation Science Standards
3-5-ETS1-1. Define a simple design problem reflecting a need or a want that includes specified criteria for success and constraints on materials, time, or cost. [Grades 3 – 5]
3-5-ETS1-3. Plan and carry out fair tests in which variables are controlled and failure points are considered to identify aspects of a model or prototype that can be improved. [Grades 3 – 5]
Common Core State Mathematics Standards
Use multiplication and division to solve problems [Grades 3-5]
Interantional Technology and Engineering Educators Association
- The engineering design process involves defining a problem, generating ideas, selecting a solution, testing the solution(s), making the item, evaluating it, and presenting the results. [Grades 3 – 5]
- Models are used to communicate and test design ideas and processes. [Grades 3 – 5]
- The use of transportation allows people and goods to be moved from place to place. (Grades 3 – 5]
Materials List
Each group needs:
To share with the entire class:
- disposable containers for the transportation system body, such as empty milk cartons, used plastic water bottles, Styrofoam bowls, etc.
- disposable items for transportation system wheels, such as CDs, LifeSavers® candy (gummy or mint/hard), straws, etc.
- disposable items for transportation system axles, such as pencils, toothpicks, chopsticks, Popsicle sticks, etc.
- construction paper
- rulers
- tape
- glue
- string
- scissors
- clay blocks, rocks or weights
- weight balance or scale
- stopwatch
Worksheets and Attachments
More Curriculum Like This


Pre-Req Knowledge
General knowledge of pyramids. Familiarity with the six simple machines introduced in Lesson 1 of this curricular unit, Pyramids to Skyscrapers.
Introduction/Motivation
Imagine you are visiting a rock quarry. This is where you excavate the huge rocks needed to build your pyramid or modern-day building. But how are you going to transport these rocks to your construction site? Think about how stone is transported today. Now imagine what it must have been like centuries ago! How might the Egyptian and Mesoamerican peoples have transported rock to make pyramids? How strong would you need to be to carry by hand rocks that each weigh more than an elephant? Today we’re going to build our own transportation systems.

Figure 2. A dump truck bed is a lever. The fulcrum is the point at which the lever pivots.
When building today, we use dump trucks to transport materials from one place to another. Have you seen these trucks around your town? Have you ever seen a house being built? Construction of a house, like a pyramid, requires a large amount of materials. Dump trucks help transport these materials, and make it easy to load and unload materials. Can anyone tell me how they do this? (Answer: They use the mechanical advantages of simple machines. A dump truck bed is a lever. When materials are ready to be dumped, the lever lifts the bed, pivoting at the fulcrum, so the materials slide down towards the lowered end. See Figure 2.) What about the wheel and axle on dump trucks? How can trucks carry so much weight? (Answer: The four to six (or more) wheels on each axle, instead of two as on most cars, enable a truck to carry a greater amount of weight.)
 Figure 3. A wheelbarrow combines two simple machines—a lever, and wheel and axle.
What are some other ways the wheel and axle, and the lever can be combined to develop transportation systems? (Answer: You might use a lever to load/unload materials on to/from a wheel and axle, such as in a wheelbarrow. See Figure 3.)
Today, I’m hiring you as a lead engineer for a huge transportation project—the building of a large and impressive pyramid! You are going to design and build your own transportation system, including a wheel and axle, and a lever.
To set the stage for this activity, show students the Wheeling It In! Presentation, a PowerPoint® file. (Either show students the slide presentation or print out the slides to use with an overhead projector. The presentation is animated to promote an inquiry-based style; each click reveals a new point about each machine; have students suggest characteristics and examples before you reveal them.)
Procedure
In this activity, student teams follow the worksheet instructions to each create a transportation cart and a lever. During the activity, emphasize the need to test and re-design the carts, and refer to the steps of the engineering design process (as described in the Activity Extensions section). After the transportation systems are built, students race their carts/trucks, measuring distance, time and weight; and then calculate total distance and speed.
Before the Activity
- Gather materials and make copies of the Wheeling It In! Worksheet.
- Use the 11-slide Wheeling It In! Presentation to introduce the activity.
- Make available a vehicle testing area that provides a clear, smooth area (floor or tabletop) that is at least 3 meters long.
With the Students:
- (optional) Review vocabulary words using the classroom board.
- Divide the class into teams of two students each.
- Start the activity by simulating the setup illustrated on slide 9 of the presentation and Figure 4, the Egyptians’ transport system. Discuss how the rolling log cylinders serve as “wheels and axles” even though the axle is a solid core.
- Hand out materials and worksheets.
- Begin by having students read the “engineering assignment letter” that explains the design challenge task (on page 1 of the worksheet).
- Direct the teams to use the provided materials and follow the worksheet instructions to design and build a transportation system that incorporates the use of a wheel and axle, and a lever. Have them sketch their designs before beginning construction.
- (optional) Review the steps of the engineering design process (see slide 11 and the Activity Extensions section). This approach aligns with the worksheet questions.
- Once teams have created the transportation systems, proceed to a cleared part of the classroom to test the transportation systems for speed.
- Have students weigh and record the load their transportation system will carry.
- Use stopwatches to record the amount of time it takes each team to race its vehicle 3 meters, dump the load and return to the starting point.
- Have students calculate the total distance traveled (6 meters), and the speed at which they traveled, recording these numbers on the team worksheet. Ask students to be aware of the direction of force they use to push or pull their transportation system. Would pushing or pulling in a different direction make it easier or more difficult?
- Note regarding measurements: The total distance is defined by the teacher, and is twice the distance from point A to point B (for example 2 x 3 meters = 6 meters). Speed = total distance ÷ time. Expect students to use the calculated total distance (in meters) and the amount of time it takes to travel that distance (in seconds) to find the speed in meters per second. Expect students to use a scale or balance to measure the amount of weight that the transportation system contained.
- Pose the question: Would weight affect how difficult or easy it is to push or pull your cart/transportation system in any direction? (Answer: Yes. Adding weight makes the force necessary to push or pull the cart greater and thus more difficult to push or pull manually.)
- Conclude by making a chart on the board with all team results. Lead a class discussion, asking the class the worksheet questions so they share with everyone what they learned. Complete the KWL chart or other summary assessments described in the Assessment section.
Vocabulary/Definitions
distance: A measure of space between two points.
excavate: To remove by digging or scooping out.
force: A push or pull on an object.
fulcrum: The point at which a lever pivots.
lever: A simple machine that increases or decreases the force to lift something. Usually a bar pivoted on a fixed point (fulcrum) to which force is applied to do work.
mechanical advantage : An advantage gained by using simple machines to accomplish work with less effort. Making the task easier (which means it requires less force), but may require more time or room to work (more distance, rope, etc.). For example, applying a smaller force over a longer distance to achieve the same effect as applying a large force over a small distance. The ratio of the output force exerted by a machine to the input force applied to it.
pivot: To cause to rotate, revolve or turn.
quarry: A pit from which rock or stone is removed from the ground.
simple machine: A machine with few or no moving parts that is used to make work easier (provides a mechanical advantage). Well-known six: wedge, wheel and axle, lever, inclined plane, screw, and pulley.
speed: A measure of how fast an object is traveling.
transport: To carry from one place to another; to convey.
weight: A measure of how heavy or light something is. The weight of an object is the mass of the object times the force of gravity pulling on the object.
wheel and axle: A simple machine that reduces the friction of moving by rolling. A wheel is a disk designed to turn around an axle passed through the center of the wheel. An axle is a supporting cylinder on which a wheel or a set of wheels revolves.
work: THe force on an object multiplied by the distance it moves. W = F x d (force multiplied by distance).
Assessment
Pre-Activity Assessment
Know / Want to Know / Learn (KWL) Chart: Before the activity, ask students to write down in the top left corner of a piece of paper (or as a group on the classroom board) under the title, Know, all the things they know about transportation systems. Next, in the top right corner under the title, Want to Know, ask students to write down anything they want to know about transportation systems. After the activity, ask students to list in the bottom half of the page under the title, Learned, all of the things that they have learned about transportation systems.
Activity Embedded Assessment
Worksheet: Observe students as they complete the activity worksheet. Is each student engaged? Do their drawings demonstrate a thorough understanding of why they are using a specific type of wheel and axle, or lever? Review their answers to gauge their mastery of the subject.
Post-Activity Assessment
Show and Tell: Have students show their engineering designs to the rest of the class, and describe why their designs are so awesome. Ask them to explain why they chose the materials they used.
Question/Answer: Ask each team:
- Was your design for pyramid building in Mesoamerica or Egypt?
- How did this choice of location affect your design?
- Did you expect your system to carry a lot of weight, or travel faster?
- Would it be safe for passengers to ride in your system?
Open Discussion: Ask the students and discuss as a class:
- Was your design goal to transport many smaller stone blocks, or fewer large stone blocks?
- Was the speed or distance you must transport the stone blocks your primary concern? Why?
- What materials did you use in your design? Why did you choose them?
- How does the wheel and axle, or lever, make transporting your blocks easier?
- What is the mechanical advantage of the wheel and axle? (Answer: It allows for faster transportation at the expense of many revolutions.)
- What is the mechanical advantage of the lever? (Answer: It requires less force, but over a longer distance, to lift something.)
- At what speed did your transportation system travel? (Compare results from all teams.)
- How much weight did your transportation system successfully transport?
- In your own words, describe your steps in the engineering design process. (Answer: Figure out the goal, brainstorm and design, plan, create or prototype, and improve.)
- How could you make your transportation system faster?
- How could you make your transportation system stronger so it could carry more weight?
- Why do material transportation systems look different than passenger transportation systems? (Answer: Passengers require a larger amount of comfort and safety, but some systems, such as trains, are used for both cargo and passengers.)
KWL Chart: Finish the remaining section of the KWL Chart as described earlier in the Assessment section. After the activity, ask students to list in the bottom half of the page under the title, Learned, all of the things that they have learned about transportation systems. Were all of the W questions answered? What new things did they learn?
Safety Issues
- Be careful with scissors when cutting milk cartons and water bottles.
- Set up the race track so that not all students are racing at the same time.
Troubleshooting Tips
If you are unable to locate milk cartons or water bottles, any other disposable containers work just as well as long as they can be easily and safely cut by students.
Activity Extensions

Figure 4. How heavy pyramid stones may have been moved to building sites.
Use sand or soil to re-create an Egyptian or Mesoamerican setting that the transportation systems must traverse. Or, take advantage of sandy or rocky playground areas on which to test the transportation systems in those conditions.
Assign students to investigate and write reports on the evolution of transportation engineering.
As students design and build their own versions of ancient transport systems, introduce them to the engineering design process—a series of steps that engineering teams use to guide them as they solve problems.
- Understand the need: What is the problem? What do I want to do? What are the project requirements? What are the limitations? Who is the customer? What is the goal? Gather information and research what others have done.
- Brainstorm and design: Imagine and brainstorm ideas. Be creative. Investigate existing technologies and methods to use. Explore, compare and analyze many possible solutions. Select the most promising idea.
- Plan: Draw a diagram of your idea. How will it work? What materials and tools are needed? How will you test it to make sure it works?
- Create: Assign team tasks. Build a prototype. Does it work? Talk about what works, what doesn’t and what could work better.
- Improve: Talk about how you could improve your end product. Make revisions. Draw new designs. Make your product the best it can be.
Engineers explore all possible options and compare many design ideas. This approach is called open-ended design because when you start to solve a problem, you don’t know what the best solution will be. Engineers use prototypes, or early versions of designs to improve their understanding of the problem, identify missing requirements, evaluate design objectives and product features, and get feedback from others. Engineers select the solution that best uses the available resources and best meets the project’s requirements.
Activity Scaling
- For lower grades, have teams weigh their transport systems, but not calculate distance traveled or speed.
- For upper grades, do not pre-define the total distance the transport systems should travel, and require a more in-depth description of the various forces acting upon the transportation system.
Additional Multimedia Support
Show students a six-minute video about a Michigan man who is building a Stonehenge replica to show people how its huge blocks could have been placed without the use of modern equipment. See Building Stonehenge: This Man Can Move Anything at: https://www.youtube.com/watch?v=lRRDzFROMx0
References
Dictionary.com. Lexico Publishing Group, LLC. Accessed January 18, 2006. (Source of some vocabulary definitions, with some adaptation)
Loethen, Chris. Pyramids Schmeramids: Why the Pyramids of Egypt and Mesoamerica Do Not Share a Common Source. Accessed January 18, 2006.
Pyramid Challenge. BBC-History, British Broadcasting Corporation, London, UK. Accessed January 18, 2006.
Westbroek, Glen. Wheel and Axle. Updated August 7, 2000. Utah State Office of Education. (Excellent animation of wheel and axle.) Accessed January 18, 2006.
Contributors
Luz Quiñónez; Lawrence E. Carlson; Jacquelyn Sullivan; Malinda Schaefer Zarske; Denise W. Carlson; Glen Sirakavit, with conceptual input from the students in the spring 2005 K-12 Engineering Outreach Corps course.
Supporting Program
Integrated Teaching and Learning Program, College of Engineering, University of Colorado Boulder
Acknowledgements
The contents of this digital library curriculum were developed under grants from the Fund for the Improvement of Postsecondary Education (FIPSE), U.S. Department of Education, and National Science Foundation (GK-12 grant no 0338326). However, these contents do not necessarily represent the policies of the DOE or NSF, and you should not assume endorsement by the federal government.
Filed under: Class Activities, Grades K-5, Grades K-5, Lesson Plans
Tags: bicycle, Engineering Design Process, Geometry, levers, measurement, NGSS aligned activity, Physics, simple machines, transporation, vehicle