


Sensory Toys Make Sense!
Lesson from TeachEngineering contributed by Inquiry-Based Bioengineering Research and Design Experiences for Middle-School Teachers RET Program, Department of Biomedical Engineering, Worcester Polytechnic Institute
Grade Level: 6-9
Time: Ten 50-minute classes
Note: This activity uses fabrication materials and tools as well computers with Internet access; a prototyping shop or lab is ideal but not required.
Summary
Students design and create sensory-integration toys for young children with developmental disabilities—an engineering challenge that combines the topics of biomedical engineering, engineering design, and human senses. After learning about the human sensory system, teams apply the engineering design process to create prototypes within given project constraints, concluding with a class presentation in which they summarize their experiences.
Learning Objectives
After this activity, students should be able to:
- Solve an open-ended design problem.
- Use the engineering design process to solve a problem.
- Develop multiple solutions to a design problem.
Learning Standards
Next Generation Science Standards [Grades 6-8]
- Evaluate competing design solutions using a systematic process to determine how well they meet the criteria and constraints of the problem.
International Technology and Engineering Educators Association [Grades 6 – 8]
- Design is a creative planning process that leads to useful products and systems.
- Requirements for design are made up of criteria and constraints.
- Modeling, testing, evaluating, and modifying are used to transform ideas into practical solutions.
Materials List
Each group needs:
- EDP Pre/Post-Test, two per student. Click HERE for PDF
- Sensory Toy Research Sheet, one per student. Click HERE for PDF
- Me and My Senses Activity Sheet, one per student. Click HERE for PDF
- Sensory Integration Reading, one per student. Click HERE for PDF
- Sensory Toy Evaluation Sheet, one per group. Click HERE for PDF
- Sensory Toy Presentation Scoring Rubric , one per group. Click HERE for PDF
To share with the entire class:
- pencils, paper (or notebooks), rulers
- computers with Internet access, for conducting research (as needed) and preparing presentations
- a wide range of materials and fasteners for fabricating the sensory toy devices, such as various woods, plastics, metals, cardboard, rope, fabric, glue, tape, etc.
- hand and/or machine tools for cutting, shaping, forming, joining, assembling and finishing student designs, such as rulers or tape measures, hand or power saws and drills, scissors, hot glue, super glue, etc.
- laptop with Internet access and projector, to show the class the Visual Aids (three slides) and a four-minute online video; alternatively use an overhead projector, print the slides as handouts, or write them on the classroom board
- PowerPoint® or Prezi (free) software for preparing and making group presentations; alternatively, provide poster board and markers
Introduction/Motivation
Think about a typical day in your life. When we get up in the morning, we spend some time getting ready for the day, and right from the beginning we start taking in information from our environment.
Your senses are a vital part of your survival system. All animals, from insects to humans, have them. A combination of receptors, neural pathways, and brain parts make up the main components of the human sensory system. This system is part of the nervous system and helps us process information taken in from our surrounding environment. What are our senses? (Listen to student ideas.) That’s right. Hearing, taste, sense of smell, sense of touch and vision are the primary receptors that collect information and help us learn about and interact with our world.
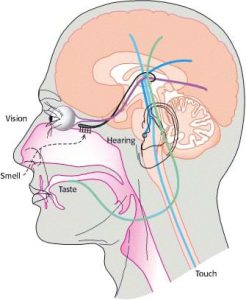 Sometimes, however, peoples’ sensory systems do not function the way they should and the information they take in is not processed as intended. This can affect a person’s daily life and make his or her everyday experiences and learning quite different or even difficult at times. For example, some people have sensory processing disorder (SPD). Common daily tasks can be a challenge to perform for people with SPD because they have difficulty and/or problems processing sensory stimuli. Muscular coordination, behavioral problems, anxiety, depression, and failure in school may be the result of sensory processing disorder. How can we help?
Procedure
Background and Overview: The focus of this design project is the application of the engineering design process (EDP) to develop a sensory toy. The objective of a sensory toy is to stimulate selected human senses; it need not have a recreational or educational purpose. For example, a child plays with a sensory toy such as a multi-colored foam cube because the colors stimulate vision and squeezing the foam provides a tactile sensation. (If you use some of this information to intro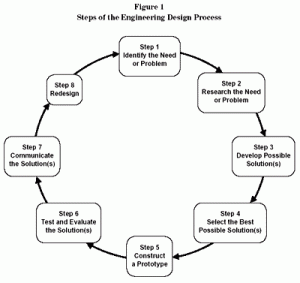 duce the project, be mindful not to give project design ideas to students.)
EDP: To adequately guide and coach students, it is best if the instructor has a good working knowledge of the engineering design process. The EDP steps provided in slide 1 of the Visual Aids are from the Massachusetts curriculum frameworks, but other versions of the EDP can also be used. This project is intended to closely follow all the steps of the EDP.
Tools: The design project also makes use of a general shop (or a design/prototyping/fabrication/maker shop or lab) with a variety of hand and/or power tools. If one is not available, the activity can be conducted in a typical classroom, but may require some modifications. Lack of these resources may make this project challenging to complete.
Materials: No restrictions are provided on the kind or type of materials used for the design project and students choose their own materials. However, the selected materials must adhere to the project constraints for cost, weight and safety, etc. The teacher may want to alter the constraints and/or limit material choices based on the budget and/or availability of tools to necessary to work with certain materials. Having knowledge of material properties is helpful to guide students if questions or problems arise during the process of selecting project materials.
Before the Activity:
- Gather any materials or fasteners that you think students may need during this project. Materials might include a wide assortment of fabric, plastics, wood, metal, cardboard and other materials. Students may also bring in their own supplies and materials. On Day 3, students generate a detailed list of supplies, materials and tools needed to fabricate their designs starting on Day 4; the items can be obtained by a combination of already available items, items from home, materials found in recycling/scrap bins and specific teacher purchases. Alternatively, if you do not have access to a wide variety of fasteners and materials, consider giving students a short list from which they choose, which becomes the teacher’s shopping list. It is up to the teacher’s discretion how to source and limit the supplies, materials and tools.
- Make copies of the EDP Pre/Post-Test, Sensory Toy Research Sheet, Me and My Senses Activity Sheet, Sensory Integration Reading, Sensory Toy Evaluation Sheet and Sensory Toy Presentation Scoring Rubric.
- If desired, establish work groups. Student pairs may either work together from the start or beginning with the research component on Day 2.
- Prepare a laptop and projector to show the class the Visual Aids, three slides in a PowerPoint® file, as well as a four-minute online video. Alternatively, use an overhead projector, slides printed out as handouts or written on the classroom board. Show slides 1 and 2 on Day 1, and slide 3 and the video on Day 2.
With the Students—Day 1: Identify the Problem
- Administer and collect the pre-test, as described in the Assessment section.
- Present to the class the Introduction/Motivation content.
- With students ready with pencils and paper (or notebooks), show the class the engineering design process graphic (slide 1 of the Visual Aids) to introduce (or review) the steps of the engineering design process (EDP). Have students copy down the following in their notebooks:
- EDP steps: Identify the problem or need, research the problem, develop possible solutions, select the best solution, create a prototype, test the prototype, communicate the results, redesign.
- Present the engineering design challenge by showing the class the sensory toy project design criteria (slide 2 of the Visual Aids). Introduce the problem statement and its constraints. For engineers, constraints are the limitations and requirements that must be considered when designing a workable solution to a problem. Have students write the constraints in their notebooks.
Problem statement: Design a sensory integration toy for a child with developmental disabilities. The device must:
- be safe
- be durable
- cost less than $10
- weigh less than 2 pounds
- be completed in 2 weeks (flexible based on available time)
- not be messy or make a mess
- target two of the following senses: visual, auditory, or tactile
- Connect the problem statement to step 1 of the engineering design process: identify the problem or need. Explain that it is important to clarify the statement of need before beginning to design.
- Provide some time for any questions and discussion about the EDP and project criteria.
With the Students—Day 2: Research the Problem
- Divide the class into groups of two students each.
- Have student pairs conduct online research (as necessary) to answer the 11 project-specific research questions about the human sensory system provided on the Sensory Toy Research Sheet.
- Show students a video explaining the human senses, such as The Sensory System by Bozeman Science [YouTube 10:31] at https://www.youtube.com/watch?v=ALw-xcKy4Gc.
- Have students individually complete the Me and My Senses Activity Sheet. Students are asked to think of examples of sensory stimulus that they commonly encounter (what they hear, see, smell, taste, touch) to heighten their awareness of the importance of sensory integration.
- Have the class read the Sensory Integration Reading (which doubles as a literacy activity). Lead a class discussion about the information in the reading. Show students the three discussion questions provided on slide 3 of the Visual Aids:
- What is the most important sentence in the first paragraph?
- Does sensory integration remain the same throughout your life?
- What is one disadvantage that may occur for people who have a problem with sensory integration?
- After this, if needed, give students additional research time on the computers.
With the Students—Day 3: Develop Possible Solutions and Select the Best Solution
- Direct the groups to begin brainstorming ideas for sensory toys. To spark ideas, have them reflect on and refer to their research from Day 2. Require teams to identify TWO specific functions that their toys will accomplish; each device must stimulate at least two of the following three senses: visual, auditory and tactile. If students are stuck, ask the Investigating Questions to help them brainstorm ideas. Encourage students to take lots of notes about their ideas, make many sketches and consider potential materials. Require them to develop at least two different plans for possible toy designs.
- Have teams compare their best design solutions, critically evaluating them to determine which best meets the criteria and constraints of the design challenge. Then have each group make a final sketch and plan of its best solution to show the teacher for approval.
- Review groups’ selected best designs and give approval after affirming that the design meets all criteria. Explain any unmet criteria and direct students to redesign as necessary. Continue to work with student groups to review/approve designs as they evolve.
- As students begin to identify materials, working off a final multi-view sketch labeled with material details and dimensions, have them prepare a detailed list of what materials and how much of each are required by the design. Working with the groups, make a plan to obtain the necessary materials and tools before the next day of the project.
With the Students—Days 4-8: Build a Prototype
- Provide groups with the necessary materials, tools and guidance to build and then evaluate their prototypes. The fabrication of the prototypes is exclusively the responsibility of students working on this step of the design process; give students the freedom to self-direct the process. Expect that all students will not finish at the same time due to the variability in design complexity and degree of focus on task. Flexibility with time may be necessary.
- During this phase, the instructor (and any other adult assistants) serves as a lab monitor to help with supplies and materials, assists with any problems that arise, and oversees student use of tools and machines. As needed, provide specific instruction, training and safety guidelines for the tools and equipment students will use.
With the Students—Days 9-10: Test the Prototype, Communicate Results and Redesign
- At this stage, students play with their prototypes to attain and confirm functionality (safe, durable, appealing, engaging, stimulating) and submit their prototypes to peer review for evaluation against the original constraints (device cost, safety, weight, etc.) and specific functions identified by the designing team.
- Have each toy be evaluated by five students using the Sensory Toy Evaluation Sheet to keep track of the feedback. Instructions are on the sheet. Any redesign modifications made from testing results and peer feedback are part of the continuing cyclical EDP to create the best solution possible.
- Direct the teams to prepare and make presentations to the entire class that document their team progress through the steps of the EDP and fully explain the resulting sensory toy device. Hand out the Sensory Toy Presentation Scoring Rubric so students understand the expectations. Inform students of the presentation requirements, as described in the Assessment section.
- Administer and collect the post-test, as described in the Assessment section.
Safety Issues
Use the following guidelines to ensure student safety in a fabrication environment:
- Train students on the correct and safe use of hand and power tools.
- Wear safety glasses when using hand and power tools.
- Expect correct and safe behavior at all times in the shop area.
Investigating Questions
- What types of things stimulate or integrate human vision? (Answer: Bright colors, contrasting colors and movement can stimulate vision.)
- What types of things stimulate or integrate human hearing? (Answer: Loud noises, ringing and music can stimulate hearing.)
- What types of things stimulate or integrate human touch? (Answer: Varying textures such as a rough surface like sandpaper.)
Assessment
Pre-Activity Assessment
Engineering Design Process Test: Before starting the activity, administer the seven-question EDP Pre/Post-Test to gauge students’ base knowledge. This could be done a day or two before starting the activity.
Activity Embedded Assessment
Reflection Questions: During design and development, have students spend time reflecting on and answering the items listed below; these questions are intended to be formative. Either ask students to write down their answers for teacher review, or check their understanding through student/teacher discussion. Either way, the answers are designed to help students keep continual focus on the design process. Student answers also indicate whether they understand how the design process works. End each class period by having students do an exit activity or self-evaluation to monitor daily understanding and project progress. Expect teams to progress at different rates, with every group eventually addressing and achieving all the items below.
- State how your design addresses the project criteria: The toy must:
- be safe
- be durable
- cost less than $10
- weigh less than 2 pounds
- be completed in 2 weeks (flexible based on available time)
- not be messy or make a mess
- target 2 of the following senses: visual, auditory or tactile
- Which of your two proposed designs did you choose? Why?
- Explain how or why your design addresses the two senses you selected.
- How do you determine whether something works or does not work?
- Does the toy design achieve the intended objective?
Design Approval: Review teams’ chosen designs to confirm that the project criteria have been met. This can be done with a simple checklist. Explain any unmet criteria so students can adjust (redesign) before submitting for teacher review again. Once approved, groups can move on to the next step.
Post-Activity Assessment
Group Project Presentations: After testing and peer evaluation are completed, direct the groups to prepare and make presentations to the entire class that document their team progress through the steps of the EDP and fully explain the resulting sensory toy device.
- Give each team a copy of the Sensory Toy Presentation Scoring Rubric so they understand the expectations while preparing the presentations.
- Require the presentation to include a title slide and one slide for each of the eight steps of the EDP so students can explain how they went from a problem to ideas to a useful solution. The slide for EDP step 8: redesign, can include ideas for possible future improvements to the design.
- Require teams to demonstrate their final sensory toy prototypes.
- Encourage the use of images (sketches, photographs) to document progress throughout the design process, as well as detailed design information in the form of descriptions, labeled drawings, dimensions, material identification, constraints and target functions.
- Grade each team presentation and project using the scoring rubric.
Engineering Design Process Test: At activity end, administer the seven-question EDP Pre/Post-Test again, comparing pre/post scores to gauge changes in student comprehension.
Activity Extensions
- Challenge students to develop marketing plans for their sensory toys. This could involve developing an accurate cost (for example, within 2 percent), identifying a target client group and creating an advertisement or brochure for the toy.
- Assign students to research specific developmental or other disabilities that have a connection to sensory integration. Examples include autism, sensory integration disorder, attention deficit disorder, etc.
Activity Scaling
For upper grades:
- In addition to developing marketing plans for the toys (see the Activity Extensions section), have students map out plans to mass produce their toys, detailing each process involved and all associated material and labor costs. Also require them to develop packaging and shipping plans.
- Have students make video clips that teach younger students about the five human senses and how important each one is in daily life.
- Have students interview an occupational therapist to see how s/he helps students with sensory integration problems.
Additional Resources
Women’s and Children’s Health Network tutorials:
Make a Water Bottle Sensory Toy. Step by step instructions for making an ocean in a bottle, from Hands On As We Grow.
DIY Sensory Fidget Board for Children with Autism and Sensory Processing Disorder. Dad makes a fidget board for his son out of a cutting board, papers, ribbon, and other inexpensive materials. [YouTube]
DIY Sensory Toys. Fox17 tips for making squishy bags and other simple sensory integration toys. [YouTube 2:17]
How to Make a Sensory Water Bottle. Fill a bottle with colorful shapes to swirl. [YouTube 3:57]
References
Science and Technology/Engineering Curriculum Framework. Last updated May 1, 2001. Massachusetts Department of Elementary and Secondary Education (archived information). (Great background information about the relationship between science, engineering and technology, as well as the steps of the engineering design process)
Sensory Development – Touch, Taste and Smell, Movement Sensations, Auditory System, Visual System, Sensory Systems in Concert – Body Position Sense. Net Industries.
Sensory Systems. The Human Physiology, Biology Online.
Contributors
Thomas Oliva, Terri Camesano, Kristen Billiar
Copyright © 2015 by Regents of the University of Colorado; original © 2014 Worcester Polytechnic Institute
Supporting Program
Inquiry-Based Bioengineering Research and Design Experiences for Middle-School Teachers RET Program, Department of Biomedical Engineering, Worcester Polytechnic Institute
Acknowledgements
This digital library content was developed by Worcester Polytechnic Institute under National Science Foundation RET grant number EEC 1132628 in collaboration with the Worcester Public Schools. However, these contents do not necessarily represent the policies of the NSF and you should not assume endorsement by the federal government.
Filed under: Class Activities, Grades 6-8, Lesson Plans
Tags: adaptive technology, Biomedical Engineering, Class Activities, Engineering Design, Grades 6-8, Lesson Plan, sensory integration toys, special needs students, toy adaptation