Class Activity: Crystal Study

(Lesson courtesy of the U.S. Department of Energy, Pacific Northwest National Laboratory) Level: Grades 6-12. Estimated Time: One class period.
CRYSTAL STUDY
LEARNING OBJECTIVES
The purpose of this lab is to provide students an opportunity to:
1. observe macro crystalline growth,
2. observe how crystals grow together and form grain boundaries, and
3. compare various kinds of crystals.
This knowledge can then be transferred to metals and ceramics, which form crystalline structure in the same manner as observed except on a micro scale.
At the end of the activity students will be able to:
1. follow a procedure that allows the study of crystal growth, size, and shapes; and
2. demonstrate their observation and recording skills through journal writing and discussion.
INSTRUCTOR NOTES
Safety Precautions:
This activity, which involves the use of chemical and heat, must be well-supervised to ensure safety. Please read all instructions and precautions thoroughly.
1. Use Pyrex or other thermal shock-resistant lab glass for glass plates. Thin plates (1/8 in. or less) are better than thicker plates. Microscope slides work well. Teachers should exercise caution to glass slides breaking when they are heated initially or handled by students, or when dismantling the “sandwich” while the material is still molten. Students and teachers alike should use tweezers when handling the slides.
2. The work area must be well-ventilated. Some substances produce irritating fumes; others produce slightly toxic fumes or fumes that will make many light-headed. Thymol, naphthalene, and naphthol produce fumes and strong odors. Benzoic acid has very irritating fumes, and phenylsalicylate has toxic fumes. Use these chemicals cautiously! Do not spill them on the hot plate’s surface. Handle only small quantities around the hot plate.
3. Hot plates can cause burns. Students must be well-supervised in their use, and to ensure they do not overheat their glass slides. To reduce breakage of the glass plates, warm all the plates slowly on the hot plate, and handle them with tweezers.
Preparing the slides:
In general, teachers should prepare the glass slides for this activity, and only involve students in the procedures for warming and cooling the plates once they are made. Some teachers may wish to have older students participate in making the slides; if so, the activity should be well supervised. Once these glass sandwiches are made, they can be re-used many times and stored from year to year.
Resource:
The 353-page Materials Science and Technology handbook from which this activity is drawn, is available for download from the education website of the Pacific Northwest National Laboratory (PNNL) in Richland, Washington. Compiled with the help of area educators, the handbook is designed to support k-12 courses of chemistry, physics, and engineering, and covers fundamentals of ceramics, glass, metals, polymers, and composites. Download the MST Crystal Study unit.
MATERIALS
Teacher Materials:
- Square glass slides
- Electric Hot Plate warmer to heat the slides
Suggested materials for crystallization:
- phenylsalicylate, also called salol
- thymol, strong “listerine” odor
- benzoic acid
- urea, crystal growth is very small, but large grains appear, (teaches grain boundaries and grains)
- naphthalene
- naphthol (also may want to use magnification to study crystals and boundaries)
- p-dichlorobenzene (fumes)
Suggested materials to form an amorphous structure for comparison to the crystalline materials (No crystals form with these chemicals):
- paraffin
- stearic acid
Student Materials:
- Prepared glass plate sandwiches, 5 cm x 5 cm, 2 ea.
- Colored pencils
- Polarized film, 5 cm x 5 cm
- Magnifying lens
- Hot plate
- Tweezers/tongs
PROCEDURES
1. Creating the glass plate sandwiches: (Teachers)
a) Place a single glass plates on an cold hot plates and warm it slowly, using a low temperature. Rapid heating may lead to breakage. Use tweezers to handle the plate once it heats up.
b) Sprinkle a few grains of chemical on the plate, and allow them to melt. Form a small puddle of molten chemical in the center of the plate.
You can also create sandwiches that contain mixtures of two chemicals (ensure they are compatible, such as napthol and naphthalene), and different concentrations of the two chemicals, for comparison.
c) Take a second warm plate, and carefully cover the puddle. To reduce air bubbles, place the top plate on edge at one end of the bottom plate and slowly lower it to cover the molten chemical evenly and force the air out the sides.
Caution: If a chemical is forced from between the two glass plates, it can drip onto the hot plate and cause smelly or harmful fumes to volatilize. Use small amounts of chemicals and ventilate your area well.
d) Allow each sandwich to cool slowly.
2. Observing Crystal Formation (Students)
Caution to students: Do not overheat glass plates. Do not put your head directly over the hot plate when heating chemicals. Avoid breathing fumes.
a) Obtain two different glass plate sandwiches, one marked “A,” the other marked “B.”
b) Obtain two pieces of polarized film.
c) Place glass “A” on a cold hot plate and turn on hot plate to a low setting (“2” is typical). DO NOT USE HIGHER SETTINGS.
d) Carefully observe the crystal formation between the two pieces of laminated glass. When the crystals start to melt, immediately remove the glass from the hot plate using tweezers. Turn off hot plate. Continue observations.
e) Record observations in your lab journal. Include sketches of crystals.
f) Repeat steps 3 – 6 using glass “B.”
3. Extension and variations:
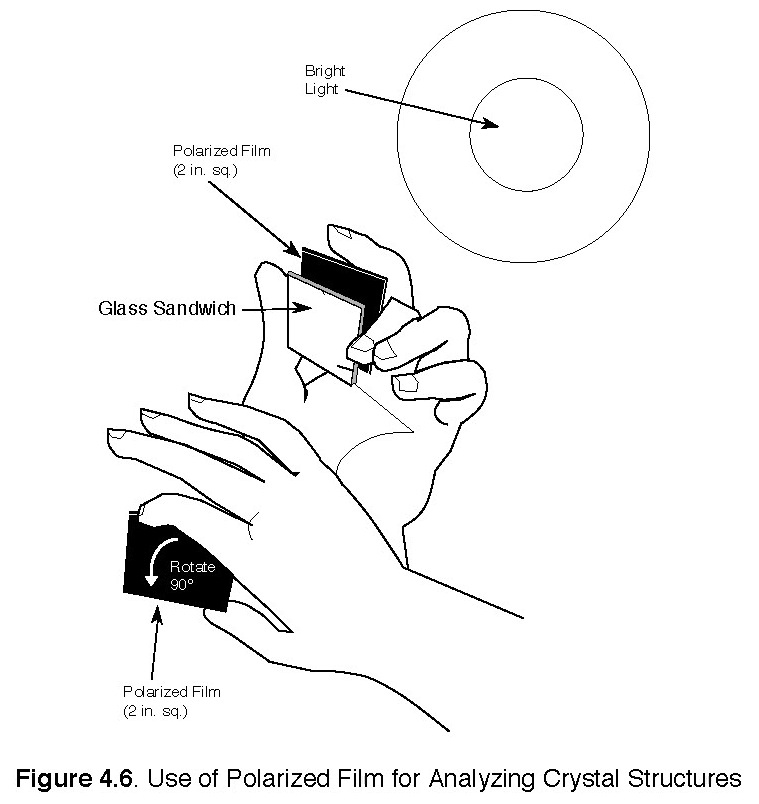
a) (See notes on polarized light below.) Place glass between polarized film with a light source behind it. Turn or rotate pieces of the film 90° and observe (see Figure 4.6). The two pieces of film can be arranged to either transmit or block light. View the glass plate with the film in both positions and without the film. Illustrate what you see in your journal using, if needed, colored pencils.
b) Observe how each mixture behaves under slow and rapid cooling.
c) Using samples with combined chemicals, observe the difference in crystal formation based on the different concentrations of combined chemicals.
d) Use a (provided) sample in a glass sandwich for which one surface of the glass is scratched. Observe how the scratch affects results of crystal growth.
e) Cool the plates under a gradient. Insulate one-half of the plate so it cools more slowly than the other half. Compare the slow and fast cool regions and the transition zone. Note the shape and size of the crystals relative to how the plate was cooled.
f) Examine the plates using transmitted light and a microscope or hand lens.
3. Follow-up Discussion: Why does crystal growth matter? Many people and industries rely on controlled crystal growth. The manufacturers of sugar and salt, for example, must produce uniformly sized grains tons at a time. They need to know about how quickly the grains grow and how to make them all the same size. You may want to compare your crystals grown from molten solutions to those made from aqueous solutions.
Drug companies also care about crystallization. Crystallization can be used to purify chemicals. Think about the plates that had a mixture of chemicals on them. Can you think of a way to “unmix” them first by heating and cooling?
The structure of a single crystal can be used to help identify the compound. How would you make large single crystals for further analysis?
ADDITIONAL EXTENSION ACTIVITIES
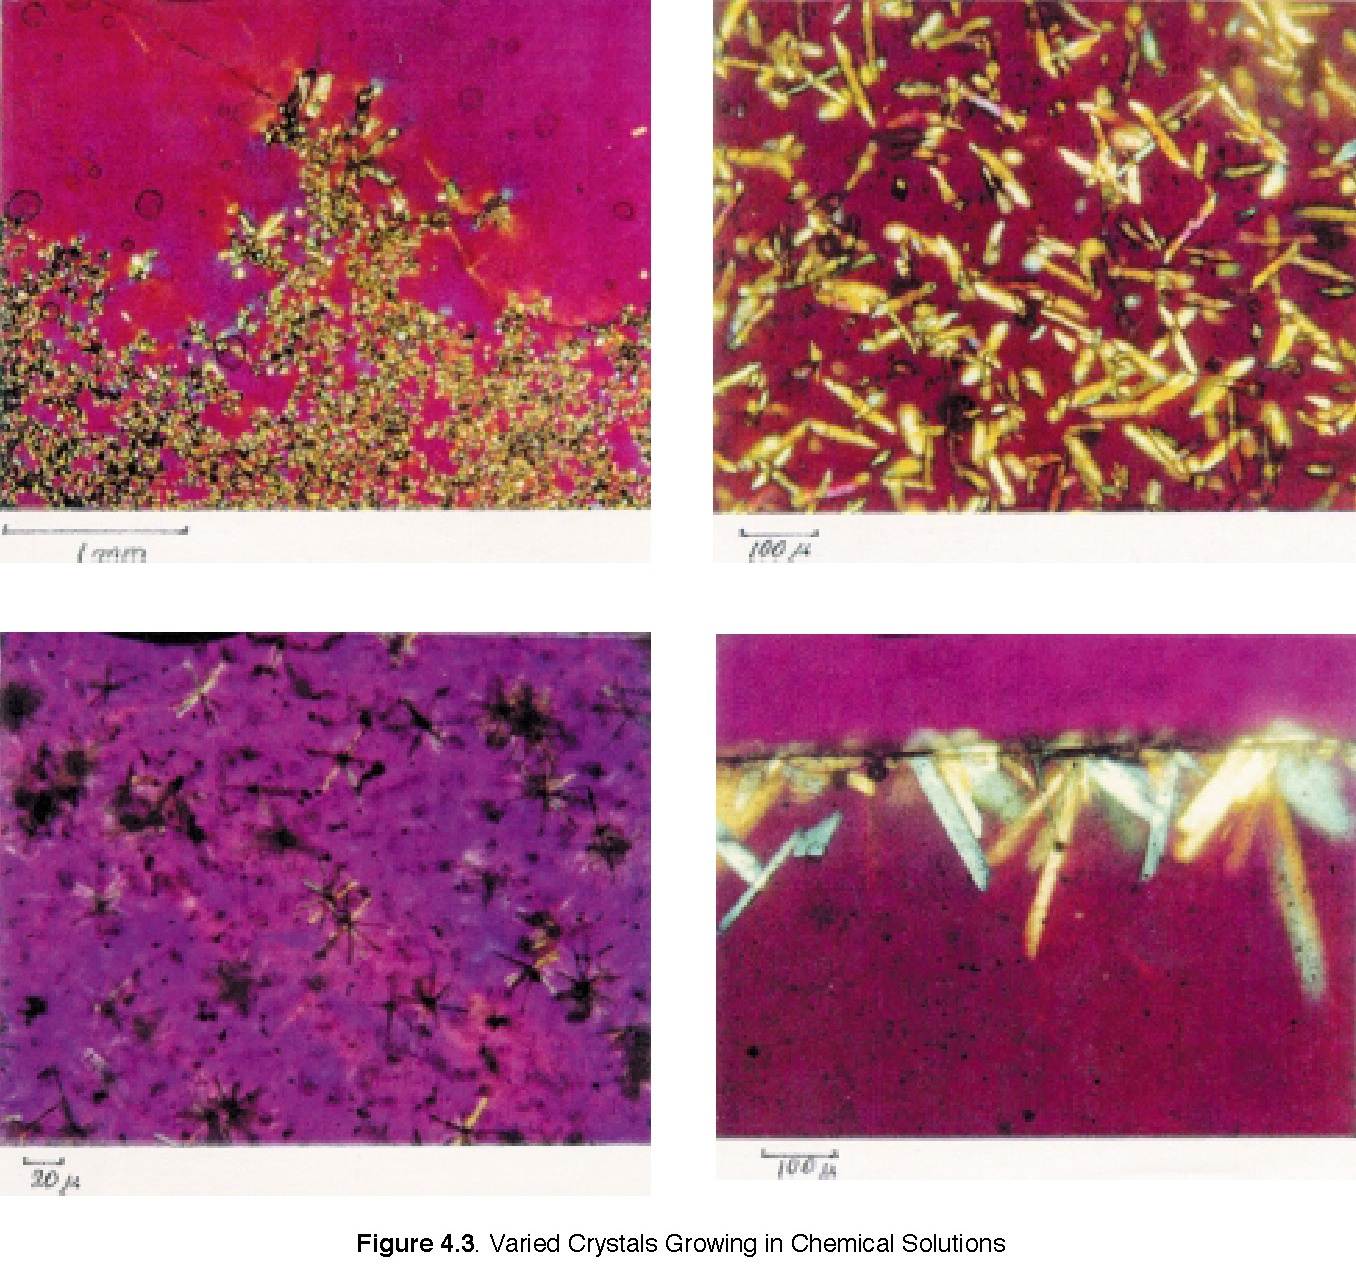
1. Teachers can extend this activity or combine with other similar activities from the Materials Science and Technology handbook, such as “Varied Crystals Growing in Chemical Solutions,” and “Use of Polarized Film for Analyzing Crystal Structures.”
2. Invite a “rock hound,” jeweler, geologist, mineralogist, or earth science teacher to visit your classroom to discuss and show various crystalline materials.
3. Have students practice sketching what they see in their journals. Have them pay special attention to how “regular” the crystals are. They are easy to draw because there are so many straight lines. Why is this? Before the structure of the atom was known, early mineralogists thought crystals were made of building blocks.
4. See if you can get the students thinking about crystals as three-dimensional objects. If you live in an area with cold winters, discuss or examine frost, snowflakes, ice, and the variety of shapes crystalline water can take. It’s all water! Guess the shape of the building block. What shape blocks would you need to make your crystals? How thick are they? Compare your flat plates to salt, sugar, or even rock candy.
5. Devise a way to measure the crystals, and have students put a scale in their sketches.
6. How does polarized light work? 11. What other materials can be analyzed with polarized light?
——————-
Notes on Polarized Light
1. Polarized Light works very well when observing transparent materials that are crystalline or have areas of stress.
2. Polarized light is used a number of ways in the MST curriculum. This activity is an introduction to the concept. It provides background information that can be used in the Crystal Study Lab and for making glass (Ceramics section).
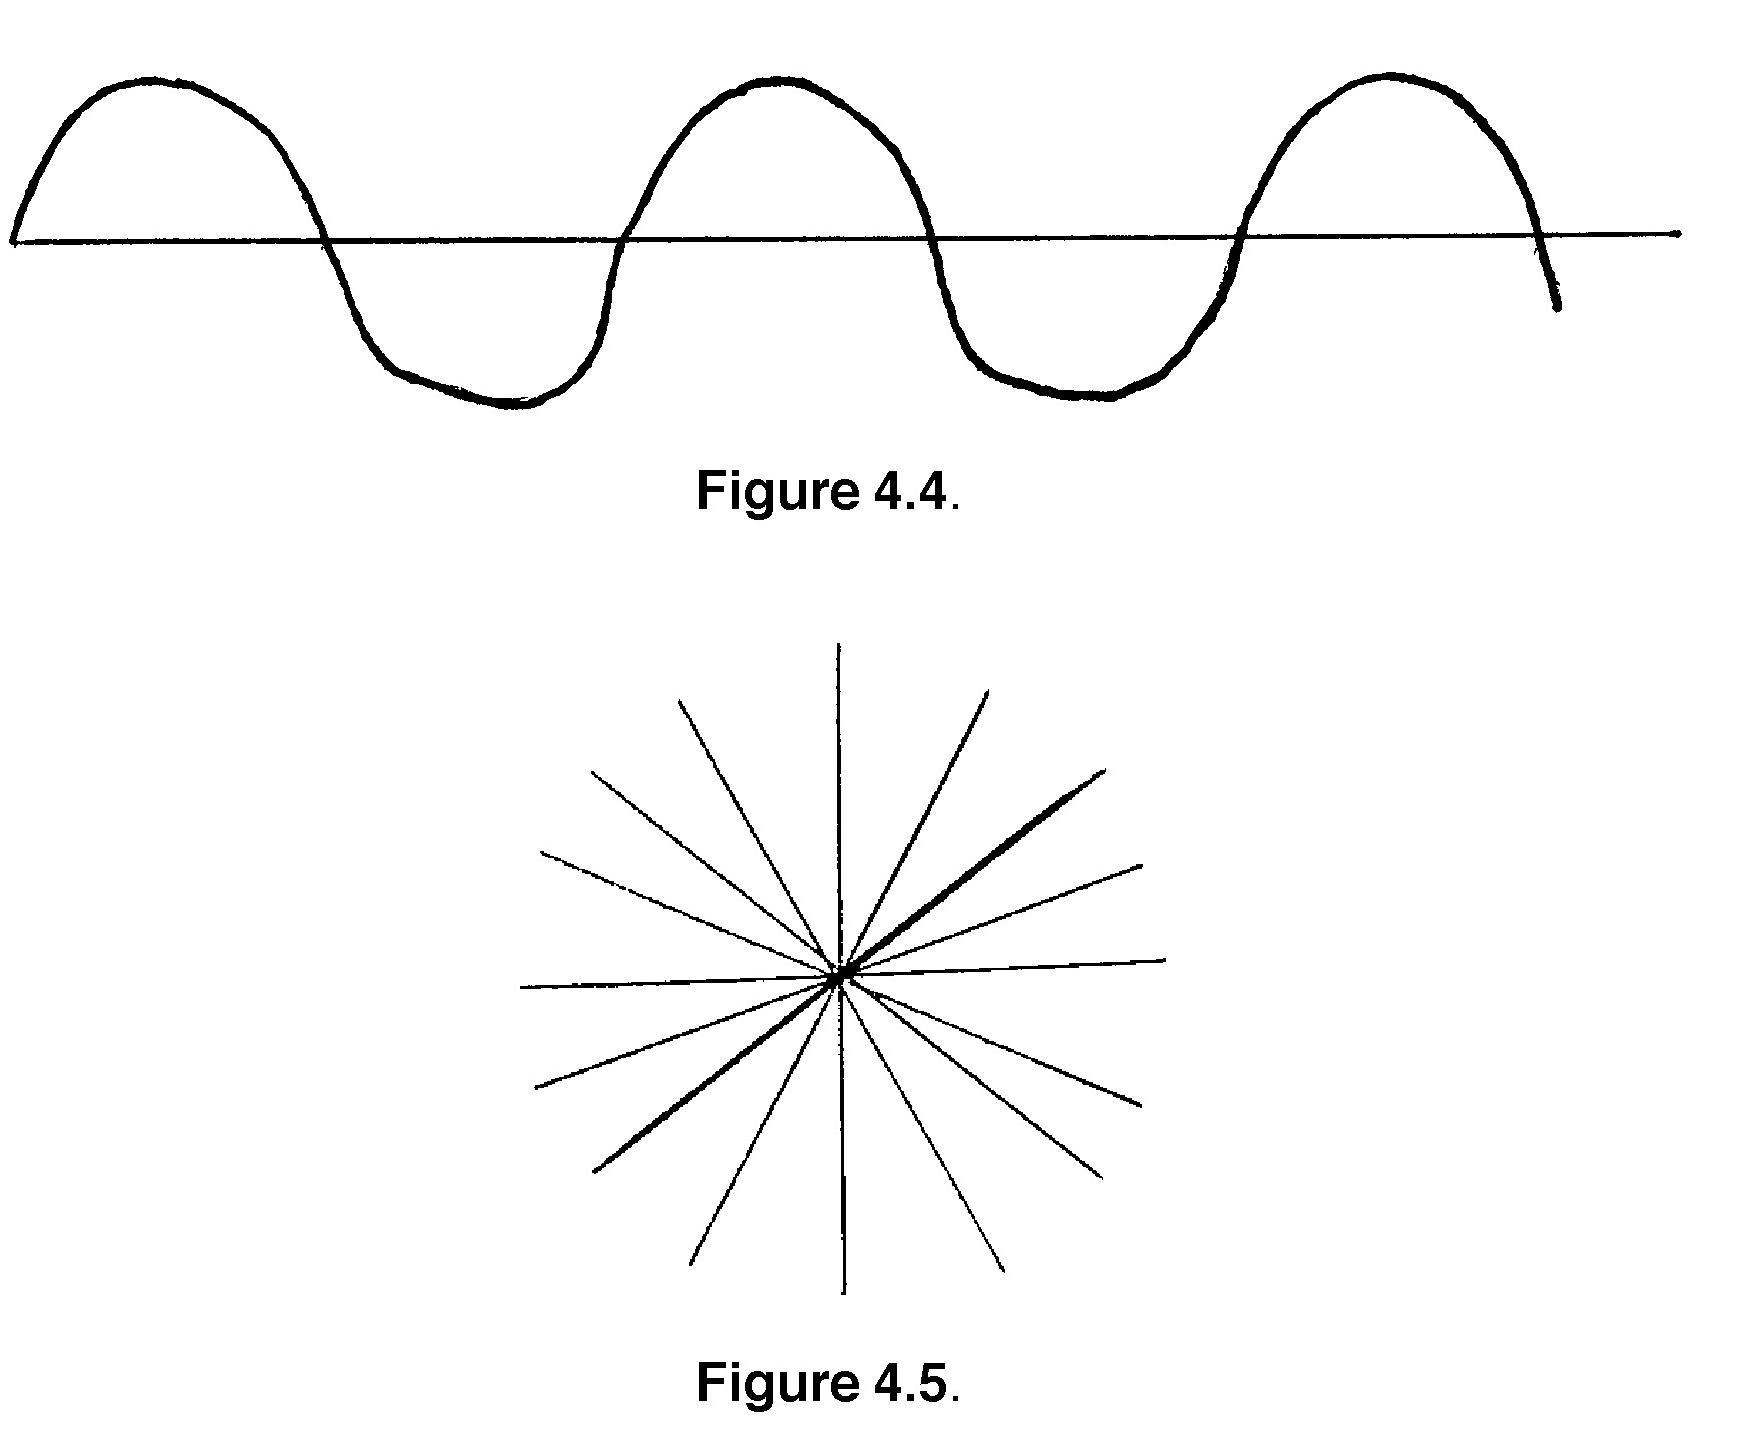
3. Light travels as a wave, much like sound. If you were to look at a light wave as it travels along, you would see a regular rise and fall in intensity and a constant distance between peaks and troughs, commonly known as a sine wave. (See Figure 4.4).
If you were to look at a bunch of light waves end-on, they would look pretty messy. This is because the waves are not all in the same plane. The general effect would be something like Figure 4.5.
4. If we could get some light waves all lined up in the same direction, some neat things could be done with them. This effect can be accomplished by using a polarizer, which is a material that looks like a picket fence to a light wave. Only the light waves oriented parallel to the picket fence are able to pass through it, and if a second polarizing filter is held with its axis perpendicular to the first, no light can pass through the pair.
5. Polarizing films can be made by heating a sandwich made from needle-like crystals of iodoquinine sulfate between two sheets of plastic. As it cools, the plastic sheets are pulled in the opposite direction to line up the crystals. This alignment produces the picket-fence effect as described above.
6. Light that is reflected from shiny surfaces is polarized to some extent. That is why polarized sunglasses work to cut glare, because the lenses in these glasses are oriented to filter out much reflected light. These lenses can be taken apart and used as a source of polarized film for the experiments involving stress visualization or crystallization.
7. In the MST handbook, polarized light is used to observe two phenomena, crystal orientation and stress. In some crystalline materials, polarized light is transmitted in some directions better than in other directions. This difference in crystal orientation can be observed when viewing these crystals between cross-polarized film. This process is explained in this experiment.
Reference: Wood, E.A. 1964. Crystals and Light, An Introduction to Optical Crystallography, Van Nostrand, New York.
Filed under: Class Activities, Grades 6-8, Grades 9-12
Tags: Chemical Engineering, Crystal study, Materials Engineering


