


Lend A Hand: Teaching Forces
Lesson courtesy of TeachEngineering.
Summary
Working in groups of three, students learn about types of forces, the relationship between form and function, and the structure of the hand by working as biomedical engineers to design, build, and test their own hand “gripper” prototypes that can grasp and lift a 200 ml cup of sand.
Grade Level: 6 to 8
Time: 270 minutes (six 45-minute classes)
- Explain how the engineering design process steps are conducted during each class.
- Generate questions for client/user to focus on a problem statement.
- Describe the interaction of forces acting on the prototype during testing periods.
- Apply the engineering design process in creating prototype devices to aid children in holding a cup of sand, and test them for strength.
Academic Standards
Next Generation Science Standards
- Plan an investigation to provide evidence that the change in an object’s motion depends on the sum of the forces on the object and the mass of the object. [MS-PS2-2]
Common Core State Mathematics Standards
- Fluently add, subtract, multiply, and divide multi-digit decimals using the standard algorithm for each operation. [6.NS.3]
International Technology and Engineering Educators Association
- New products and systems can be developed to solve problems or to help do things that could not be done without the help of technology.
Engineering Connection 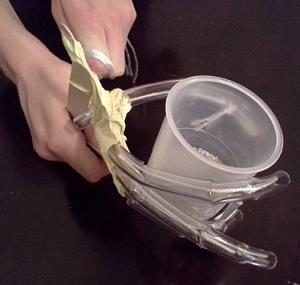
Biomedical engineers use their knowledge of biology, physics, math, and technology to create biomechanical devices. Biomedical engineers create assistive hand devices by researching the anatomy, form, and function of the hand and the necessary responses and movement required for performing basic and advanced functions, such as rotating the hand vs. gripping an object. In considering the qualities of the materials that can be used for the specified functions, students subsequently practice the skill of designing and testing prototypes within constraints—all essential aspects of engineering.
Click HERE for vocabulary and definitions.
Photos of student-designed hand prosthetics © 2015 by Kelly Cox, science teacher, Holy Name Central Catholic Jr. High School, Worcester, Mass.
Materials
For the teacher’s introductory presentation:
- EDP Assistive Hand Device Presentation
- Projecting capability
Each group needs:
- 3 pairs scissors
- computer with access to the Internet (for research)
- Problem Statement Worksheet (one per student) Click HERE for PDF
- List the Client’s Criteria Worksheet (one per student) Click HERE for PDF
- Materials Cost Table & Budget Sheet (one per student). Click HERE for PDF
- Reflecting on the Engineering Design Process Worksheet (one per student) Click HERE for PDF
- paper and pencils/pen (for each student)
For the entire class to share:
- ~100 feet clear vinyl tubing (preferably ½” outer diameter, 3/8″ inner diameter)
- 1 box regular-size craft sticks
- 1 box jumbo-size craft sticks
- 1 roll duct tape
- 1 roll masking tape
- 10-lb. bag play sand
- ~1,000 feet polyester string
- 4-10 electronic scales or triple beam balances
- 4-10 force meters or spring scales
- 4-10 100-ml graduated cylinders
- 4-5 6-8 oz. clear plastic cups
- (optional) 4-5 tube cutters
- (optional) dynamometer
- computer and projector, to show the class the PowerPoint® presentation
Introduction/Motivation
If a person has trouble seeing, what is used to help them see? (Glasses) If a person has trouble hearing, what is used to help them hear? (Hearing aid) If a person has trouble walking, what is used to help them walk? (Cane or crutch) A pair of glasses, a hearing aid, a cane or a crutch—what do these objects have in common? They are all assistive devices, a product that helps someone perform a function that could not be done without that piece of technology.
Technologies like these are developed by biomedical engineers who integrate their STEM (science, technology, engineering and mathematics) knowledge, including the field of medicine, to create products and processes that improve the health and quality of human lives.
In this project, you play the role of biomedical engineers to design and test an assistive hand device that helps someone with cerebral palsy grip a cup that varies in weight.
Procedure
Background
Students should have read the Fairly Fundamental Facts About Forces and Structures lesson, which provides all necessary background information for this activity.
Before the Activity
- Gather materials and make copies of the Problem Statement Worksheet, List the Client’s Criteria Worksheet, Materials Cost Table & Budget Sheet, and Assistive Hand Device Pre-Activity Quiz, one each per student.
- Use the 28-slide EDP Assistive Hand Device Presentation, a PowerPoint® file, to teach and conduct the activity. Set up a computer/projector to show the presentation to the class.
With the Students
Day 1 – Introduce the EDP and Assistive Hand Device Challenge
- (slides 2-12) Instruct students to record notes from the presentation. These slides includes key vocabulary terms, the steps of the design process, and the criteria and constraints for the design challenge.
- Give students the Problem Statement Worksheet and, from the client statement, have students individually compose brief problem statements of essential information. Lead a class discussion to make sure all significant information has been identified.
- Hand out the List the Client’s Criteria Worksheet, and have students identify the prototype requirements. Lead a class discussion to make sure all significant information has been identified.
Day 2 – Conducting Research
- (slides 13-19) Instruct students to record notes, including key vocabulary terms, the purpose of reverse engineering, and the expected structure of T-chart. (On the classroom board, demonstrate to students the intended structure and purpose of a T-chart. This information is not provided in the presentation.)
- Provide students with the Materials Cost Table & Budget Sheet so they are aware of the materials they are permitted to use in constructing the prototypes.
- Assign each student five vocabulary terms for which to record definitions and other relevant information. They submit this information to the teacher, who compiles it for sharing in a class discussion.
- Have students research the structure of the human hand as well as assistive hand device technologies. Direct students to make T-charts of the pros and cons of these technologies in consideration of the specified criteria and constraints. Require students’ charts to include information about the structures and functions of existing designs. Students submit their information to the teacher for later use during a class discussion.
Day 3 – Budgeting, Brainstorming and Building
- (sl
 ides 20-22) Instruct students to record notes, including the key vocabulary term “budget” (slide 20) and the definition and guidelines for brainstorming (slides 21-22). Explain the requirements for purchasing materials—that students must fill out the materials for purchase on their budget sheets, so the teacher can sign off on the budget calculations before handing out materials.
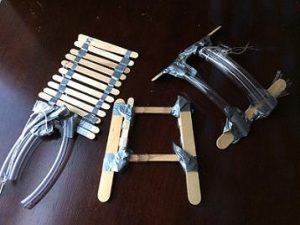
 - Assign students to groups of 3-4 students each. Direct the groups to brainstorm among themselves hand device designs (refer to Figures 1-3 for examples created by other student groups).
- Once teams have an idea of viable designs, they create at least three sketches, labeling the parts and materials to be used for each structure in the design.
- Groups who complete the minimum three sketches must reach agreement between all members to begin with one of the three sketches. These groups fill out their budget sheet and begin building.
Day 4 – Prototype Construction
- If groups did not start building by now, then it is time to select one sketch to start building the prototype today.
- Have groups fill out their materials budget sheet, obtain materials and construct prototypes.
The fingers (clear plastic tubing) of a student’s prototype are pulled by threaded strings.
Day 5 – Prototype Building, Testing, Communication and Redesign
- Have students record notes from (slides 23-28) the presentation, which includes key vocabulary and the EDP steps 4-8.
- Give each group 1 cup filled with 200 ml sand, and a second, empty cup. Each group tests its prototype by gripping the empty cup. Once they have succeeded in lifting the empty cup, they slowly pour the sand from the filled cup into the empty cup. Explain to students that this test is not exactly the same between groups, since the rate of sand being poured per second will differ between groups.
- Instruct students to communicate within their groups as to how the prototype performed, using key vocabulary terms (physics-based). Then students create new sketches that incorporate improvements to their design prototypes.
- Groups continue to build second prototypes, completing their budget sheets and obtaining materials as needed.
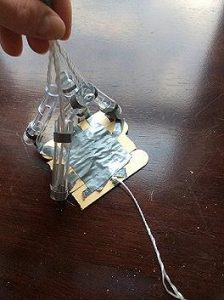
A student’s hand device prototype, designed to pull a string to tighten the grip around a cup.
Day 6 – Reflection
- Give each student the Reflecting on the Engineering Design Process Worksheet. Describe what is expected in filling out each part of this assignment.
- Give teams time to make final alterations to their prototypes. Walk around to each group and have them perform a final test. Have students to discuss within their groups how their prototype performed, discussing forces and using other key vocabulary terms.
- In groups, have students complete the rest of the EDP worksheet.
Assessment
Click HERE for pre-, embedded, and post-activity assessment.
Safety Issues
Instruct students on how to use safely use the tube cutters (or scissors). Observe students while cutting tubes.
Troubleshooting Tips
As students conduct the iterative process of building, testing, and redesigning, advise them to consider reusing as many materials as possible. Remind students that they do not get a budget increase for each prototype; they must make do with the overall designated budget.
Activity Extensions
- Have students apply their knowledge of forces to draw free body diagrams of their prototypes’ performances in the final test.
- Have students explore marketing by assigning criteria for visual appeal. Have students make 1-2 minute commercials. Follow this with a vote by instructors or students from another class.
- Engineering and Empathy: Teaching the Engineering Design Process through Assistive Devices. Worcester Polytechnic Institute month-long lesson for middle school students focuses on three design projects—an off-road wheelchair, a portable wheelchair ramp, and an automatic floor sweeper computer program.
Activity Scaling
- For lower grades, do not permit them to use the tube cutter.
- For higher grades, require design teams to communicate in writing the strengths and weaknesses of their design sketches, before giving out materials. Provide loans with interest, for extra money in the budget.
Additional Resources
Lend a Hand. eGFI feature on several engineering programs where students design and build prosthetic hands for children or adapt toys for use by children with disabilities.
Prosthetic hands designed by Worcester, Mass., high school students. Boston 25 news article and video, April 26, 2017, about their project to make inexpensive mechanical hands for children overseas.
Design and Manufacture of a Scalable Prosthetic Hand Through the Utilization of Additive Manufacturing. Example-filled undergraduate thesis illustrating the steps by which four Worcester Polytechnic Institute students decided on the design and manufacture of prosthetic hands for various ages of users.
Contributors
Kelly Cox, Kristen Billiar, Terri Camesano, Jeanne Hubelbank; © 2015 by Regents of the University of Colorado; original © 2015 Worcester Polytechnic Institute
Supporting Program
Inquiry-Based Bioengineering Research and Design Experiences for Middle-School Teachers RET Program, Department of Biomedical Engineering, Worcester Polytechnic Institute.
This activity was developed under National Science Foundation grant no. EEC 1132628. However, these contents do not necessarily represent the policies of the National Science Foundation, and you should not assume endorsement by the federal government.
Filed under: Class Activities, Grades 6-8, Grades 6-8, Lesson Plans
Tags: adaptive device, anatomy, assistive technology, Biomedical Engineering, Class Activities, Design, disability, forces, Grades 6-8, hand, Lesson Plan, prosthetic