Lesson: Hovercraft Racers
 (Lesson courtesy TeachEngineering, Integrated Teaching and Learning Program, College of Engineering, University of Colorado at Boulder)
Students gain first-hand experience on how friction affects motion by building a hovercraft that uses air from a balloon to levitate a craft made from a compact disc (CD). Students learn that a bed of air under an object significantly reduces the friction as it slides over a surface.
Understanding how friction works helps engineers design moving objects so they can be controlled. Sometimes they design materials to increase the friction, other times to reduce the friction. Snow tires may have metal studs that poke into the snow and ice, creating more friction than rubber alone. Rollerblade wheels must be sticky enough for control, but not so soft that they create too much drag or wear out too fast. Engineers also reduce friction between moving parts so that they run smoothly and do not wear down as quickly.
Learning Objectives
After this activity, students should be able to:
- Understand that friction slows moving objects, but also allows them to be controlled.
- Understand how a hovercraft moves and why it floats on a pillow of air.
- Predict characteristics of surfaces that might influence the amount of friction.
- Recognize that understanding how friction works helps engineers design moving objects so they can be controlled
Learning Standards
International Technology Education Association-ITEA STL Standards
- G. Brainstorming is a group problem-solving design process in which each person in the group presents his or her ideas in an open forum (Grades 6-8)
- G. Transportation vehicles are made up of subsystems, such as structural propulsion, suspension, guidance, control, and support, that must function together for a system to work effectively (Grades 6-8)
- H. Technological innovation often results when ideas, knowledge, or skills are shared within a technology, among technologies, or across other fields. (Grades 9 – 12)
- J. The design needs to be continually checked and critiqued, and the ideas of the design must be redefined and improved. (Grades 9 – 12)M. Conservation is the process of controlling soil erosion, reducing sediment in waterways, conserving water, and improving water quality. (Grades 9 – 12)
California Science Standards
Materials List
Each group needs:
- 1 compact disc (CD) (Possible sources: Ask students to bring from home used CDs from old software or free trial CDs. Or, purchase blank CDs for less than $1 each.)
- 1 plastic bottle with a cap (such as a Coke bottle, ~16 oz. size)
- 1 balloon
- hacksaw (to cut the top off the plastic bottle)
- drill (to put holes in the bottle cap)
- hot-glue gun (to be shared among groups)
Introduction/Motivation
Boat engineers and builders know that friction between a boat and water is one thing that slows the boat down. Over the years, they have been figuring out ways to design boats so that they do not touch water very much, but still float. In 1877, a British engineer named Sir. John Thornycroft patented a method to design boats to ride on a cushion of air. Basically, his method was to use a large fan powered by a motor to force air down under the craft. Eventually, the air pressure was large enough to lift the vehicle off the surface.

Engineers took this idea and built upon it, designing “flying boats” and other airplanes that can lift off of a water surface. Finally, in the early 1950s, British, American and Swiss engineers began to think of new ways to use Sir Thornycroft’s air cushion idea. In 1955, a British man named Christopher Cockerell tested a new kind of craft and patented his idea for the first real hovercraft — a vehicle that can travel on a cushion of air over water, ice, dirt, pavement and other surfaces. Hovercrafts are so versatile that the Ford Motor Company even made a “hovercar” called the Glideair in 1959. Now, hovercrafts are used for rescue work on rapidly moving rivers and thin ice, cargo transport and ferrying work (such as across the English Channel), and by the military to transport troops and equipment from boats to the shore.
Universal Hovercraft, founded by an aeronautical engineer, has some nifty photos and videos of hovercraft in action. And the 2011 Paris Air Show even featured a hovercraft with a new kind of propulsion system using rotating cylinders.In this activity, we are going to build our own model hovercraft to learn why suspending something on a cushion of air might help it slide over certain surfaces.
Before the Activity
- Gather supplies: Purchase or have the students bring in plastic soda or water bottles with caps and compact discs (CDs) before the activity.
- Prepare materials: Using a hacksaw, cut the top of the bottle at the neck. Save the top and cap, discard the rest of the bottle. Drill 1-3 holes in each bottle cap, with a different number of holes in different caps, so that students can compare the results of hovercraft racers with different numbers of holes in the caps.
- With students: Discuss with students the concepts of friction. Ask what happens when you roll an object across the ground over grass vs. the sidewalk. (Answer: Object rolls farther on the smooth concrete surface.) Which is easier to ride your bike on? (Answer: Sidewalk.) Why? (Answer: There is less friction between the bike and the sidewalk vs. the bike and grass.)
Activity
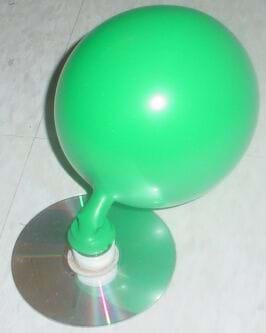
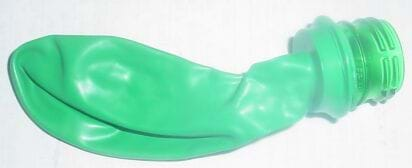
- Invite teams of two students each to pick a bottle top and cap. Have them attach a balloon to the cap, over the cut neck (see Figure 1).

Figure 1: Attach the balloon to the cut-off top of a plastic bottle. Copyright © Ben Heavner
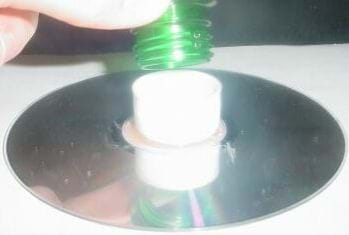
2. Making sure they have caps that fit their bottle tops, have students use hot glue to attach the caps to the shiny side of their compact discs (see Figure 2), with the holes in the caps centered over the holes in the middle of the CDs. Be sure to use enough hot glue to completely seal the space between the cap and the CD.

Figure 2: Use hot glue to attach the bottle cap to the shiny side of a CD. Copyright © Ben Heavner
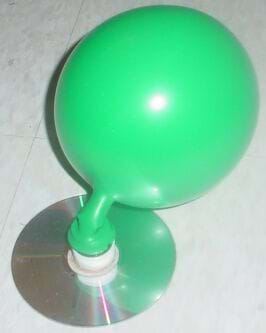
3. Once the hot glue cools, the hovercraft racers are ready for final assembly. Have the students blow up their balloon through the bottle tops, then pinch the neck so that air does not escape while they screw the top into their cap, which is attached to the compact disc (see Figure 3).

Figure 3: Screw the blown-up balloon into the bottle cap, which is glued onto the CD. Copyright © Ben Heavner

Figure 4: A Hovercraft Racer slides across the floor
4. Place the hovercraft racer on a smooth, flat surface and release the neck of the balloon, allowing air to escape. Tap the side of the hovercraft racer, and see how it glides over the surface! (See Figure 4.) To gather comparison data on the different hovercraft versions, set up a starting line, and collect measurements of distance and time traveled.
SAFETY ISSUES: Hot glue can burn, so closely supervise the students when they use the hot glue gun. Or, the teacher can do the gluing for the students.
The hacksaw and drill also present risks and could cut the person preparing the bottle tops and caps. It is sometimes best to prepare the bottle tops and caps before the activity begins.
Troubleshooting Tips
1. The hovercraft racers work much better on smooth surfaces such as a tabletop, desktop or linoleum floor compared to a carpeted surface. It may take some experimentation to find the best surface for a hovercraft race.
2. The hovercraft racers work best if the bottle cap is glued to the shiny surface of the compact disc so that the labeled side of the disc is down.
Assessment
Pre-Activity Assessment
Discussion Question: Solicit, integrate and summarize student responses.
- How can two surfaces have no friction between them? (Answer: If they are not touching.)
Activity Embedded Assessment
Discussion Questions: Solicit, integrate and summarize student responses.
- How well does the hovercraft racer slide when the balloon is out of air? (Answer: Not well.)
- How well does the hovercraft racer slide over rough surfaces, such as a carpeted floor? (Answer: Not well.) Why do you think that is? (Answer: The air can escape through spaces between the carpet fibers, and so does not hold up the compact disc as well.)
Pairs Check: After students finish creating their team’s hovercraft, have them work with another group to compare the performance of the hovercraft built with a cap with one hole vs. a hovercraft built with a cap containing two or three holes.
- What are the advantages of having multiple holes? (Answer: Air can escape more quickly, so the compact disc is lifted further away from the surface and glides better.)
- What are the advantages of having only one hole? (Answer: Air escapes more slowly, and so lasts longer.)
Post-Activity Assessment
Brainstorming: Have the students engage in open discussion and list their ideas on the board. Remind students that no idea or suggestion is “silly.” Encourage wild ideas and discourage criticism of any ideas. All ideas should be respectfully heard. Ask the students:
- Now that you have experimented with hovercraft, can you think of any ways to improve your design? (If no student responds, try to encourage ideas with: How about a way to keep air flowing because the balloon runs out quickly?)
- What changes would you make if you wanted to build a hovercraft that could carry a heavy cargo? (Note: Modern hovercraft ferry cars across the English Channel!) If no student responds, try to encourage ideas with: How much cargo could your hovercraft have carried? How would you carry cargo?
Design homework: For a homework assignment, ask the students to create a blueprint of a new hovercraft design that is capable of lifting heavy loads. Suggest that they consider using any of the ideas listed on the board from the brainstorming assessment activity
Extension
Ask students to research the history and uses of hovercraft. Who was Christopher Cockerell? How did he make his first model of a hovercraft? How are hovercraft used today?
Activity Scaling
- For upper grades, students may be able to drill the holes in the caps themselves (with supervision) and thus be able to experiment with their hovercraft by first drilling one hole, and then adding more holes and experimenting again. Have the students write a hypothesis on how more than one hole will change the motion of the hovercraft, record their observations, and write a short paragraph comparing and contrasting the hovercraft behavior with one hole vs. more.
See where the personal hovercraft like New Zealand’s Slider can take you!
[youtube]http://www.youtube.com/watch?v=GmECZzbjsCo[/youtube]
Or watch a DIY hovercraft built from a chair!
Contributors: Ben Heavner, Malinda Schaefer Zarske, Denise Carlson, Integrated Teaching and Learning Program, College of Engineering, University of Colorado at Boulder
© 2004 by Regents of the University of Colorado.
Filed under: Grades 6-8, Lesson Plans
Tags: Class Activities, friction, hovercraft, Lesson Plan, Physics


