


Fancy Feet
Activity adapted form Teachengineering.org. Click HERE for the after-school version in English or HERE in Spanish.
A more advanced shoe-design activity for high school students – Convertible Shoes: Function, Fashion & Design, Form – is also available in the Teachengineering digital library, as is the Design a Sneaker activity for 4th and 5th graders.
Summary
Teams of students in grades 6 to 8 use the engineering design process to design, build, and test a pair of wearable platform or high-heeled shoes, taking into consideration the stress and strain on the wearer’s foot. The activity concludes with a “walk-off” to test the shoe designs and discuss the design process.
Grade level: 6-8
Time: 60 minutes
Engineering Connection
Lots of engineering goes into designing and making the thousands of different types of shoes on the market today. Engineers consider many variables when designing footwear, such as durability and function of various materials, anticipated shoe stresses and strains, the health and safety of the wearer, and aesthetics. Engineers often work with podiatrists to design high-tech shoes that are safe, comfortable and stylish! Mechanical engineers apply principles of physics to analyze, design, and manufacture mechanical systems, including new shoes. Materials engineers—specialists in the structure of materials and their properties—select and design the best combinations of materials for specific shoe purposes.
Learning Outcomes 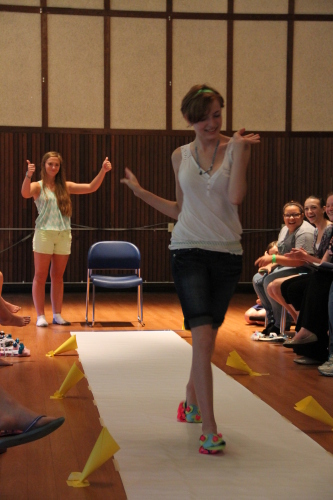
After doing this activity, students should be able to:
- Explain how engineers are involved in the analysis and design of contemporary shoe technology.
- List different aesthetic and structural considerations involved in shoe design.
- Follow the steps of the engineering design process to analyze, model, and optimize a problem.
Learning Standards
Next Generation Science Standards
- Define the criteria and constraints of a design problem with sufficient precision to ensure a successful solution, taking into account relevant scientific principles and potential impacts on people and the natural environment that may limit possible solutions. [Grades 6 – 8]
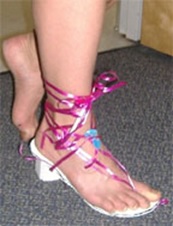
Image: Students test their shoe designs at West Virginia University’s 2015 STEM Summer Academy for Girls.
International Technology and Engineering Educators Association
- Apply a design process to solve problems in and beyond the laboratory-classroom.
- Make two-dimensional and three-dimensional representations of the designed solution.
Common Core State Mathematical Standards
- Solve real-world and mathematical problems involving area, surface area, and volume. (Grade 6)
Background Information (see TeachEngineering activity for full description)
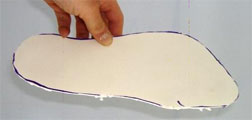 In this activity, students will use foam board for the soles.
(Images © 2007 Lauren Cooper, Integrated Teaching and Learning Program, College of Engineering, University of Colorado Boulder.)
The soles of foam core shoes are relatively simple and can be created in a few steps:
- Shaping the sole: Trace the shape of your feet on the foam core board and cut out the shape using an Xacto™ knife.
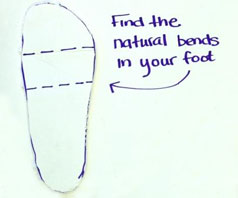
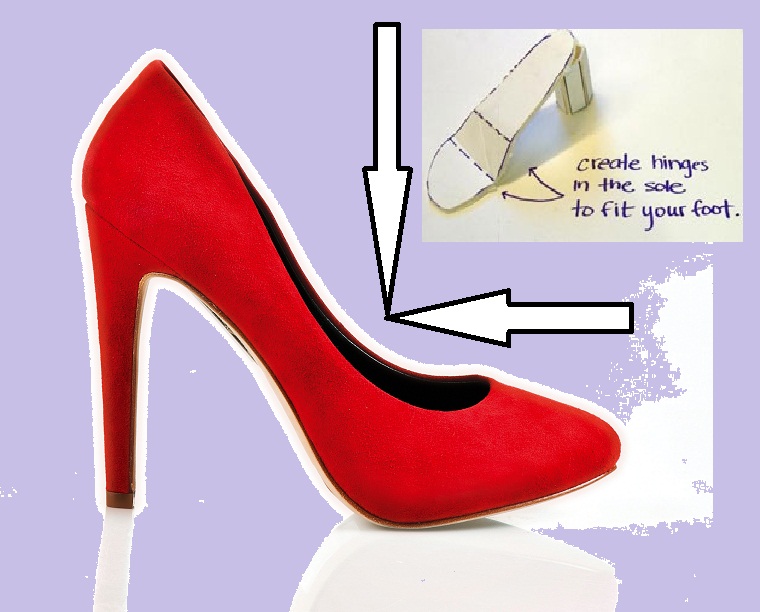
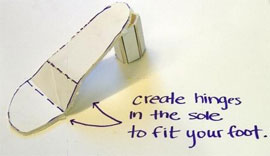
- Fitting the shoe: Mark the lines at which the sole should bend to fit your foot and create hinges in the foam core.
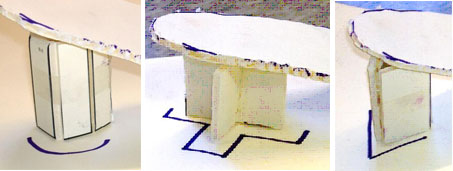
- Creating the lift: The heel and/or platform of the shoe requires more foam core design work, but a little creativity yields many designs!
- Design Considerations: The general performance requirements of a shoe include durability, high-abrasion resistance (less prone to scuffing), flexibility, dimensional stability (shoe does not shrink or spread in wear), resistance to chemical degradation, and good permeability and absorption properties.When designing a pair of heels or platforms, remember to design the toe box with enough room for the toes to assume a normal separation. Also, heels that are too wide do not necessarily offer more stability. In fact, heels with too much width can cause unhealthy side-to-side torque to the ankles, creating additional impact on the feet. The best design for a high-heel shoe is one with a narrower width, in which the heel is kept more solidly underneath the ankle. Lastly, make sure the heel is able to support the wearer! Make the heel flexible enough to absorb some shock, but rigid enough not to bend or buckle.
Materials
Each group needs: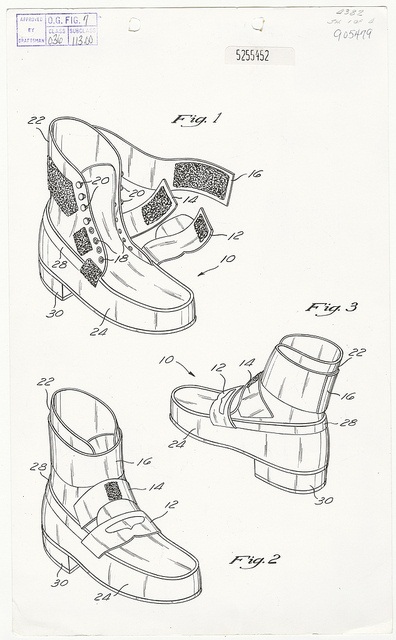
- 1 utility knife/box cutter
- 1-2 markers (any color)
- 1 ruler
- assorted sizes of foam core board
- assorted decorating materials, such as ribbon, markers, paint, buttons, and construction paper
- hot glue gun/sticks
- duct tape (shared)
- 2 sheets of blank paper
- 1-2 pairs of scissors
- Foam Core Tips
- Fancy Feet Steps
Procedure
Overview: Students design and build high-heeled shoes using simple materials. They then test and redesign their shoes to provide maximum comfort and stability for the wearer.
Image: Michael Jackson’s Anti-Gravity Illusion Shoes Patent Drawings
Before the Activity
- Review background information, including how to create shapes with foam core. Building a pair of foam core shoes for demonstration is a good way to practice with the material.
- Gather supplies and make copies of the Foam Core Tips and Fancy Feet Steps, and/or prepare overhead transparencies of them.
- Prepare a classroom or hallway area suitable for a “walk-off” to take place at the activity conclusion. One suggestion is to have the walk-off in an area in which students from other classes can watch the activity to see how cool it is be an engineer!
With the students
- Organize the students into groups of two or three.
- Give each team a copy of the steps and tips handouts.
- In their groups, have students discuss for 3-4 minutes the properties that make up a good shoe (that is, flexible, comfortable, stylish, durable, etc.). Then, lead a brief class discussion on the same topic, specifically discussing stability, what the shoe will be used for, how durable it needs to be, its comfort, etc.
- Tell students that they will be making high-heeled shoes from the materials listed above (show supplies to students). They need to make a pair of shoes to fit one member of their team, then that member will complete a “shoe walk” through an obstacle course.
- Give each team a half sheet of foam core board. Explain the engineering design challenge: To create a prototype of a heeled or platform shoe design using only a half sheet of foam core. The finished product should be a pair of shoes that can support the student’s weight while walking. As an example, show students a finished pair of foam core shoes.
- Have student groups brainstorm ideas for their shoes (10 minutes), sketching out viable ideas on paper. The shoes should meet the following requirements: At least a two-inch heel (at the highest point); Must stay on the foot without being held on by the other foot or a hand; Must be a matching pair (left foot and right foot).
- As necessary, demonstrate how to create different designs using the foam core techniques described in the tips handout.
- Review the safety hazards of using Xacto™ knives and glue guns.
- Have each team generate several preliminary sketches of possible shoe designs. Remind students to recall the ideas they generated earlier.
- Lead the activity embedded assessment (see Assessment section) in which each team swaps its favorite preliminary sketch with another team and provides constructive feedback.
- After each group has agreed on a shoe design, have students check their ideas with a leader before they begin building. Make sure they have a plan for making the shoe fit, holding it on, making sure it is the right size, keeping the heel attached, etc. Give them time to figure out how they will cut all of their shoe components efficiently from the half sheet of foam core board. Allow about 15 minutes for building.
- Please note: for the next step, the instructor(s) should supervise the use of the hot glue guns and utility knives at all times. If necessary, cut/glue the material for students.
- Help students safely cut their shoe components from the foam core using the knives.
- Help students glue shoe components together using the hot glue guns.
- Advise students to test and modify their shoes before decorating and finishing them.
- If some students’ shoes are buckling or failing when tested, help them brainstorm possible solutions. See the Troubleshooting Tips section.
- To complete the design/build portion of the activity, give students time to decorate their shoes and prepare for the “walk-off.”
- Conclude the activity by leading the class in a “walk-off” around a short obstacle course to see which shoes hold up best. (Allow 5 to 7 minutes for the test.)
- After the obstacle course is completed by all groups, give students a chance to improve their shoe designs, addressing any flaws they noticed in the testing. As time permits, have students continue to test their shoes as they see fit.
Wrap Up – Thought Questions
- Which aspects of your design worked well? Why?
- Which aspect did not work well? Why not?
- What other supplies could you have used to build your shoes? How would you have used these additional materials?
Attachments
Safety Issues
Alert students to the safety hazards of using sharp knives and hot glue.
Remind students of the cutting safety tips described on the Foam Core Tips handout.
Troubleshooting Tips
If some students’ foam core shoes collapse when worn, have them rebuild the soles, paying extra attention to the natural bend of the foot. It is common for students to make the heel portion of the sole too small, forcing more weight forward. Ideally, we want most of the weight to rest on the heel. Another idea is to have students make a shorter heel to reduce the amount of pressure on the toe box of the shoe.
Investigating Questions
- How do design constraints affect engineering projects? (Answer: A design constraint is a physical, economical, social, aesthetic or time limitation, requirement or boundary. In the real world, engineers work within these constraints to design products, structures and systems.)
- How would you describe somebody who is “ingenious” and “resourceful”? (Answer: An ingenious person is someone who is clever and original when inventing or constructing something. A resourceful person is able to act imaginatively and creatively, especially in difficult or restrictive situations.)
- Why is it advantageous for an engineer to be ingenious and resourceful? (Answer: Because engineers must respond to design constraints, it is important that they maximize their available resources by being clever, original and imaginative while working within in a set of constraints.)
- How can we use the engineering design process to create a pair of shoes? (Answer: We follow its cyclical steps. We firstbrainstorm ideas and generate a design for a pair of shoes. Once we have analyzed a design and thought about all the different circumstances that might cause the design to fail, we build prototypes of the shoes. Then we test the shoes to assess performance. We want to determine what design modifications are necessary to produce shoes that are safe, comfortable and stylish. If changes are needed, we create a new or improved design and work through the design process again.)
Assessment
Pre-Activity Assessment
Dream Shoes Design: Have each student think about his/her “dream shoes.” If you could design any type of shoe, what would you design? Suggest that students consider characteristics such as function, comfort, durability, flexibility, waterproof and breathable materials, style, marketability and cost. Have students create descriptions and drawings of their dream shoes.
Activity Embedded Assessment
Peer Review/Evaluating Alternatives: After students have generated several preliminary shoe designs, have each team swap its best sketch with another team. Ask teams to provide each other with constructive feedback. Is the proposed design too stylish to be practical? Does the shoe heel or platform appear to be a reasonable height? What components are provided to make sure the wearer’s toes will be held in place and not be too squished?
Post-Activity Assessment
The Walk-Off/Engineering Presentation: For the “walk-off,” have one person from each team walk a set distance in the team’s shoes. For fun, arrange to have the walk-off in a hallway or an area in which more students can see the activity! Pose a question to each team after they have completed the walk-off (see the Investigating Questions section for ideas). Have students whose shoes were successful explain the engineering design features that encouraged safety, comfort and style. Have students whose shoes did not endure the walk-off explain what they would do differently if given the chance to improve their designs (a step in the engineering design process). Have all students name one component or structural consideration involved in shoe design.
Activity Scaling
For older students:
Encourage them to create more complicated shoe designs. Assign each team to design a pair of shoes that performs a specific function. For example, “Wrangler” shoes might be similar to cowboy boots. “Summit” shoes might be designed for hikers. “Puddle Jumper” shoes might be waterproof. Provide students with a greater variety of materials (such as cardboard, foam, foil, plastic wrap, cork, etc.) from which to create these “functional” shoes. Have students discuss the compressive and tension forces in action with their shoes.
- Convertible Shoes: Function, Fashion & Design, Form – Teams of high school students apply their knowledge about the mechanics of walking and running to design and build shoe prototypes that convert between high heels and athletic shoes.
For younger students:
Prepare foam core shoe components in advance. Give each group a different set of shapes and have them create their shoes without using the sharp knives.
- Engineer a Sneaker Students in 4th and 5th grade decide on specific design requirements, such as good traction or deep cushioning, and then use a variety of materials to build prototype shoes that meet the design criteria.
Additional Resources
Day in the Life of a Shoe Designer. ConnectEd’s “Day in the Life” series focuses on Shane and Fabio Rattazzi, founders of DZR shoes who specialize in producing functional and fashionable cycling shoes. [YouTube 4:43]
Secrets of Shoe Design. England’s Victoria and Albert Museum interviews famous shoe designers about the source of their design inspirations and their craft. [YouTube 13:01]
How to Use 3-D Shoe Design Software. AutoDesk webinar explaining how to use design software to cut the time and cost of taking concept shoes to market. [YouTube 33:51]
The Engineering Behind Shoe Design.Great information about engineering in everyday life at the University of Southern California’s Viterbi School of Engineering’s online magazine, illumin.
Walking in High Heels, the Physics Behind the Physique. Another Illumin article.
Summer Academy Connects Girls to STEM Possibilities. West Virginia University’s 2015 summer program included a shoe design contest.
Science and Engineering Camp Aims for Girls. Charleston (W.Va.) Gazette-Mail article (July 1, 2015) on shoe design challenge at West Virginia University Institute of Technology’s STEM Summer Academy for girls.
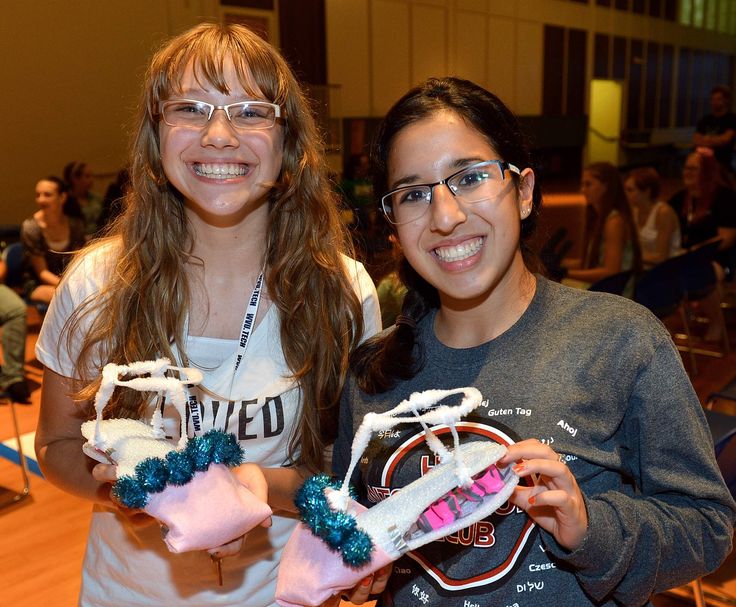
Photo by CRAIG CUNNINGHAM/DAILY MAIL
Copyright © 2007 by Regents of the University of Colorado
Filed under: Class Activities, Grades 6-8, Grades 6-8, Lesson Plans
Tags: Class Activities, Engineering Design, fashion, footwear, Grades 6-8, Lesson Plan, making, Materials Engineering, shoe design, sneaker, STEAM