Build-a-Toy Workshop
Activity courtesy of Teachengineering.org, theIntegrated Teaching and Learning Program, College of Engineering, University of Colorado, Boulder.
It is designed to follow the One Path lesson and two associated activities: Bulbs and Batteries in a Row and Light Your Way.
Grade level: 3 – 5
Time: 120 minutes
Summary
In this hands-on activity, student teams apply the engineering design process to create prototype toys with moving parts. They set up electric circuits using batteries, wire, and motors, and plan project materials to meet budget constraints.
Engineering connection
Modern toys often incorporate electronics, from motors to radio transmitters and receivers to electronic voice systems. Even without such technologically advanced components, toys are engineered with careful attention paid to their shapes and material composition. Due to the complex nature of the toy design and manufacturing industry, toy engineering often relies upon people with diverse engineering backgrounds who can work in multidisciplinary teams.
Learning objectives
After doing this activity, students should be able to:
- Apply the engineering design process to a design challenge.
- Create a plan for project material expenses based on a budget.
- Set up an electric circuit using batteries, wire, and a motor.
Standards
International Technology and Engineering Educators Association
- C. The engineering design process involves defining a problem, generating ideas, selecting a solution, testing the solution(s), making the item, evaluating it, and presenting the results.
- D. When designing an object, it is important to be creative and consider all ideas.
Next Generation Science Standards
Engineering Design
- 3-5-ETS1-1 Define a simple design problem reflecting a need or a want that includes specified criteria for success and constraints on materials, time, or cost.
- 3-5-ETS1-2 Generate and compare multiple possible solutions to a problem based on how well each is likely to meet the criteria and constraints of the problem.
- 3-5-ETS1-3 Plan and carry out fair tests in which variables are controlled and failure points are considered to identify aspects of a model or prototype that can be improved.
Physical science
- 4-PS3-4 Apply scientific ideas to design, test, and refine a device that converts energy from one form to another. [Crosscutting concept: Engineers improve existing technologies or develop new ones.]
Materials
- 10 Popsicle or wooden craft sticks
- 10 plastic drinking straws
- 1 pair of scissors
- 5 notecards
- 1 small electric motor (available online, such as the 1.5 to 3VDC hobby motor at Radio Shack, model #273-223
- 2 wheel and axle sets (available online, such as at Kidder)
- 2 sets of gears (available online, such as at Science Kit (plastic gears IG0030524) or Kidder (ID=80-3570-00)
- 1 rubber band
- 3 paperclips
- 2 feet (.6 m) thin insulated wire
- 2 AA batteries
- 1 ruler
- 3 sheets of paper
- 1 set of markers
- 4 magnets
- masking tape
- toy money (such as Monopoly money)
- 1 copy of Build-A-Toy Workshop Design worksheet
You have also already learned about resistance. What is an example of a resistor that you have seen in past lessons and activities? (Answer: A light bulb.) Your toys will incorporate motors, which act as resistors. It is up to you to decide how to use that spinning motor as part of your toy. One last constraint for this engineering challenge: your toy must cost $80 or less to build. Let’s get started!
Before the Activity
- Gather materials and arrange them into a “store.” Consider posting the cost of each item on the board. Suggested material prices are provided on the design worksheet.
- Prepare to project the attached Toy Engineering Presentation. (Click HERE for .pdf)
- Make copies of the attached Build-a-Toy Workshop Design Worksheet, one per group.
- Divide the class into groups of three students each.
Activity

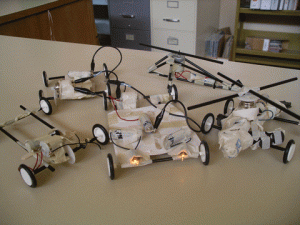
Examples of student-designed toy vehicles Copyright © 2009 William Surles, University of Colorado Boulder
1. Introduce students to their engineering design challenge with the Toy Engineering Presentation. Review basic information about electric circuits.
2. Review the following information with students:
Before you start working on your toy, it is important that we review the engineering design process so we can use it to accomplish this task. Who can list the engineering design process steps for me? (Answer: Identify the Prpblem, imagine or brainstorm ideas, design, build, test, redesign and retest.)
First, you need to outline the problem and your constraints. Next, brainstorm with your group and write down all ideas you can think of, no matter how crazy they sound. After you have written down your ideas, vote as a team and agree on one, best design to work on. Draw out a plan for how to make the idea you’ve created. Then, gather materials and begin building a prototype. Once your prototype is complete, test it to see if it works the way you planned. After you’ve tested it, apply what you learned to improve it.
3. Distribute a Build-a-Toy Workshop Design Worksheet, $80 of toy money, and several markers or other writing utensils to each group.
4. Direct students to begin working through the steps of the design process using their worksheets. Consider requiring that each section be signed off by theh teacher before the team can move on to the next step (this prevents groups from taking shortcuts and subsequently constructing sloppy toys).
5. After groups complete the “Build” section of their worksheets and know exactly what materials they need (as well as the total cost) they are ready to purchase materials from the “store.”
6. Give students time to build their toy prototypes. Toy construction may take a significant amount of time, especially if students have chosen a more complicated design (such as an electric car).
7. Once building is complete, encourage students to test their toys and see how well they function. Tell students to complete the “Test” portion of the worksheet, in which they detail two changes they feel are necessary to improve their designs.
8. Give students time to make changes to their designs. If they need additional materials, issue additional money to each of group for re-design expenses, or permit them to sell back materials they did not use.
9. When groups finish improving their toys, challenge them to develop a sales pitch or advertisement for their creations. Explain that they need to sell their idea to the Build-a-Toy Workshop management team to get the toys manufactured. Have students include explanations of their electrical circuits and how they used the motor in their toys.
Troubleshooting Tips
- Before the activity, build several different example toys using the activity materials to give students a head start and help them understand how the motors work.
- Students may automatically want to build toy cars because of the materials provided. If so, encourage them to make their vehicles unique and different from other toy cars available at stores.
Activity Scaling
- For lower grades, reduce the number of available materials and provide a more defined design task. For example, define the type of toy to be designe (such as a robot, electric car, helicopter, etc.) or provide pre-constructed individual toy components.
- For upper grades, give students additional money, materials and time. Challenge them to make their toys functional as well as aesthetically pleasing. When they have finished constructing their final designs, have groups develop short commercials for their toys.
Additional resources
Toy Makers, an engineering design activity from the Children’s Engineering Educators, asks elementary students to design and build a homemade toy that two to four children can play with together, using as many found materials as possible.
Can Toys Create Future Engineers? Dec. 12, 2013 New Yorker feature on GoldieBlox and other STEM toys.
Fun and Games. Article on engineering and computer science graduates who create toys for a living.
Copyright © 2009 by Regents of the University of Colorado
Contributors: Jacob Crosby, William Surles, Eszter Horanyi, Jonathan McNeil, Malinda Schaefer Zarske, Carleigh Samson.
Filed under: Class Activities, Grades K-5, Grades K-5, Lesson Plans
Tags: Class Activities, Design, Electrical Engineering, Engineering Design, Grades K-5, Lesson Plans, Mechanical engineering, toys


