


Engineering for the Three Little Pigs
Lesson from Teachengineering.org was contributed by the Integrated Teaching and Learning program at the University of Colorado, Boulder’s College of Engineering. It is part of the Engineering for the Earth curricular unit.
A similar activity for students in grades K-3 is available from the Stevens Institute’s Center for Innovation in Engineering and Science Education.
Can your team design and build a house that the big, bad wolf cannot blow down? Click HERE [PDF] for an NGSS- and CCSS ELA-aligned Three Little Pigs design challenge suitable for K-5 students that was developed by educators at the Mid-Columbia STEM Education Collaboratory. See video (below) for classroom example.
Summary
Students learn about the importance of using the right materials for the job by building three different sand castles and testing them for strength and resistance to weathering. They then discuss how the buildings are different and what engineers need to think about when using rocks, soils, and minerals for construction.
Grade Level: 3 to 5
Time: 90 minutes
Engineering Connection
When designing structures, engineers must understand the material properties of rocks, soils, and minerals and how these properties change when mixed together. Engineers must also make sure that the rocks, soils, and minerals are strong and safe enough for the job. Other material constraints might include ease of manipulation and material expense.
Learning Objectives
After doing this lesson, students should be able to:
- Explain that combining different materials is necessary when using rocks, soils, and minerals for construction.
- Explain how engineers need to consider material properties of rocks, soils and minerals when creating something new.
Standards
International Technology and Engineering Educators Association
- E. The process of designing involves presenting some possible solutions in visual form and then selecting the best solution(s) from many.
- F. Test and evaluate the solutions for the design problem.
Next Generation Science Standards
- Generate and compare multiple possible solutions to a problem based on how well each is likely to meet the criteria and constraints of the problem.
Common Core State Mathematics Standards
Draw a scaled picture graph and a scaled bar graph to represent a data set with several categories. Solve one- and two-step “how many more” and “how many less” problems using information presented in scaled bar graphs.
Materials
Each group of three needs:
- 6 bathroom-sized paper cups (“Dixie” cups)
- 1 small bowl for mixing ingredients
- 4 cups of sand
- 5 tsp. white glue
- 1 cup water
- 2 plastic spoons (about teaspoon-sized)
To share with the entire class:
- 1 permanent marker, any color
- 1 watering can
- a few bricks
- 1 can of non-stick cooking spray
- safety glasses
Engineering motivation
What kinds of materials are used to make buildings? Do you know? Some buildings are made of wood, stone, steel, concrete, brick or adobe (List these on the board.) Which of these come from a rock, soil or mineral? Almost all of them are directly made from rocks, soils and minerals. From the list we made, only wood is not actually a rock, soil or mineral. However, since trees need soil to grow, wood is still closely related.
When building any type of structure, engineers need to make sure they pick the right material for the job. Let’s think about some examples. (Start a new list on the board of the material properties engineers consider from the examples below.) Why do you think engineers do not build airplanes out of marble? Well, marble is too heavy, and the plane might not be able to lift up into the air! So engineers use aluminum, which is still strong, but much lighter.
Engineers do not always have to think about the weight of a material when building something. Why don’t engineers build big skyscrapers out of wood? Wood is not strong enough to hold up such a tall structure. We can use wood to build houses, because they are shorter. So, engineers have to think about the strength of the material they are using. However, wood is still cheap and easy to work with.
Why don’t engineers build bridges out of diamonds? Diamonds are very strong, but they are incredibly expensive, and building a bridge out of diamonds would be very difficult. Engineers have to think about how much a material costs when they are using it as well as how easy it is to work with the material. Why don’t engineers build houses out of concrete? Sometimes they do, but usually houses are built out of wood or bricks because people like the way it looks better than concrete. Engineers have to think about the way things look when building something, as appeal is a great motivator for finished products.
So, many of the materials that engineers use when they are constructing come from rocks, soils and minerals. Engineers need to know about the properties of the different materials and how to use them in order to create something that is heavy or light enough, strong, cost effective and aesthetic (looks good), as well as functional, safe and reliable. Today, we are going to create buildings out of different materials. You are going to be the engineers who figure out which materials are best for the buildings we are making, taking into consideration all the properties of materials that we have discussed.
ProcedureBefore the Activity
- Gather materials.
With the Students
PART 1: BUILDING
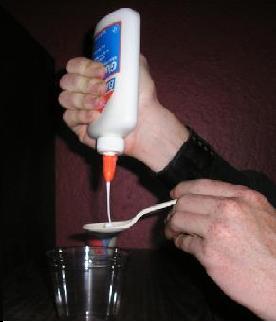
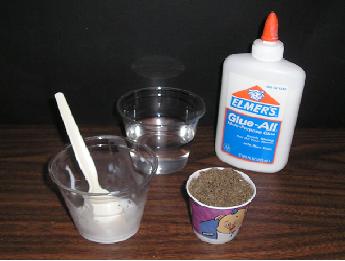
Activity photos copyright © 2006 Geoffrey Hill, ITL Program, University of Colorado at Boulder
About four days before the testing part of the activity, have the students construct four of the buildings as follows.
- Carefully measure out glue and mix 4 tsp. of glue with 4 tsp. of water in the mixing bowl (photo, below).
- Add two full Dixie cups full of sand to the glue/water solution and stir until you have a completely damp sand mixture.
- Spray the inside of two bathroom cups with the non-stick spray.
- Place this mixture into the two bathroom cups so that they are nearly full. (Photo)
- Set the cups aside so they can dry for at least four days.
- Mix 1 tsp. of white glue with 6 tsp of water in the bowl.
- Add two full bathroom cups full of sand to the glue/water solution and stir until you have a completely damp sand mixture.
- Spray the inside of two bathroom cups with the non-stick spray.
- Place this mixture into the two bathroom cups so that they are nearly full.
- With a permanent marker, write “C” on the sides of these bathroom cups.
- Set the cups aside so they can dry for at least four days.
PART 2: TESTING
- Before Part 2 of the activity, make sure that the B and C labeled buildings (filled bathroom cups) are completely dry.
- Have each group mix 2 bathroom cups full of sand with 6 tsp. of water in the bowl. Have them fill the two remaining bathroom cups with this damp sand (no glue). Mark an “A” on these cups.
- Have each group take their two A, two B and two C cups outside with a watering can and a brick.
- Have each team carefully turn over one of their A cups and place it on the ground. It is best if this is done on a dirt patch, but concrete and asphalt work as well. Then have them slowly pull the cups off, leaving the damp sand (photo, below).
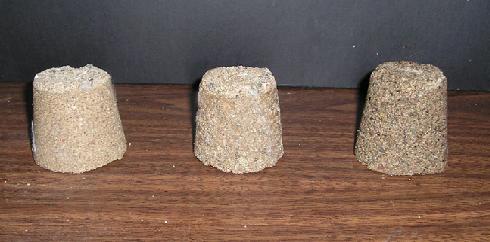
A, B, and C Buildings ready for testing.
- Then have one student from each group pour water on his/her building using the watering can. Ask the students what they observed. Did their buildings remain standing? What does the water from the watering can represent? (Answer: Rain or erosion.)
- Have each group set up their second A building on the ground in the same way they did with the first one. Have them try and set the brick on top of the building. Ask the students what they observed. Is the building able to hold up the brick? What do they think the brick represents? (Answer: The brick represents the weight of people, furniture and other objects [loads] that the structure must hold up. Engineers often test buildings by adding more weight to them than is realistic, since it is better to be safe than sorry. This is called a safety margin.
- Next, have students get one of their B buildings and place it on the ground. Have them tear away the cup from the sand, water and glue mixture very carefully.
- Then have one student from each group pour water on their B building using the watering can. Ask the students what they observed. Did the building remain standing? Did it hold up better or worse than the A buildings? Why did this building do better? (Answer: The glue helped hold the sand together.
- Have each group set up their second B building on the ground in the same way they did with the first one. Have them try and set the brick on top of the building. Ask the students what they observed. Does the building hold up the brick?
- For buildings that are still standing, have groups hold their bricks 6 inches above their buildings. On the count of 3, have them drop a brick on each building. Have them describe about their observations.
- Repeat steps 7-10 with the C buildings. Discuss how well the C buildings did compared to the A and the B buildings.
Safety Issues
- When dropping the bricks, have the other students stand back several feet to avoid getting sand in their eyes. Have the dropper wear safety glasses.
Troubleshooting Tips
Assessment
Pre-Activity Assessment
- If you had to build a house out of soil, would you rather have one built out of rough sand, medium-grain silt or fine-grain clay? (Answer: While sand castles are fun to build, they are not very strong; once they dry out, they usually crumble easily. Silt-type soil is good for growing plants, but it does not hold together well enough for the creation of a building. Clay is the best option. In fact, some buildings are really made out of clay when you realize that materials such as concrete, brick and adobe have a high clay content.)
Activity-Embedded Assessment
- Which buildings survived the weather and weight the best? Why? (Probable answer: It is most likely that the C building survived the best. This is because sand and water do not hold together well, and the glue holds the sand together better. It is important that engineers understand the properties of rocks, soils and minerals in order to design successful structures. In this scenario, our buildings were made of sand and glue — sand being a soil and glue being composed of different minerals. In the real world, engineers design many buildings using concrete, which is a mixture of minerals, rocks and soils.)
Post-Activity Assessment
- What if it turned out that the sand costs 5 cents for one bathroom cup full, glue costs 10 cents for one teaspoon, while water costs 1 cent for one teaspoon? (Answer: Each building A was built with 3 teaspoons of water and 1 cup sand – therefore costing about 7 cents a piece. Each building B was made with 2 teaspoons of glue, 2 teaspoons of water and 1 cup of sand – therefore costing about 27 cents a piece. Each building C was made with ½ teaspoon of glue, 3 teaspoons of water and 1 cup of sand – costing 13 cents each. In this case, it is probably best to have a C building since it is much cheaper than a B building, and it works nearly as well.)
- Discuss with the students how engineers must constantly weigh the pros and cons a design to come up with the best design. For example, we could build buildings out of titanium since it is incredibly strong; however, we do not actually build them out of titanium since it is so expensive and buildings do not need to be that strong in order for us to safely live in them.
Activity Extensions
Activity Scaling
- For upper grades, purchase/borrow some large washers and have students load their structures with the washers instead of a brick. Then, have them plot the number of washers it takes to collapse each structure.
- For lower grades, it may be easier to construct the buildings for them in advance.
Additional Resources
 The Story of the Three Little Pigs. The Library of Congress has digitized the original 1904 children’s classic by Frederick Warne in a turn-the-page format.
The Three Little Pigs. PBS LearningMedia’s library includes this read-aloud episode of the children’s classic from “Between the Lions.”
“Rocks and Deposits” U.S. Department of the Interior, U.S. Geological Survey, Science Topics – Earth Characteristics.
Copyright© 2006 by Regents of the University of Colorado. Integrated Teaching and Learning Program, College of Engineering, University of Colorado Boulder
Filed under: Class Activities, Grades K-5, Grades K-5, Lesson Plans
Tags: Civil Engineering, construction, Engineering Design, Materials Engineering, Problem Solving, sand castles, soil